Download the Guide
Click here to download the guide.
What We Need
Output Specifications from your device to quote and onboard your spare.
Why This Matters
Learn what happens with the outputs retrieved and why we need the information from these commands at PivIT’s Sparing Integrity Program.
Procedure
Following is the process for executing a Virtual Audit, which is required for us to provide the most accurate and competitively priced quote for your Compellent System. This process applies to the following models of Compellent that are supported by our company:
- SC 20, 30, 40
- SC 8000
- SC 4020
The Virtual Audit may be performed by the Compellent system administrator or other individuals within your organization that is familiar with the Compellent system.
If desired, we can provide remote assistance to your staff when a Virtual Audit is needed. This assistance may be provided over the phone, where we will provide assistance to your local staff via a voice call, or via a remote desktop session where we will actually access your system via the network to remotely perform the Virtual Audit process below to collect all of the information that is needed.
We will use a remote desktop screen sharing software such as:
- TeamViewer
- Go To Meeting
- Join Me
Open a web browser and navigate to the IP address of your Compellent device. Log into the Storage Center Manager.
On the left-hand pane, expand on the Controllers folder
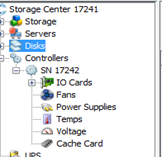
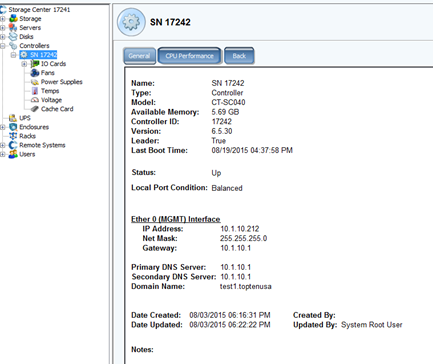
Select each of the controllers in the left-hand pane and take a screenshot of the controller’s general information on the center screen.
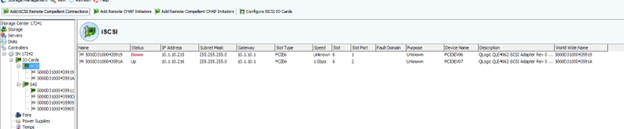
Next, expand the IO cards in the left-hand pane. Depending on your system you may have ISCSI, Fibre, SAS, or any combination.

Now, take a screenshot of all the IO cards General Description. Be sure to include all information for each card.

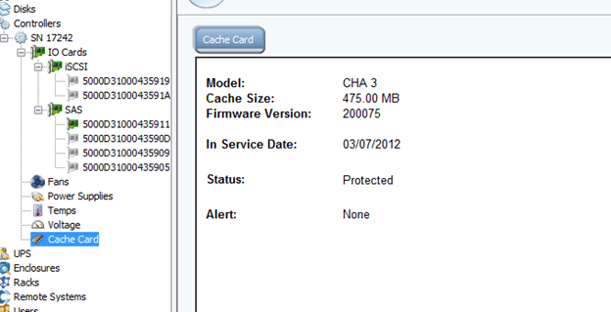
Now, select the Cache Card and take a screenshot of the information.
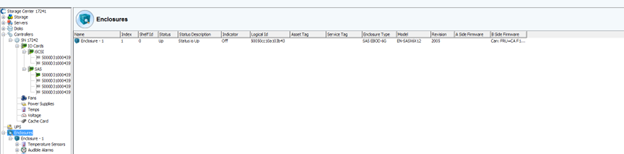
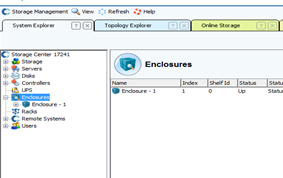
Once all of the controller information is gathered, we will need to obtain information about the enclosures. On the left-hand pane select the enclosures tab. You will see that all of the enclosures in the system will be listed on the center screen.
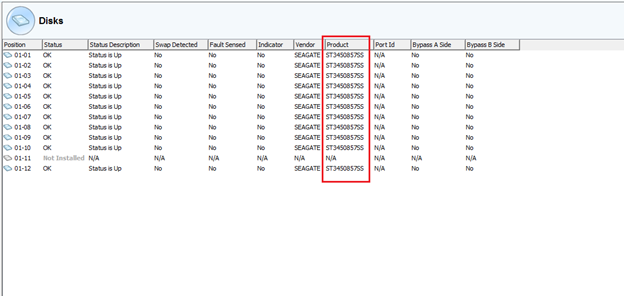
Next, we are going to obtain the disk information for the system. In the left pane, expand on enclosures. You will then see all of the enclosures that are connected to your system.
Next, you will need to expand each enclosure and select the Disks tab.
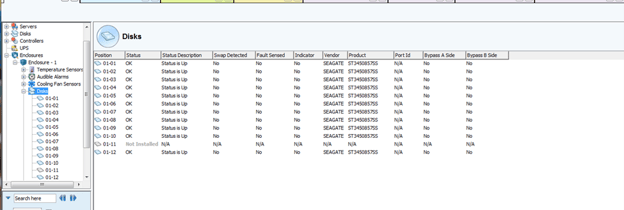
Finally, you will screenshot the Center pane with all of the disks that are on that shelf. Please be sure to include all of the disks that are on the shelf and that the Product section (highlighted in red) is showing the full model number of each disk.
You will need to repeat the last two steps of this process for each disk enclosure. Please be sure that all images are not missing any information as this will cause a delay in the quotation. Share file with OneCall Support: https://onecall.pivitglobal.com/file-upload/quote