-1.png)
Cisco built the next-generation data center-class operating system (NX-OS) to be designed for maximum scalability and application availability. The NX-OS data center-class operating system was built with modularity, resiliency, and serviceability at its foundation. As a major OS in the world of Cisco, there is endless amounts of information to help understand the system and how it can best work for you. For example, a new feature allows you to upgrade NX-OS software while the Nexus Switch continues to forward traffic. Our goal is to decrease the complexity of the system. Below are basic configurations to improve your network.
Today, we will put focus on the Layer 2 topology of your switching network, specifically the Rapid PVST+ protocol. As an IEEE 802.1w standard Rapid Spanning Tree Protocol (RSTP), Rapid PVST+ is an enhanced version of PVST+ and allows for spanning-tree calculation and convergence in response to Layer 2 topology changes. Below we will give a brief overview of the protocol itself as well as key configurations and functionality. Let's dive in!
Rapid Per-VLAN Spanning Tree Protocol
Each Rapid PVST+ protocol on a VLAN is a single root switch. Although Rapid PVST+ is the default STP mode for the switch, we can enable or disable Rapid PVST+. The protocol uses point-to-point wiring to provide rapid convergence of the spanning tree.
Convergence
A quicker convergence happens when using Rapid PVST+, STP. By default, each designated or root port in the STP sends a Bridge Protocol Data Unit (BDPU) every 2 seconds. If topology changes, the device initiates a BPDU exchange resulting in the following:
- One network device is elected as the root bridge
- The shortest distance to the root bridge is calculated for each network device based on the path cost (configuration below).
- A designated bridge for each LAN segment is selected. This network device is closest to the root bridge through which frames are forwarded to the root.
- A root port is elected. This port provides the best path from the bridge to the root bridge.
- Ports included in the spanning tree are selected.
The reconfiguration, based on the point-to-point wiring, is able to occur in less than 1 second as opposed to the 50 seconds with 802.1D STP. This can happen so quickly due to a designated or root port in the topology. For example, if hello messages are missed three consecutive times or if the maximum age expires, the port immediately flushes all protocol information in the table. Cisco highlights a port that considers that it loses connectivity to its direct neighbor root or designated port if it misses three BPDUs or if the maximum age expires. This rapid aging of the protocol information allows quick failure detection. The switch automatically checks the PVID.
Rapid PVST+ provides for rapid recovery of connectivity following the failure of a network device, switch port, and a LAN. The following is a description of each ports connectivity:
- Edge ports— when you design a port as an edge port on a RSTP switch, the edge port quickly changes to the sending state. Configurations should only occur on ports that connect to a single end station as edge ports. More configuration info below.
- Root ports— if Rapid PVST+ selects a new root port, it blocks the old root port and immediately transitions the new root port to the forwarding state.
- Point-to-Point links— if you connect a port to another through point-to-point links and the local port becomes a designated port, it then negotiates a rapid transition with the other port. It uses a proposal-agreement handshake to ensure a loop-free topology.
Before we continue, ask yourself a couple of questions:
Do I have the time to handle configurations?
Do I have the bandwidth to configure my devices?
If you answered "No" to these questions, let PivIT handle the OSPF configuration on your network with EXTEND. Hire an engineer to take on these basic configurations and more. Click below to learn more about SmartHands.

Configuring Rapid PVST+ in Your Network
The below configurations best set you up to run Rapid PVST+. To see a full configurations list, check out the full data sheet.
Enable Rapid PVST+
This feature is disable by default on all the switches so, we need to enable feature by under mentioned command.

Per VLAN enable PVST+
We can both enable and disable rapid PVST+ on all the VLAN. Under below is the commands to enable PVST+ within VLAN.

To disable Rapid PVST+ per VLAN

Configuring the Root Bridge ID
To configure a VLAN instance to become the root bridge, modify the bridge priority from the default value (32768) to a significantly lower value. When you enter the spanning-tree vlan (number value) root command, the switch checks the bridge priority of the current root bridges for each VLAN. The switch sets the bridge priority for the specified VLANs to 24576 if this value will cause the switch to become the root for the specified VLANs. If any root bridge for the specified VLANs has a bridge priority lower than 24576, the switch sets the bridge priority for the specified VLANs to 4096 less than the lowest bridge priority. In the below example we use spanning-tree vlan 5 root command with a primary diameter of 4 bridge hops between any two end stations.

Configuring a Secondary Root Bridge
When you configure a software switch as the secondary root, the STP bridge priority is modified from the default value (32768) so that the switch is likely to become the root bridge for the specified VLANs if the primary root bridge fails (assuming the other switches in the network use the default bridge priority of 32768). STP sets the bridge priority to 28672. Below you'll see the secondary diameter keyword is set to 4 again, to specify the number of bridge hops between any two end stations in your network.

Configuring the Rapid PVST+ Port Priority
You can allocate lower values to LAN ports that you want Rapid PVST+ to choose first and higher need esteems to LAN ports that you want Rapid PVST+ to choose last. If all LAN ports have the same value, Rapid PVST+ puts the LAN port with the lowest LAN port number as priority.

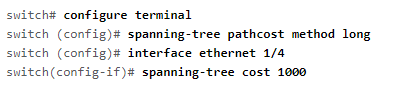
Configuring the Rapid PVST+ Path Cost Method and Port Cost
On access ports, you assign port cost by the port. On trunk ports, you assign the port cost by VLAN; you can configure the same port cost on all the VLANs on a trunk.
Configuring the Rapid PVST+ Bridge Priority of a VLAN

Valid bridge priority values of a VLAN are 0, 4096, 8192 (used in example), 12288, 16384, 20480, 24576, 28672, 32768, 36864, 40960, 45056, 49152, 53248, 57344, and 61440. The default value is 32768. It is recommended to configure the primary root and secondary root to modify the bridge priority.
Configuring the Rapid PVST+ Hello Time for a VLAN

This example of configuring the hello time of a VLAN is 7 seconds. You can configure this anywhere from 1 to 10 seconds with the default being 2 seconds.
Today we highlighted various configurations we've seen clients ask for in the past although this is not the full extensive list. Let us know if you are looking for a specific configuration or want to chat more about Rapid PVST+ and the benefits it can bring to your network!
About PivIT Global
PivIT Global provides the support you need through infrastructure, maintenance, and professional services. Contact us today to chat more about the configurations or how we can support you through our third-party maintenance and professional services offerings.