Best Practices for Switch Stacking Configuration
-2.png)
If you’re in need of more ports in your network, a cost-effective solution is switch stacking. It’s a commonly used method that combines multiple switches into one, eliminating the need to refresh to a bigger switch.
This article covers all the details of switch stacking, including configuration, benefits, and licensing.
What Is Switch Stacking?
Switch Stacking physically connects multiple switches into one logical switch. The switches will appear as one and interact together as if they were one large switch.
Traditionally, when additional ports were needed, you would have to upgrade to a larger switch or add an additional switch via a trunk port. Switch stacking allows your network to become more elastic as you can add additional switches as needed. Instead of having to replace an entire core switch because you need an additional 10 ports, you can add an extra 12/24/48 (depending on the series/model) port switch for much cheaper.
The stacking of these switches also allows for easier and more concise device management, managing them all from one terminal session instead of many. It also helps to mitigate configuration drift between the switches.
This guide will use the Cisco Catalyst 9000 series as a reference for properly setting up switch stacking. Alternatively, check out how to configure a Cisco Virtual Switching System.
Hardware Options For You
We make it easy for you to find the switches with stacking capabilities. Click below or reach out to let us know how we can help.
Switch Stack Terminology
Here is some switch stack terminology to follow along in this guide:
- A ‘Standby Switch’ is a switch that will become the new Active Switch if the original Active Switch goes offline. In this way, a backup helps maintain the resiliency of the stack.
- A ‘Member’ is a stackable switch that operates as an additional unit within the stack.
- A ‘Stack Port’ is a port on the switch that is used to communicate with other switches in the stack. Depending on the model, a switch can have either preconfigured or user-defined stack ports.
- An ‘Active Switch’ is a switch in the stack that handles the configuration for the entire stack. All Cisco stacks have an active switch or 'Commander'. When you want to manage your stack, the Active Switch is the device that you connect to for configuration changes. The Active Switch also handles other important stack functions, such as detecting when switches enter or leave the stack, as well as upgrading outdated switches.
Download the guide and refer back to it at any time!
Right-To-Use Licensing
The software features available with Right-To-Use (RTU) licensing fall under the base or add-on license levels. The license types available are:
- Base licenses
- Network Essentials
- Network Advantage (Contains Network Essentials plus more)
- Add-on licenses
- Can be subscribed for a fixed term of 3, 5, and 7 years.
- Digital Networking Architecture (DNA) Essentials
- DNA Advantage (Contains DNA Essentials plus more)
After the initial term of the add-on license expires, you will be able to continue using the base license by deactivating the add-on license and reloading the device.
Right-to-use licensing is supported on switch stacks. A switch is a set of up to nine stacking-capable switches connected through StackWise-480 ports. One switch in the stack is identified as the Active Switch and the remaining switches are Standby Switches. The Active Switch is the switch that is activated with an RTU license and from its active console, the license level for the standby switches in the stack can be activated at the same time.
.png?width=2138&name=1%20(10).png)
Cable Management for Switch Stacking
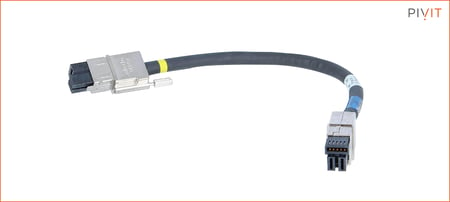
Below is an image of a Cisco StackPower Cable which is specifically intended for switch stacking. These are alternative options to using ethernet or fiber connections between the switches. The StackPower cables range from 1 to 5 feet.
Shown below is a simple full bandwidth, fully redundant cabling option for switch stacking.
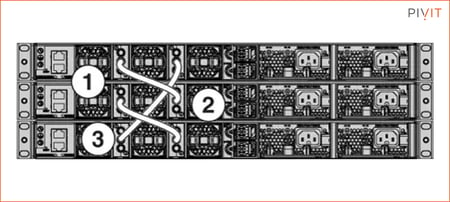
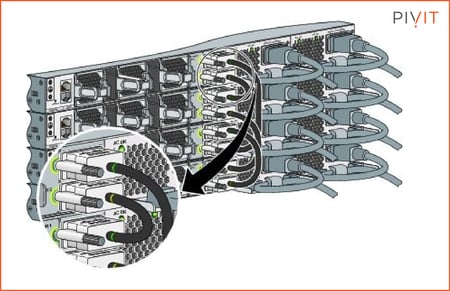
A more advanced cabling option is a ring topology, creating more redundancy.
Get a quick quote on cables and accessories
Switch Stacking Configuration
Reflect the proper prompts when you enter a configuration mode such as ‘config’, as shown in the example below. Note: the commands below are not intended for the Cisco Catalyst 9300 model. Refer to Cisco documentation for the commands for these switches. Small business switch commands will be used for stacking.
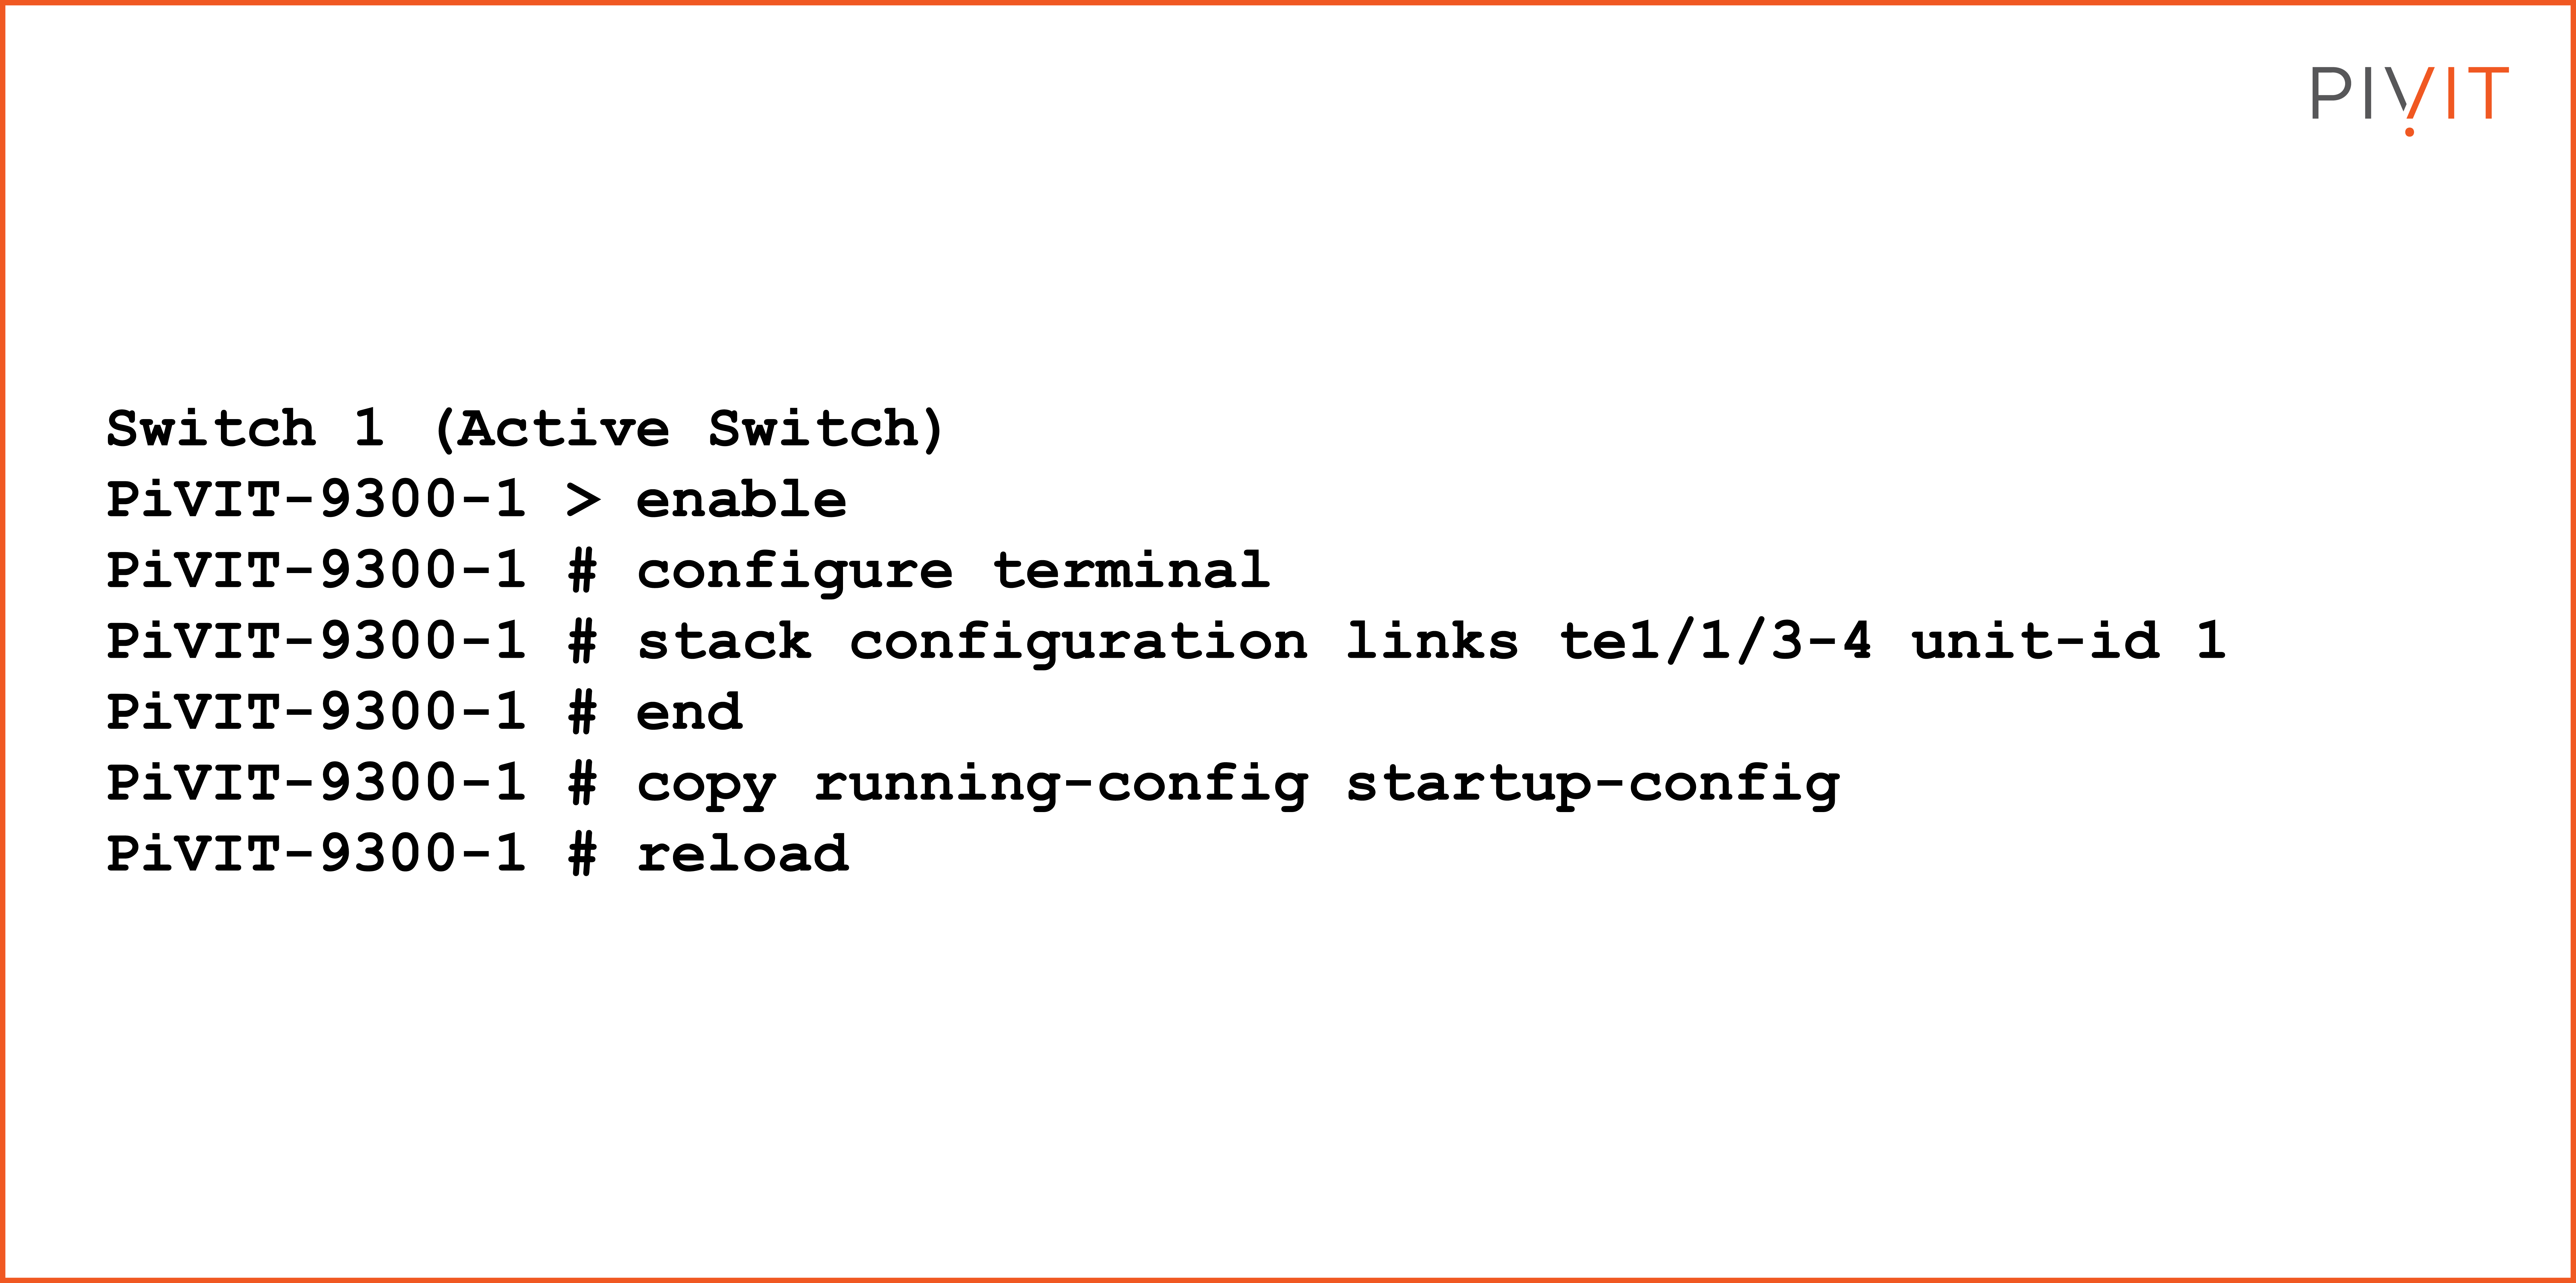
A reboot is required to apply the changes made. This is why the configuration save is important prior to rebooting.
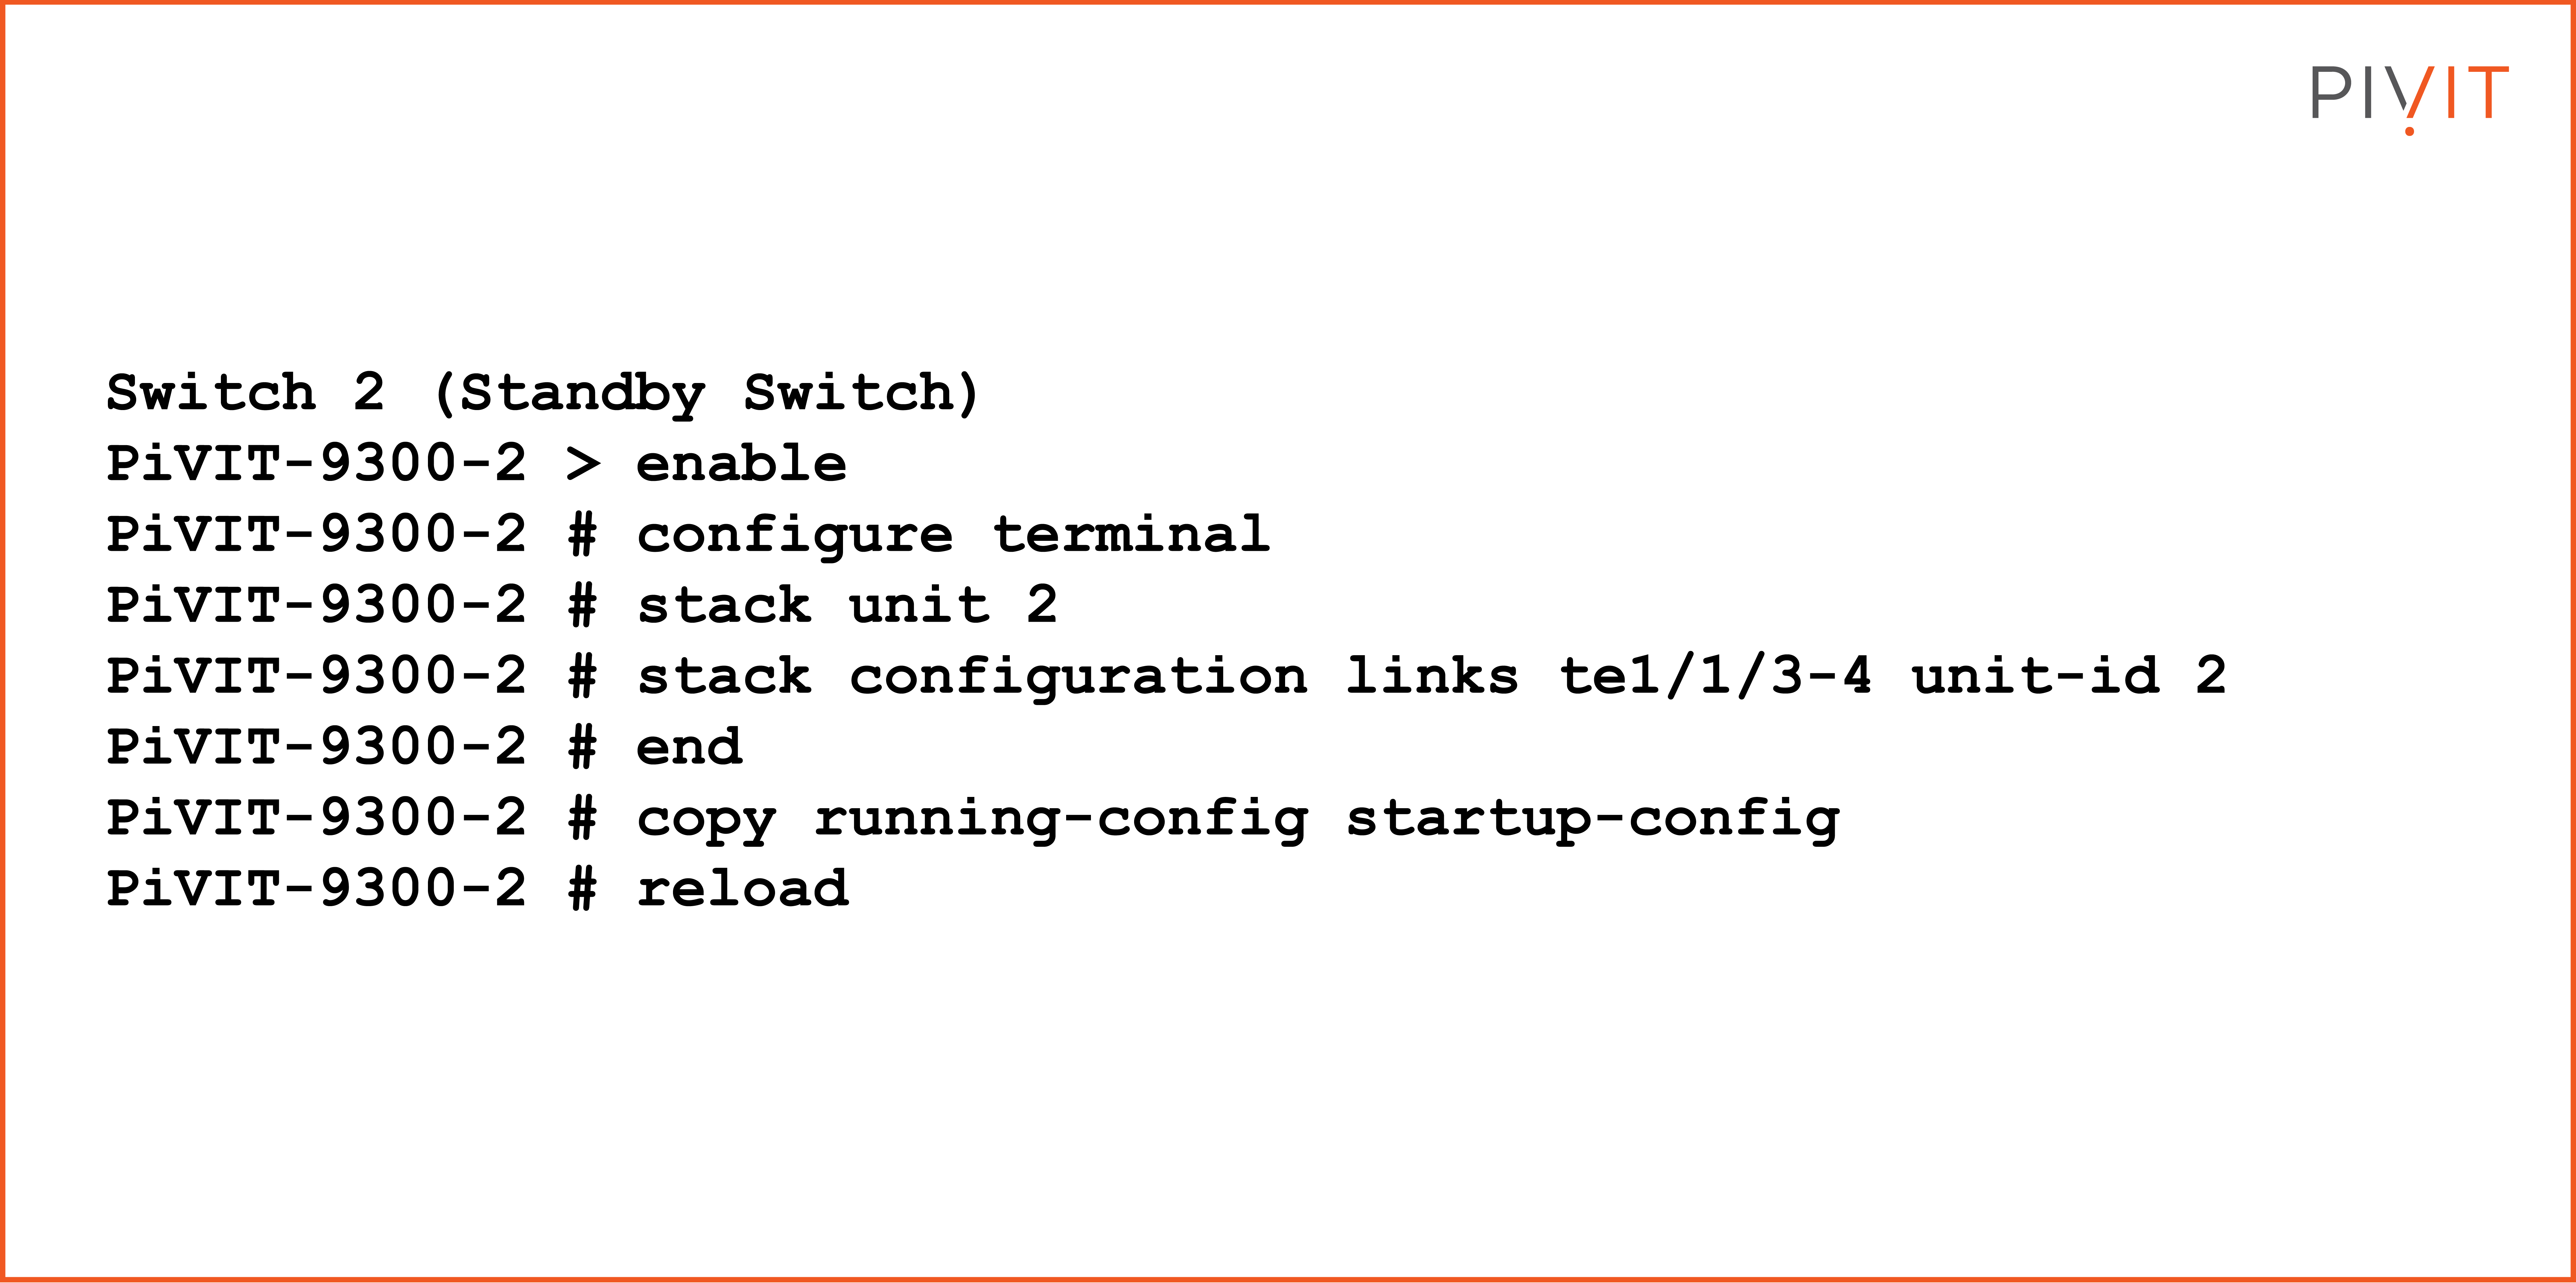
The process can be repeated as needed with an additional switch, but be sure to edit the unit number and port numbers as they relate to each switch.
Configuring Switch Stack Priority
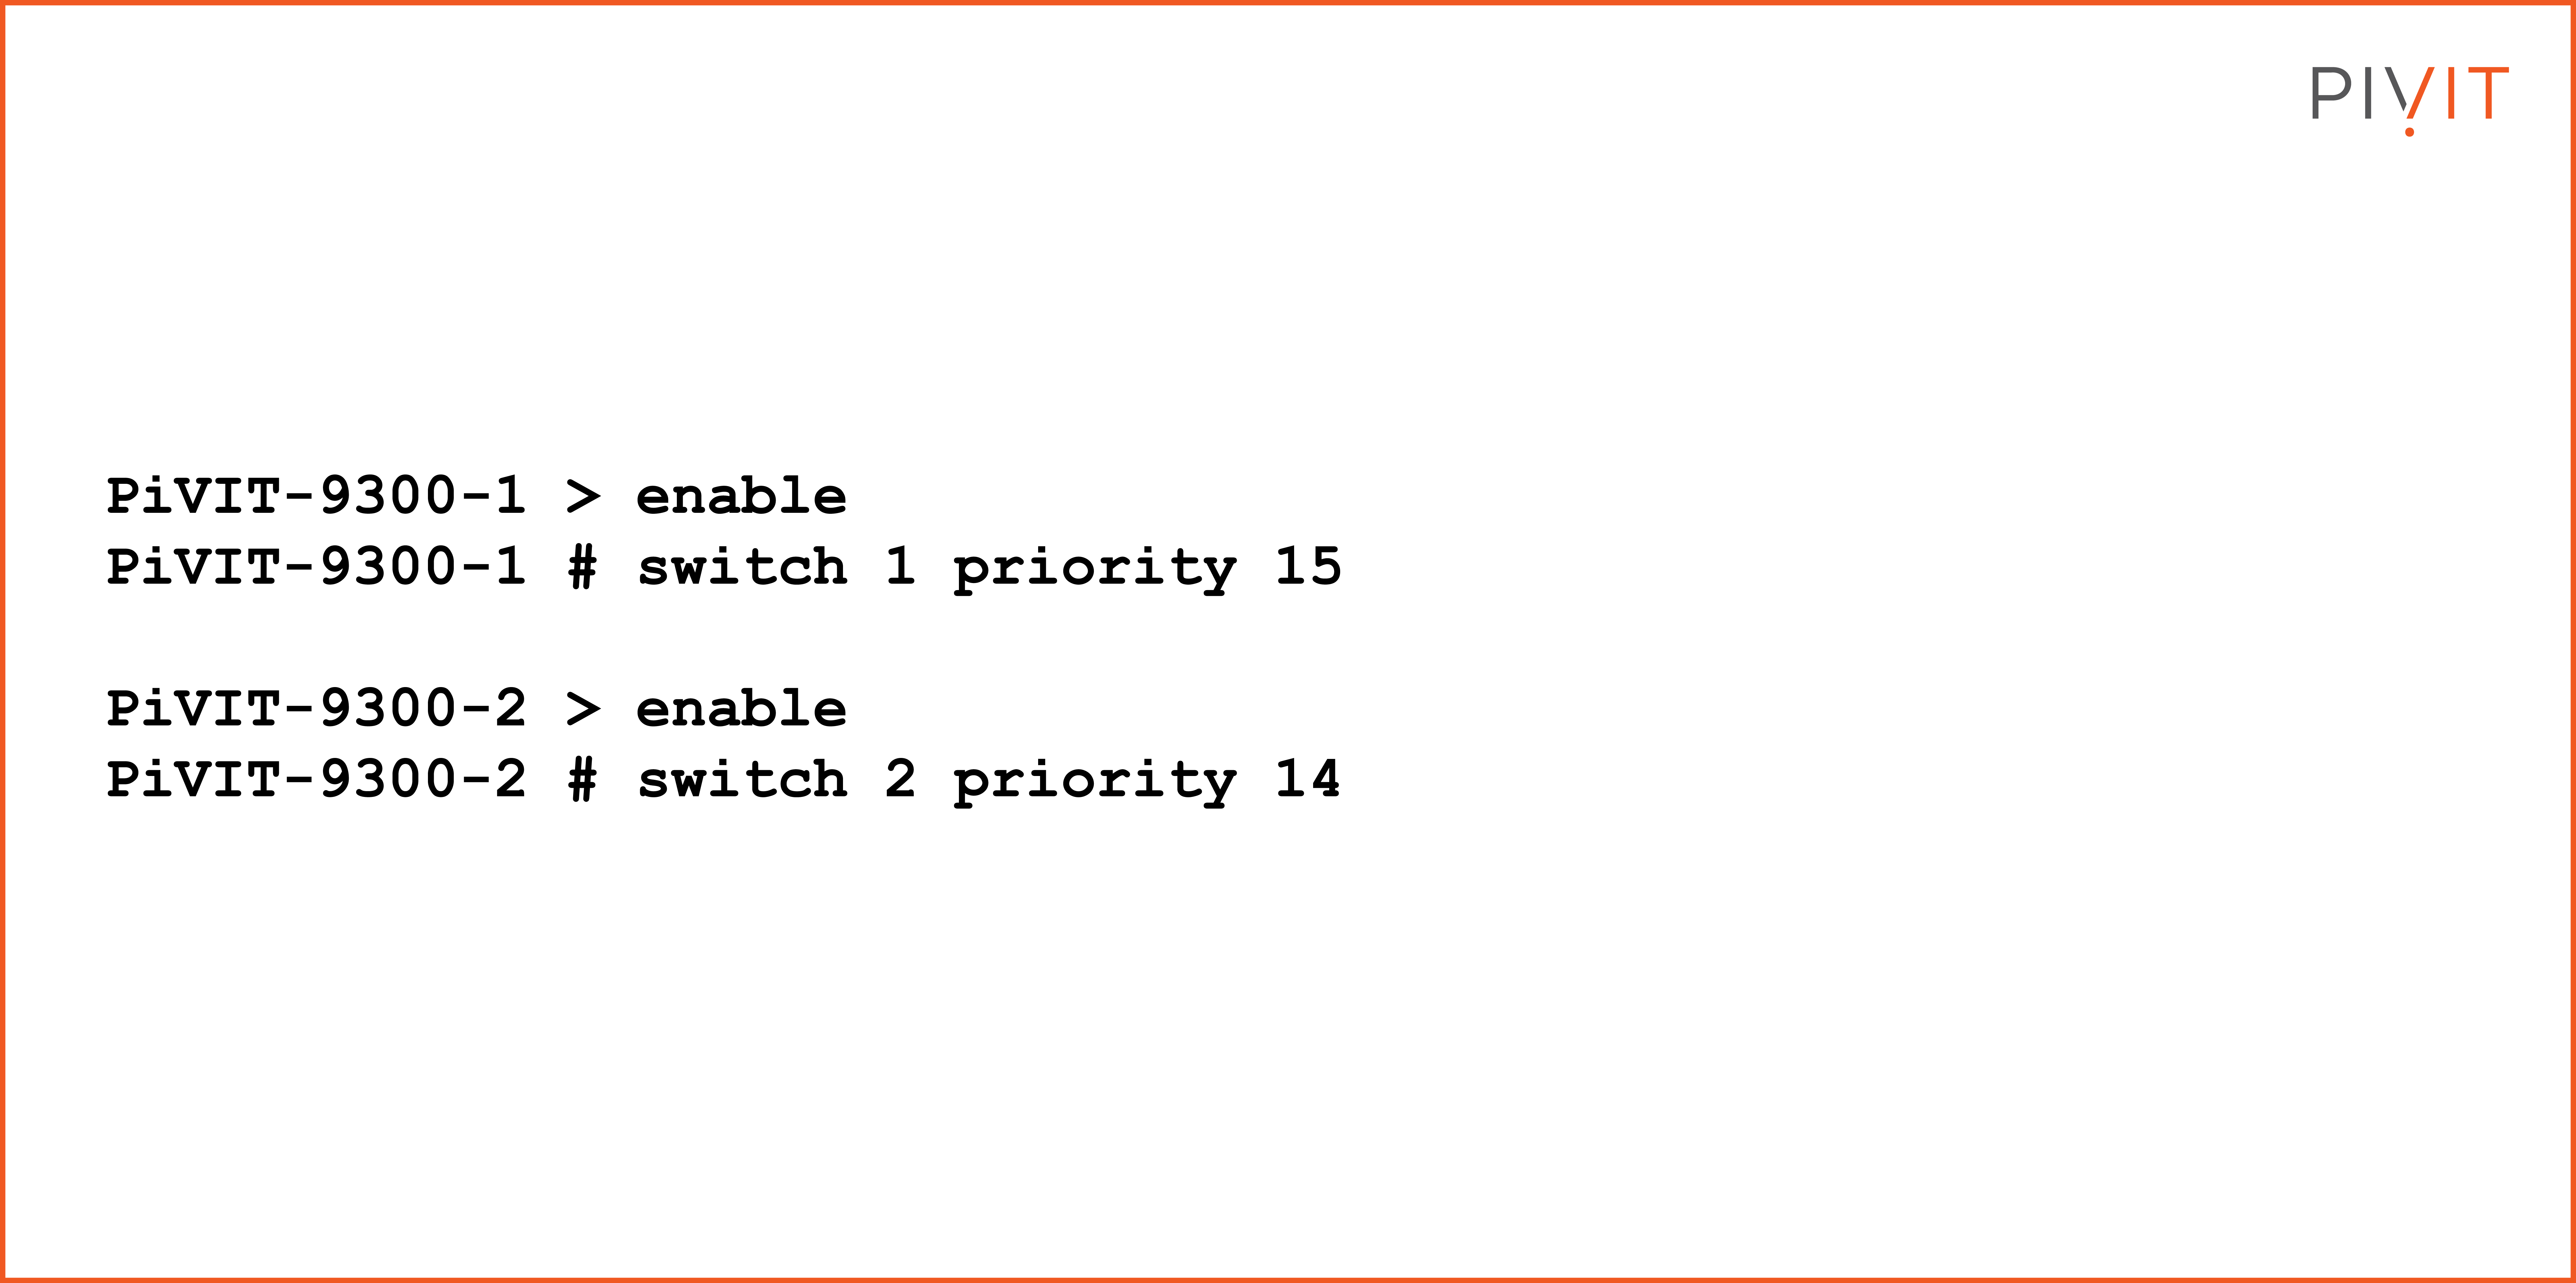
A priority of 15 sets the switch to the ‘Active’ role, a priority of 14 sets the switch to the ‘Standby’ role, and a priority of 13 sets the switch to the next ‘Standby’ role. Continue down the value list to set the next standby priority.
Here are examples of priority commands:
Do you have older switches that are coming up on their end-of-sale date? Roll those right onto your OneCall maintenance strategy where you get dedicated spares so you can protect your critical infrastructure.
View Switch Stack Configuration Settings
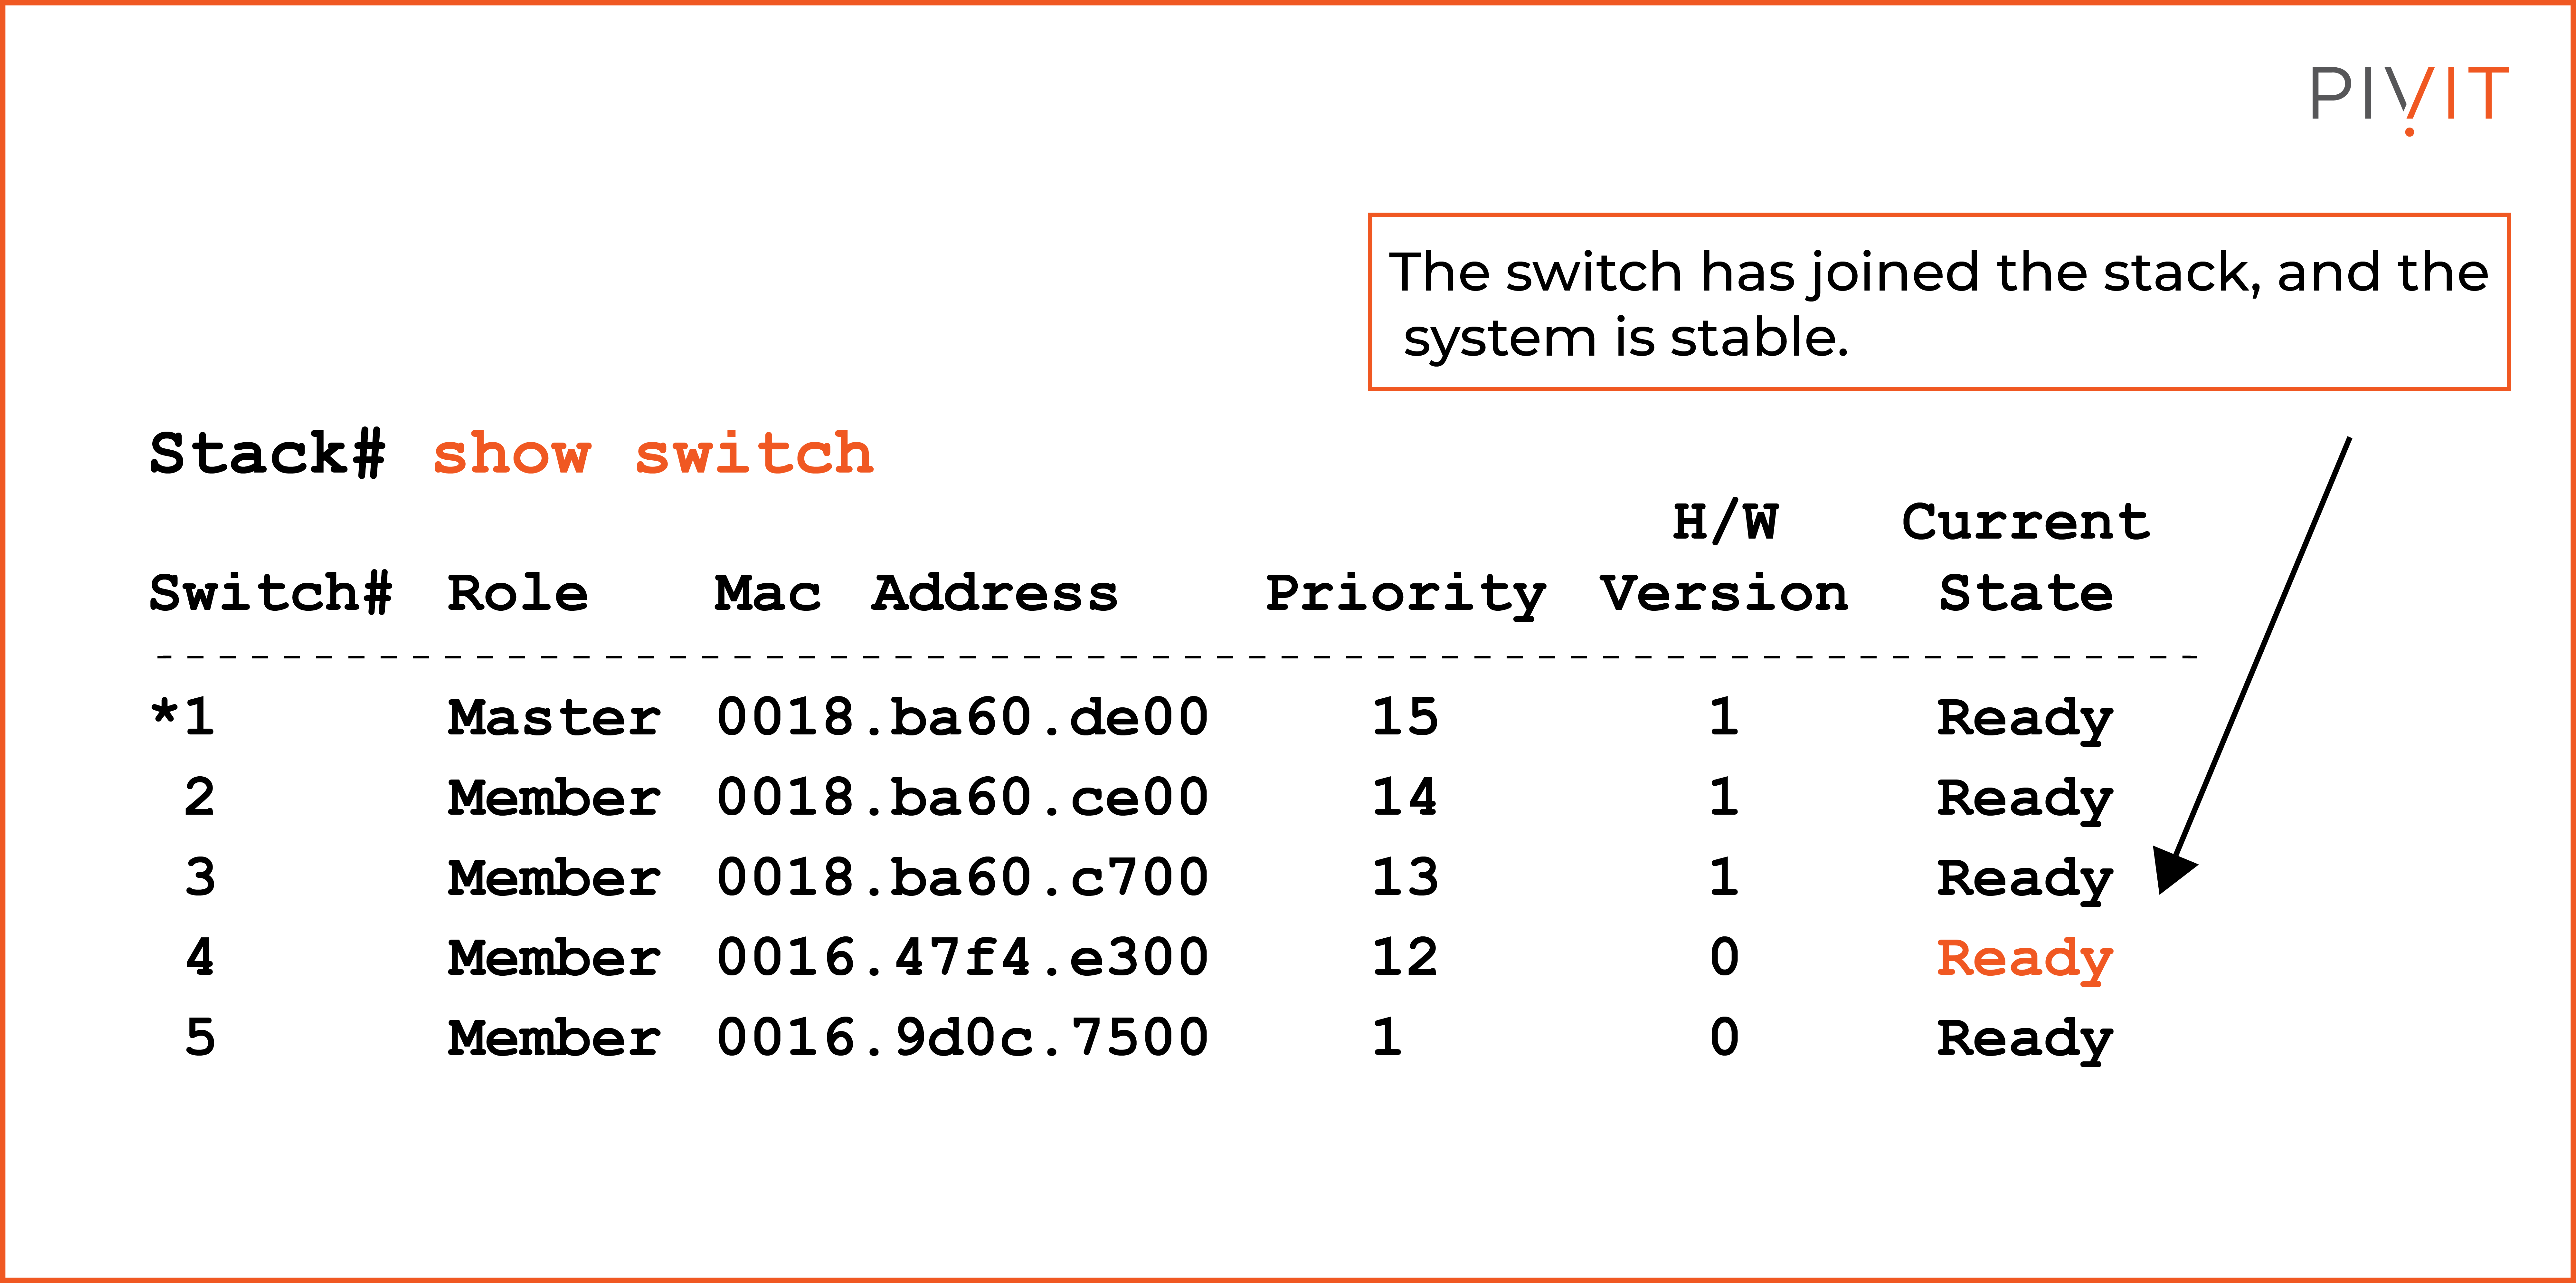
The following command can be used to view the switch stack configuration settings:
PiVIT-9300-1 # show switch
This command will show you the roles, priorities, and each switch's current state. Note that even though the switches are logically joined, they are still recognized individually by MAC addresses.
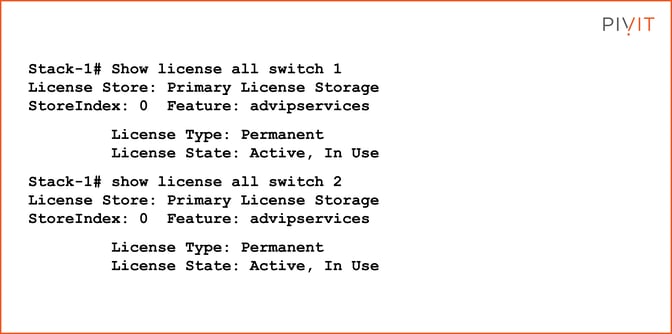
Viewing Licensing per Switch
The following commands will show you the license for each switch:
Augment Your Team With PivIT's EXTEND
Short on team resources to configure your gear? We know teams can sometimes be stretched thin and don't always have the resources or headcount to configure your gear at the speed you'd like.
PivIT's EXTEND offering can step in to augment your team and remote in to configure your gear with expert-level engineers (check out EXTEND's Smart Hands). If you need someone on-site, we have field services ready at a moment's notice.
FAQs
How many switches can you stack?
The maximum number of switches you can stack depends on the models/series you’re using. For instance, Netgear allows up to eight switches to be stacked, whereas with some Cisco series, you can stack up to nine switches. For more information about Cisco switches, check out our ultimate guide for enterprises.
What is the difference between trunking and stacking switches?
Both trunking and stacking involve connecting multiple switches, but their purposes are different. Trunking involves bundling multiple physical connections between switches to increase bandwidth and create a single logical connection. It's typically used to connect switches in various parts of a network. Stacking, on the other hand, involves physically connecting multiple switches to create a single logical unit, allowing them to be managed as a single entity with shared resources and simplified configuration.


