Share this
by PivIT Global on Jan 31, 2023 7:05:00 AM
Using firewalls in networks today is a common approach for achieving better security.
It’s vital in today’s environment when it comes to security breaches. According to ThoughtLab, the average number of cyberattacks and data breaches increased by 15.1 percent from 2021.
However, you must first configure some essential parameters to make Cisco Adaptive Security Appliance (ASA) operational and ready for exchanging data traffic.
One of those parameters is the interface’s configuration. You must configure, at minimum, the basic interface configuration parameters so that Cisco ASA can not only receive and send data but also filter and analyze traffic, as well as protect from potential outside and inside attacks.

This article will provide the following:
- An overview of a basic interface configuration.
- A look at default security policy.
- An examination of inter-interface communication.
- An examination of intra-interface communication.
- An exploration of interface configuration through CLI and ASDM.
Not what you were looking for today? View some of our popular articles:
- Back to the Basics: Cisco ASA Firewall Configuration Guide
- Cisco ASA Firewall Active/Standby Configuration Guide (Part 1 – Overview)
- A Complete Guide to Access Control Lists: Types and Creation Methods
An Overview of Cisco ASA Interface Configuration
All interfaces on the Cisco ASA are disabled and with empty configuration by default. To make them operational, you must configure three basic parameters: IP address, interface name, and security levels.
Once configured, the last step is to enable the interfaces from their initial shutdown state.
Configuring an IP address on the Cisco ASA is the same as configuring it on a Cisco router or switch. You must apply the correct IP address on each interface based on the network design. In addition, you must also configure interfaces on the Cisco ASA with a name.
The most commonly used names are “Inside,” “Outside,” and “DMZ,” which represent the parts of the network to which they connect, but you can use any other name that makes sense.
The last part of the interface configuration process is the security level, which is a critical parameter because it identifies the trustworthiness of the interface. It is a value between 0 and 100, where the higher the number, the more trusted the interface is.
The default access control on the Cisco ASA appliance is based on the interface security levels. This means that an interface with a higher security level is considered more secure or protected than an interface with a lower security level. Remember that each interface on the Cisco ASA appliance must have a security level to be operational.
When you set the name “Inside” to an interface, the security level automatically sets to 100, making that interface the most secure on the firewall. Any other name you specify on an interface sets the security level to 0 by default.
Therefore, you need to apply appropriate security level values for all interfaces other than the inside interface, which connects to the inside of the network.
Typical Cisco ASA implementation has a security level of 100 on the inside interface and 0 on the outside interface. The rest of the interfaces have security levels somewhere in between, based on their priority and the network parts to which they connect.
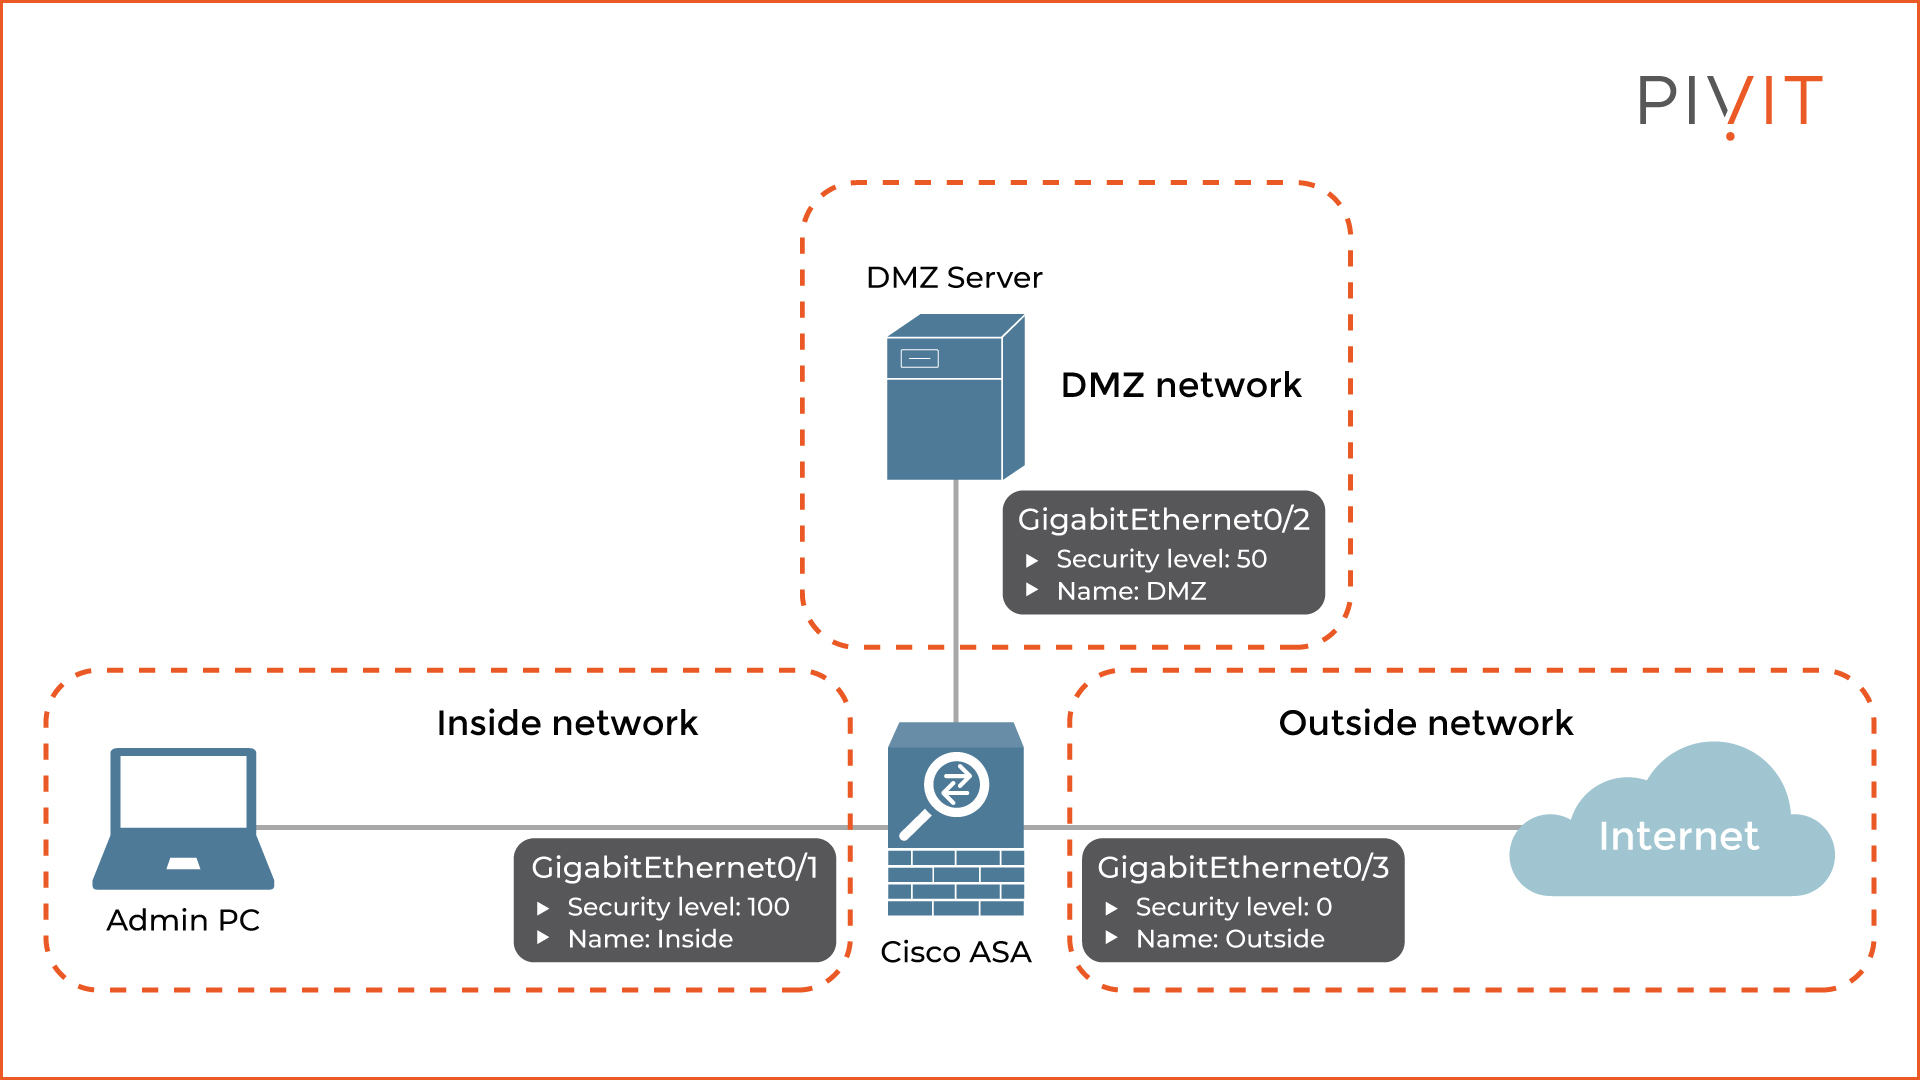
As you can see in the image above, the Cisco ASA appliance has three interfaces, each connecting to a different network.
Interface GigabitEthernet0/1 connects to the internal network, so it is named “inside,” and the security level is set to 100, which makes it the most trustworthy interface. GigabitEthernet0/2, configured with the name “DMZ,” connects to the DMZ network and has a security level of 50.
The last one, interface GigabitEthernet0/3, connects to the internet, so it is named “Outside” and has the lowest security level of 0.
Knowing the Default Security Policy Rules
Traffic flows on the Cisco ASA are defined as inbound or outbound based on the security levels of the incoming and outgoing interfaces on which traffic passes through the appliance.
Inbound traffic travels from a less trusted interface with a lower security level to a more trusted one with a higher security level.
In contrast, the outbound traffic travels from a more trusted interface with a higher security level to a less trusted interface with a lower security level.
Cisco ASA's approach with the security levels for allowing or denying traffic is quite simple. By default, the appliance allows outbound traffic only and denies inbound traffic. This means that connections initiated from a more trusted interface to a less trusted interface are allowed by default.
Since Cisco ASA is a stateful firewall, the outgoing traffic is inspected, which results in the returning traffic traversing the Cisco ASA without any limitations.
On the other hand, the inbound traffic is denied by default, which means that connections initiated from a less trusted interface to a more trusted interface always get denied by default. This provides an extra layer of security because, without additional configuration, Cisco ASA blocks traffic sent from anywhere to the internal part of the network.
You can easily override this implicit rule by applying an access control list to an interface that explicitly permits inbound traffic.
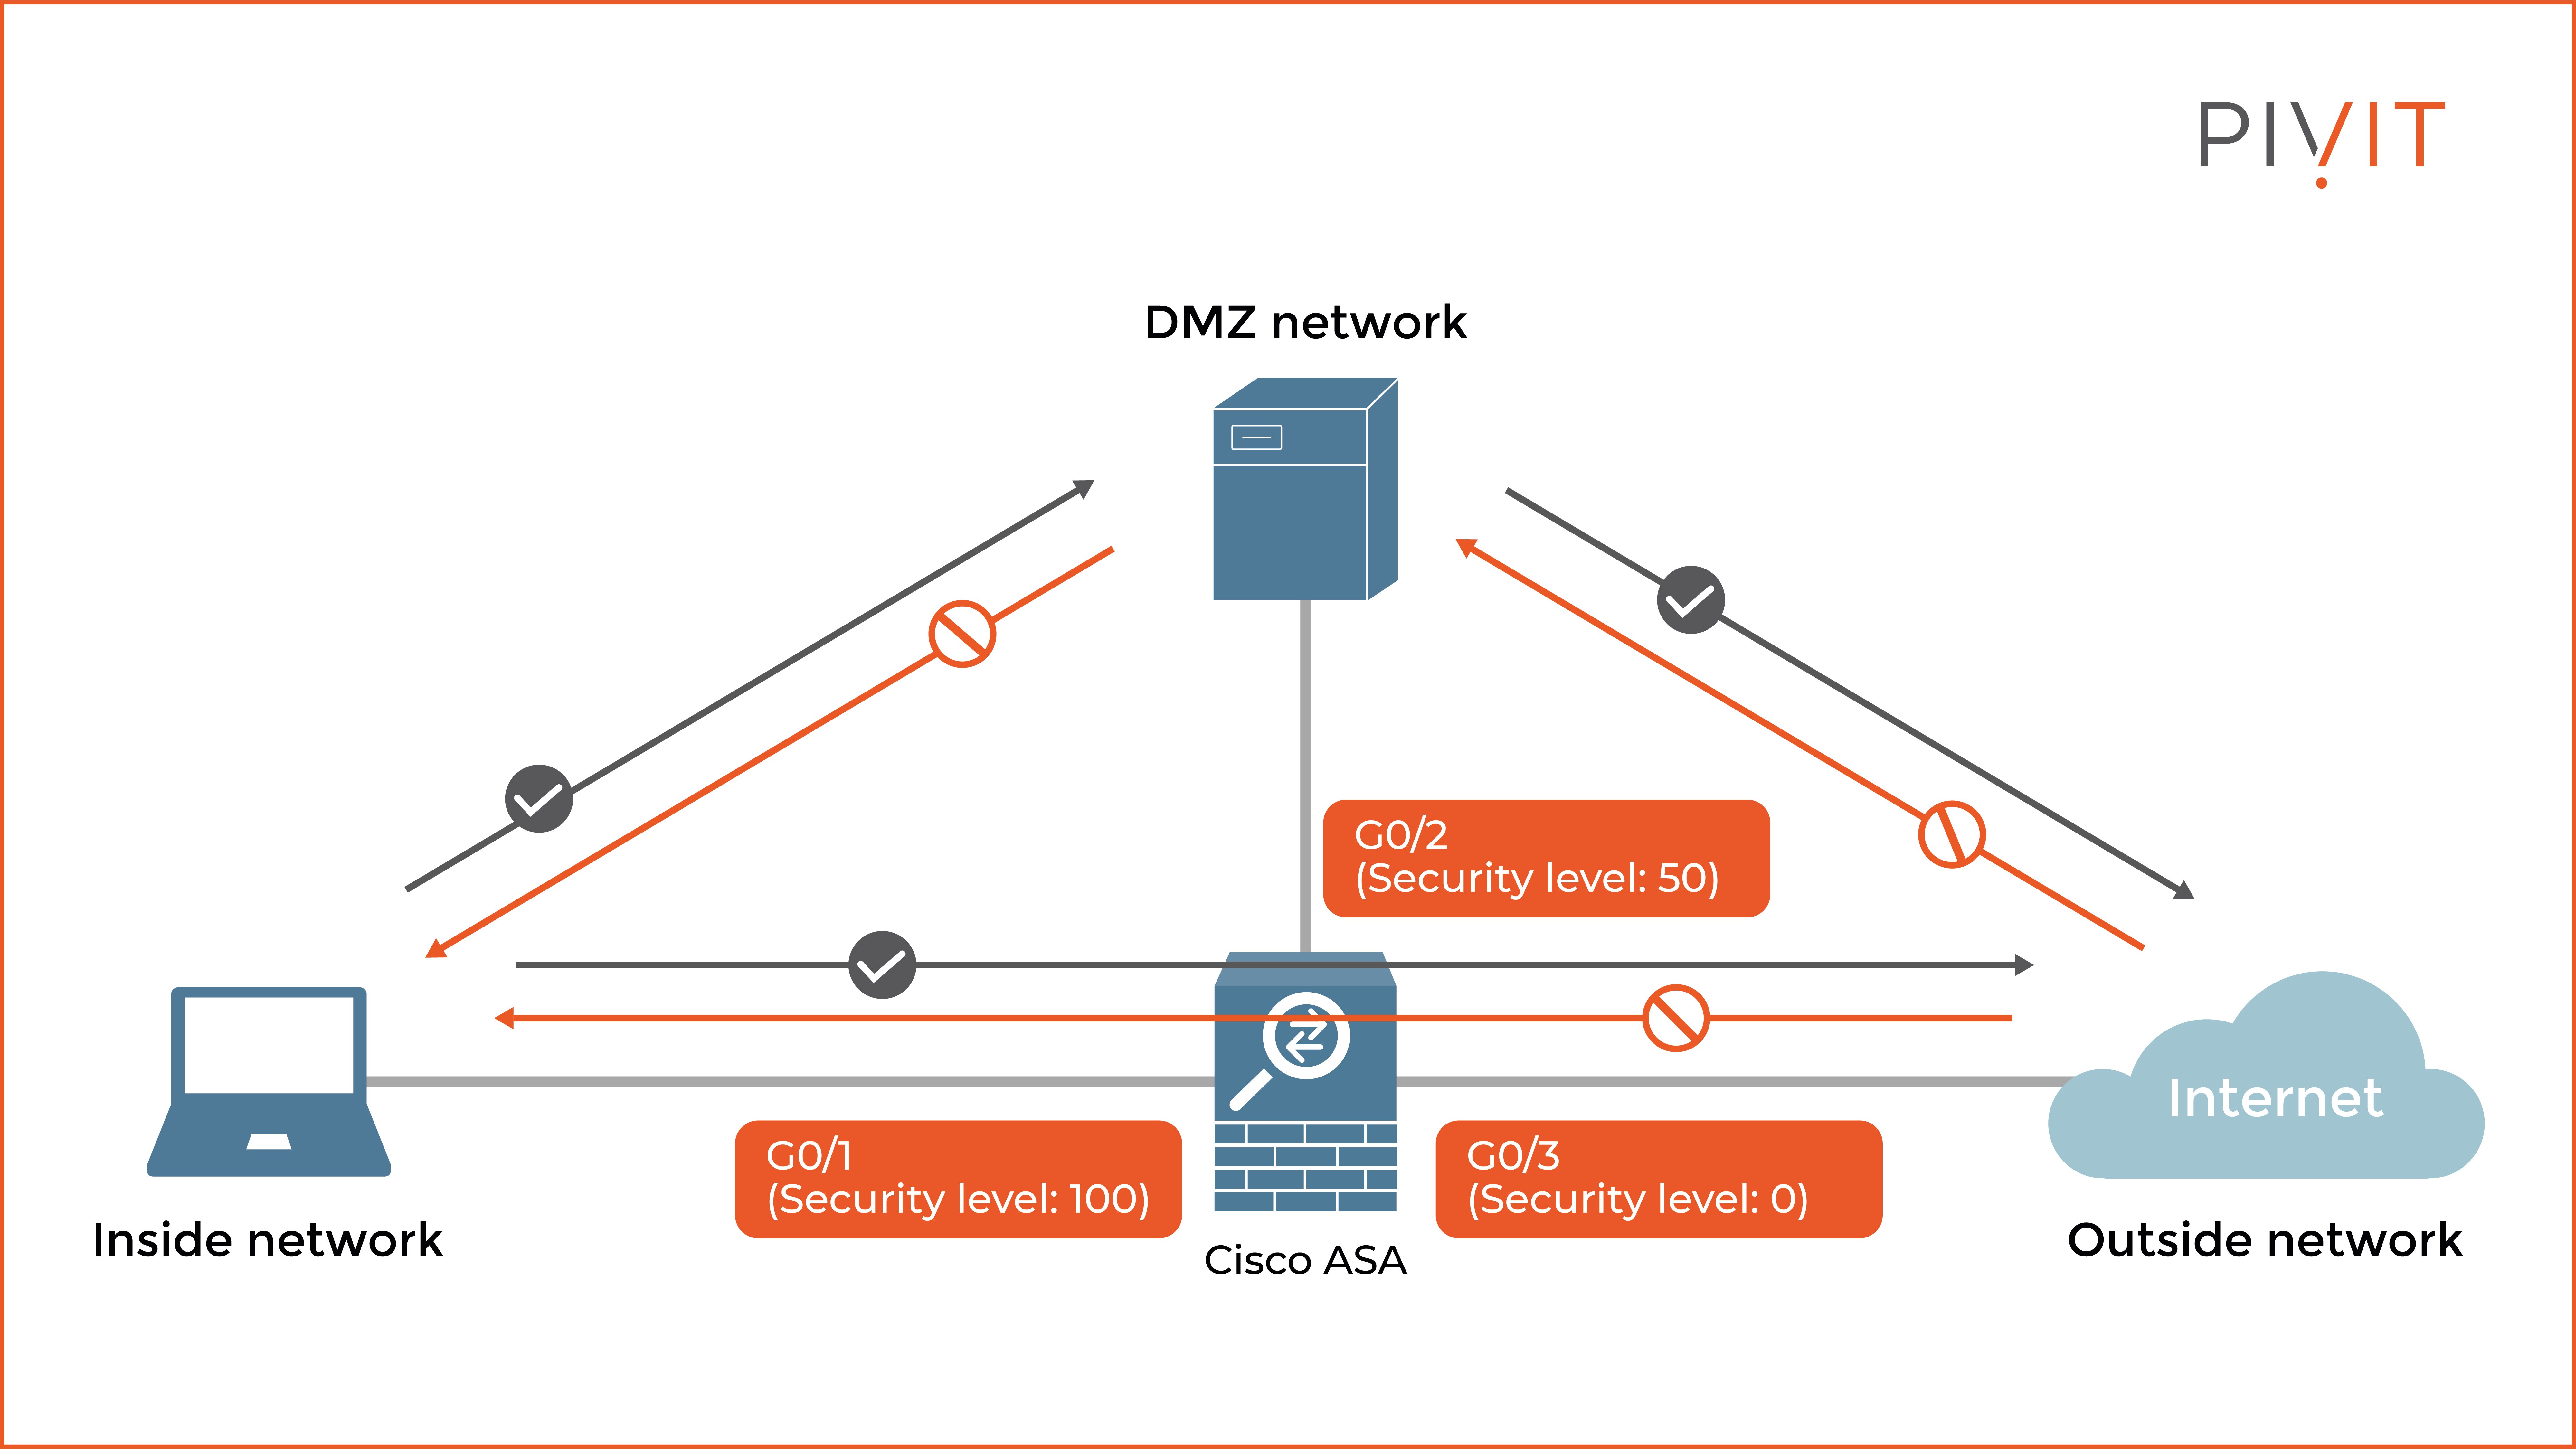
As you can see in the image above, only the traffic flows in green are permitted by default because the source interfaces have higher security levels than the destination interfaces.
In other words, the inside network can access the DMZ network and initiate connections to the internet, just like the DMZ server. The traffic flows in red are only permitted as returning traffic but denied when they are initiated from lower security-level interfaces.
________________
Need to quote a firewall?

________________
Understanding Inter-Interface Communication
Because there are only 101 security levels (0-100), in some cases, this range may not be enough for the total number of physical and logical interfaces used. As a result, some interfaces might have the same security level, providing undesired results.
The Cisco ASA appliance does not allow communications between interfaces with the same security level by default. Even if you apply an ACL that explicitly allows that traffic, the appliance will still deny the traffic flow at the end.
The only way to override this rule is by enabling inter-interface communication between interfaces using the same security level. Since this is a global configuration, it applies to all interfaces.
Remember that once the feature is enabled, when desired, you can always control the communications between specific interfaces by applying an ACL.
Understanding Intra-Interface Communication
Similar to the default behavior of the appliance regarding inter-interface communications, the Cisco ASA also does not allow traffic to enter and exit the same interface. This can be a huge problem in some situations, like in hub-and-spoke VPN topologies.
For example, the Cisco ASA at the headquarters must establish site-to-site VPN links to several branch offices through the same physical interface. However, because of the default rule, the branch offices cannot communicate with each other through the hub appliance.
You can override this rule by enabling intra-interface communication on the Cisco ASA. This would allow you to receive and send traffic over the same interface.
Configuring Cisco ASA Interface Parameters
You can use two methods to configure the basic interface parameters on a Cisco ASA, the CLI, and the Cisco ASDM GUI tool. Although both options provide the same result, the ASDM tool is typically used for configuring and managing Cisco ASA appliances.
The following commands should be configured on a Cisco ASA through the CLI to enable the interface GigabitEthernet0/2, name it DMZ, set a security level of 50, and assign the IP address 192.168.1.1/24 to it.

To configure the same parameters through the Cisco ASDM tool, you need to navigate to Configuration>Device Setup>Interfaces. The image below shows the window where all interface parameters should be defined.
.jpg?width=8000&height=4501&name=A%20Complete%20Guide%20to%20Configuring%20Cisco%20ASA%20Interfaces%20ASDM%20and%20CLI-04%20(1).jpg)
Simple, Yet Essential Configuration
For proper ASA functioning, you must configure the basic interface parameters. Although it is a straightforward process, you should be extremely careful not to misconfigure something.
That especially applies to the security levels since the default access control is based on them. A single wrong value could provide different results and unexpected communications between the other parts of the network, so verifying the parameters is always recommended.
Using firewalls in networks today is extremely important. When you’re ready to make Cisco ASA operational, follow these tips to set up this simple yet essential configuration.
________________
Are lead times slowing you down and preventing you from getting the firewall hardware or services you require to protect your data center? Send us a request or connect with our Team in real-time using our chat feature. Know what you want but need help configuring your setup?

________________
No Comments Yet
Let us know what you think