Share this
Ultimate Guide to Site-to-Site VPN Technologies on Cisco ASA
by PivIT Global on Jan 12, 2023 7:04:00 AM
Demand for secure communications over the internet rapidly grows daily within organizations. There’s no big surprise why. After all, CPO Magazine reported that the FBI reported about 847,376 cybersecurity complaints last year, representing almost $7 billion in business losses.
In this changing landscape, organizations are forced to implement appropriate technologies to satisfy requirements and provide a simple, secure base for exchanging data between geographically connected dispersed sites.
The simplest and best approach to these new business trends that follows modern security standards is to implement an appropriate VPN deployment based on the organization’s requirements.
Such an arrangement provides high-level protection for transferred data over high-speed broadband internet connections and virtually connects all remote corporate sites, allowing full access to all services.
Download the guide and refer back to it at any time!
In this article, we will:
- Provide an overview and cover the basics of site-to-site VPN technology.
- Find out more about the benefits it provides.
- Take a look at the configuration steps for implementing a site-to-site VPN on a Cisco ASA firewall by using the ASDM management tool.
Looking for other ways to understand the mobile business landscape better? Check out these articles:
- 6 Questions To Ask When Considering SD-WAN Technology
- Is Your Cloud Solution Preventing Business Growth?
- Network Outages: Do They Cost More Than You Think?
An Overview of Site-to-Site VPN
Back in the day, organizations relied heavily on classic router WANs to interconnect geographically dispersed sites, exchange data and offer access to internal services.
Today, WANs are considered obsolete and not appropriate for modern business requirements, and have been replaced with site-to-site VPNs. This type of VPN allows secure connectivity between enterprise sites and the ability to partner networks over an untrusted public network, such as the internet.
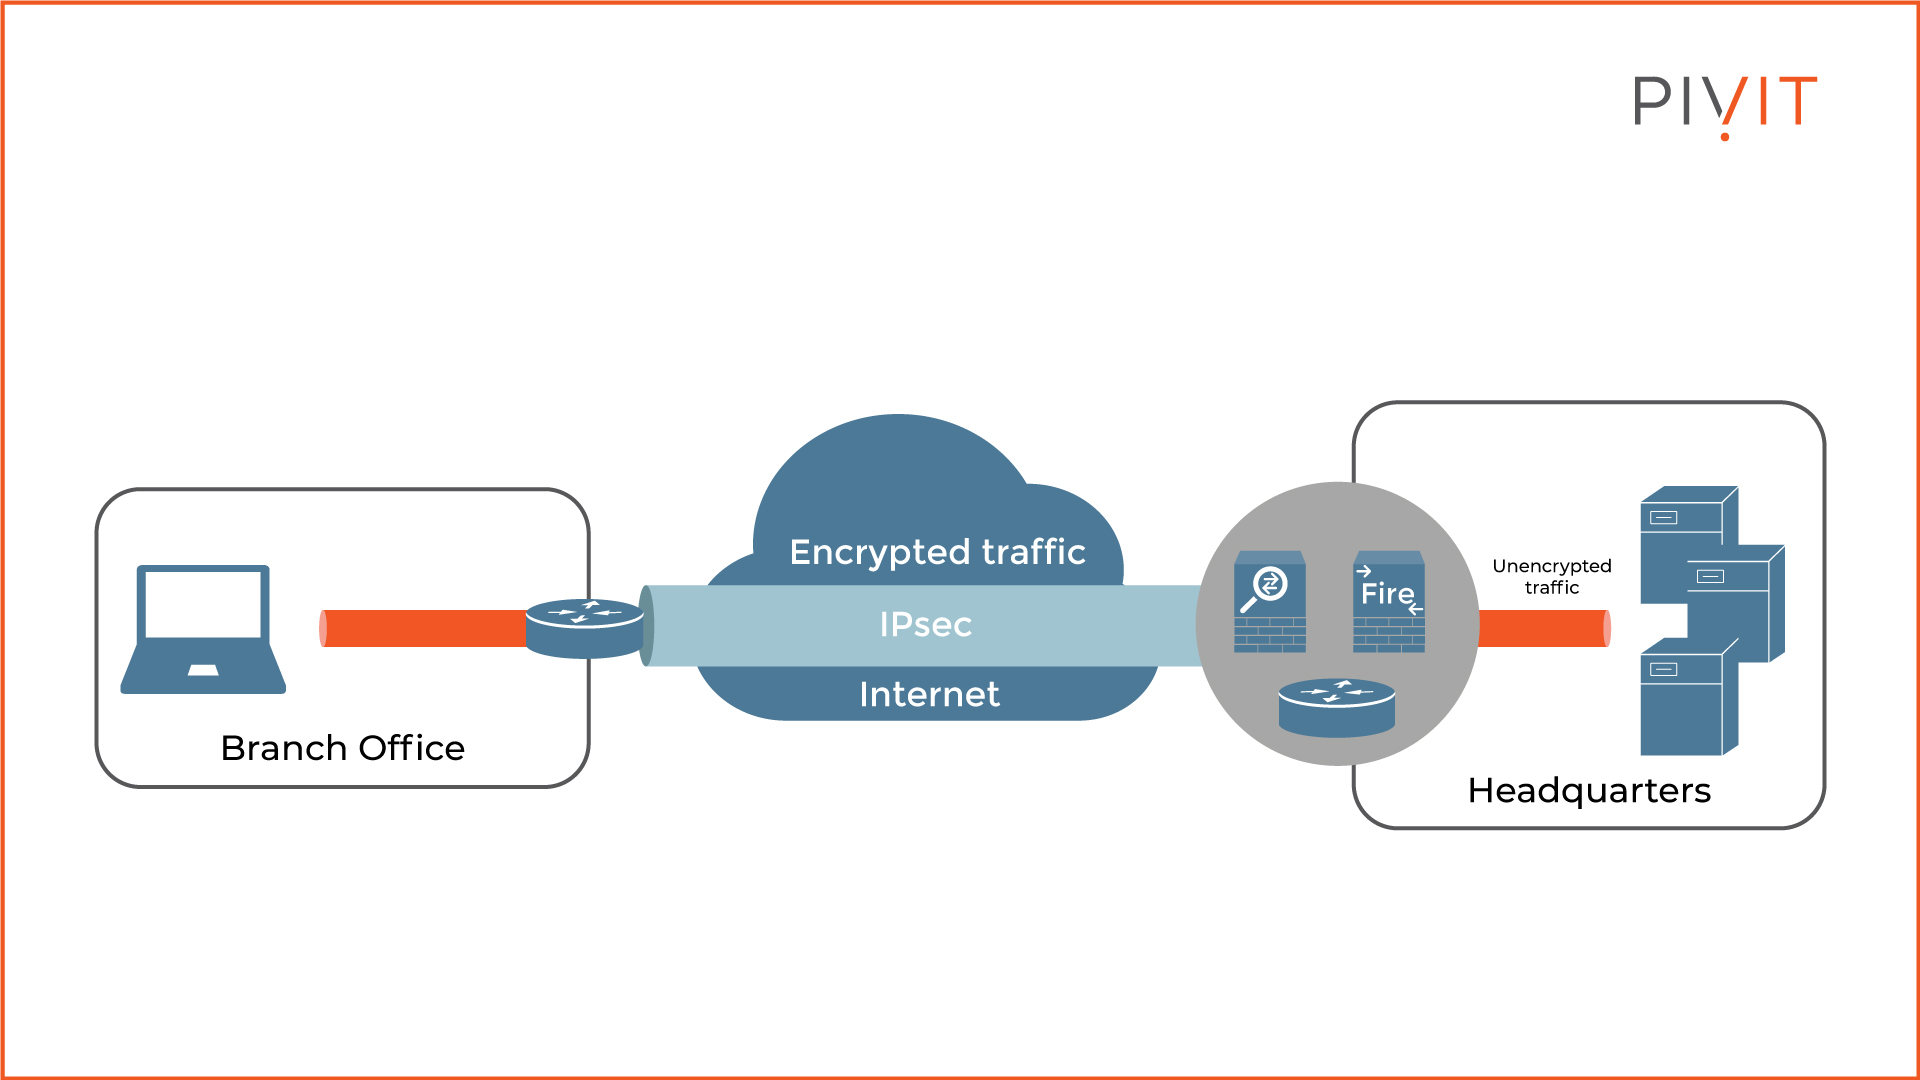
The site-to-site VPNs are usually deployed between branch offices and the headquarters, but they can also be deployed between offices from the same organization.
This VPN type integrates the IPsec framework as a mechanism for applying various security algorithms to provide confidentiality, integrity, authentication and anti-reply protection.
At the same time, the basic requirements — such as high reliability and extensive scalability — are satisfied with the site-to-site VPN deployments and achieved more cost-effectively. On top of that, this VPN type provides more scalable performance and greater flexibility.
Because of the support for various topologies and technologies, the IPsec VPNs can be deployed in many different variants. Ensure you are familiar with all of those options to choose and apply the most appropriate one when designing an IPsec site-to-site VPN solution.
Site-to-Site VPN Topologies
A network topology represents how certain entities are interconnected with each other over a public or private network. The same approach applies to VPNs as well.
Geographically dispersed sites are connected to the headquarters or between each other over the internet, which defines the VPN topology, which generally means a logical one.
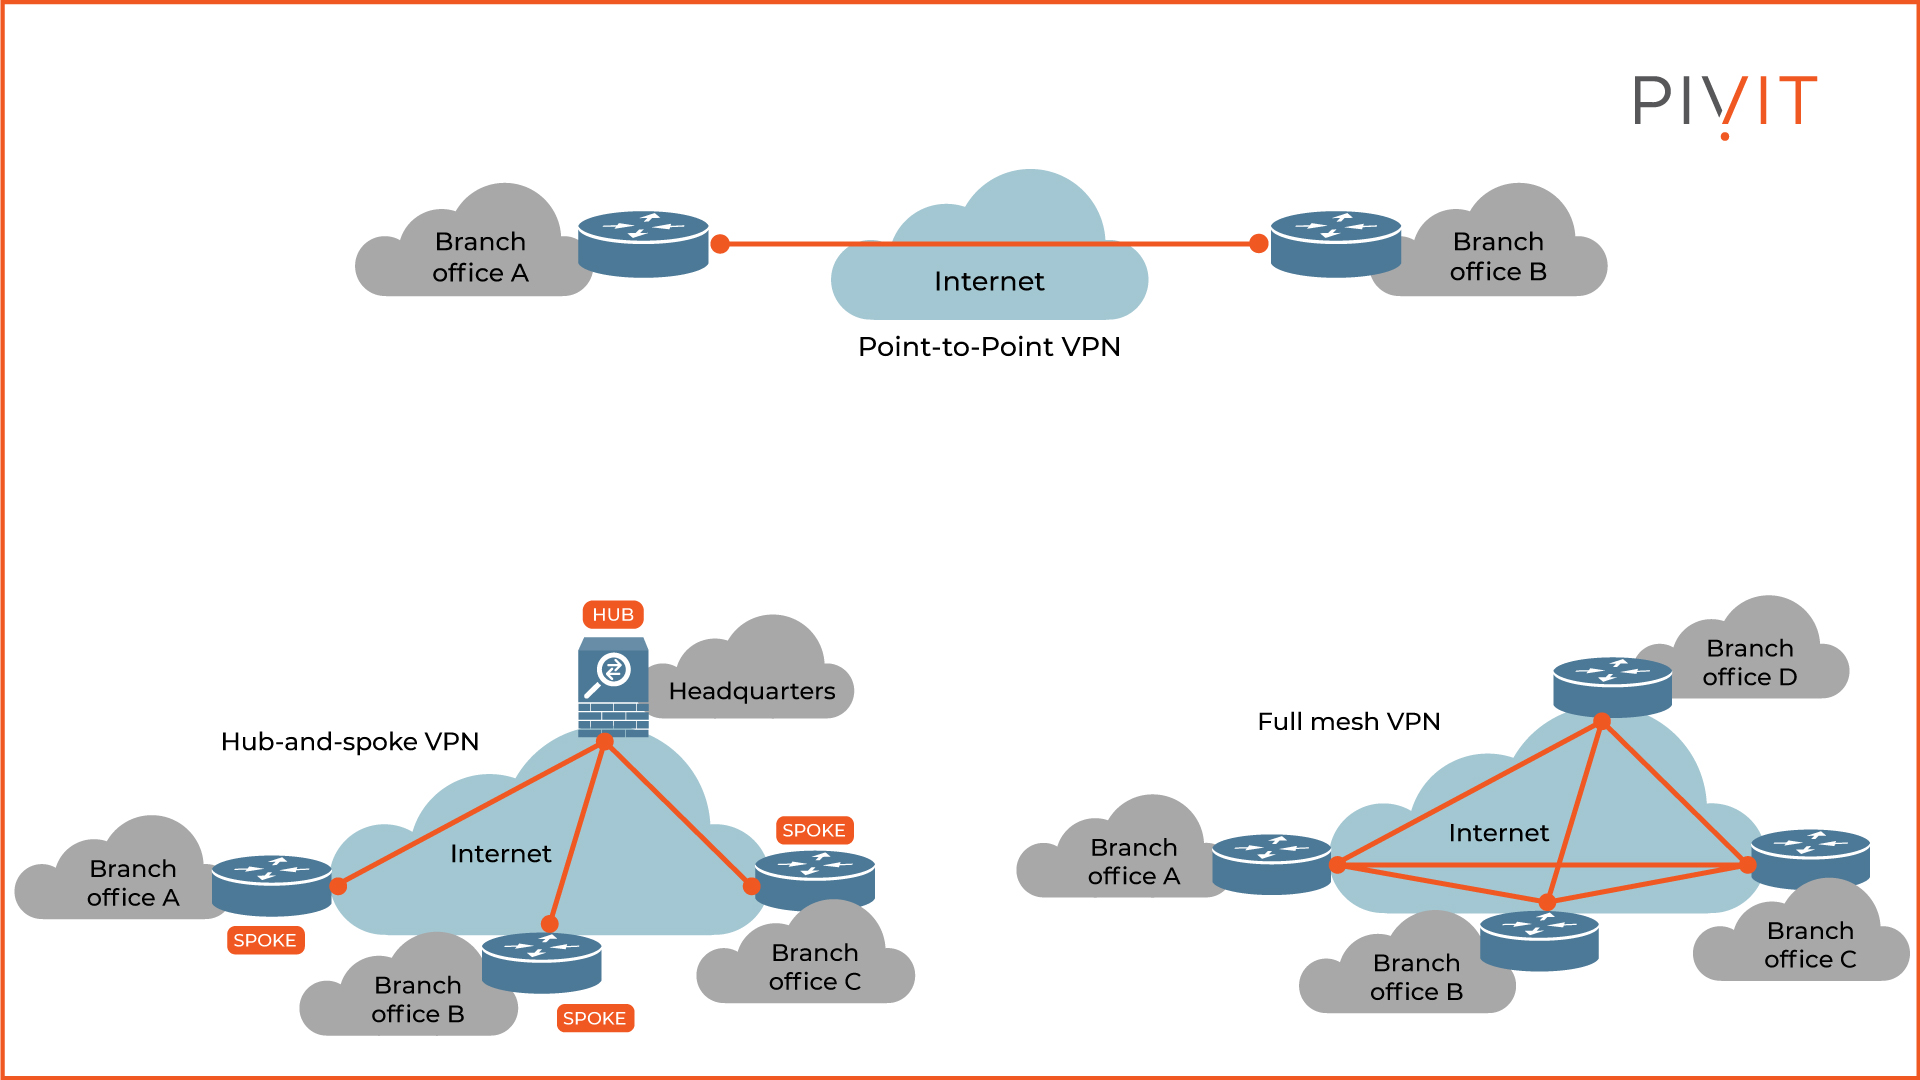
Even though numerous logical VPN topologies can be used in site-to-site VPNs, three of them are most commonly used in deployments. They are:
- Point-to-point VPN: A direct VPN tunnel between two sites that need to connect securely. Some networks may consist of several individual point-to-point VPN connections when enterprise requirements demand it.
- Hub-and-spoke: This is the most commonly deployed topology in general. The way this topology functions is quite simple. There is one central site that represents the hub, and the rest of the sites (also called spokes) exclusively connect with the hub. In a real case scenario, the headquarters represents the hub, while the branch offices are the spokes.
Typically, most of the traffic that is exchanged between the spokes goes through the hub, however, direct communication between spokes is also possible. This is supported in Cisco Dynamic Multipoint VPN, or DMVPN, in which case the hub acts as a relay and facilitates the spoke-to-spoke communication. - Full mesh: Probably the best yet the most expensive and complex solution. With this topology, each site is connected to every other site, which results in a fully-meshed network. This provides any-to-any communication, the most optimal paths in the network, and the greatest flexibility.
Besides the three main VPN topologies that are commonly used, three additional more complex topologies can be used in site-to-site VPN deployments when there are special requirements. These VPN topologies are:
- Partial mesh, which acts as a light version of the full mesh topology.
- Tiered hub-and-spoke, where a single device can function as a hub for one part of the topology and spoke for the other.
- Joined hub-and-spoke, where two topologies such as point-to-point, hub-and-spoke or full mesh form a point-to-point tunnel when connecting to each other.
________________
Hardware Options For You
Here at PivIT, we know the importance doesn't stop with the device itself. It stretches to what is available today, financing options, and more. We make it easy for you to find the hardware to build your network on your terms.
________________
Site-to-Site VPN Deployment Types You Need to Know
Even though we will focus on configuring a simple site-to-site (point-to-point) VPN later on in the article, you should be aware that there are a few additional site-to-site VPN deployments that you can implement:
- Basic P2P: Solution that provides a point-to-point connection between two locations that need to connect, such as a headquarters and a branch office.
- DMVPN: Cisco solution that allows scalable IPsec VPN, supporting hub-and-spoke and spoke-to-spoke VPN tunnels for greater flexibility, lower bandwidth consumption, and simpler implementation and management.
- FlexVPN: Cisco solution that greatly simplifies the overall VPN implementation when organization requirements demand several VPN types deployed at the same time.
- GET VPN: Tunnel-less solution suitable for deployment in MPLS networks that efficiently secures IP unicast and multicast traffic. This VPN type combines IPsec with Group Domain of Interpretation (GDOI) to provide any-to-any connectivity.
Understanding the Site-to-Site Tunnel Negotiation Process
Before we start with the site-to-site VPN implementation on a Cisco ASA firewall, we first need to take a look at the site-to-site VPN tunnel negotiation process.
This is essential to easily understand the IPsec site-to-site VPN configuration steps used later on in the article, but most importantly the overall configuration process.
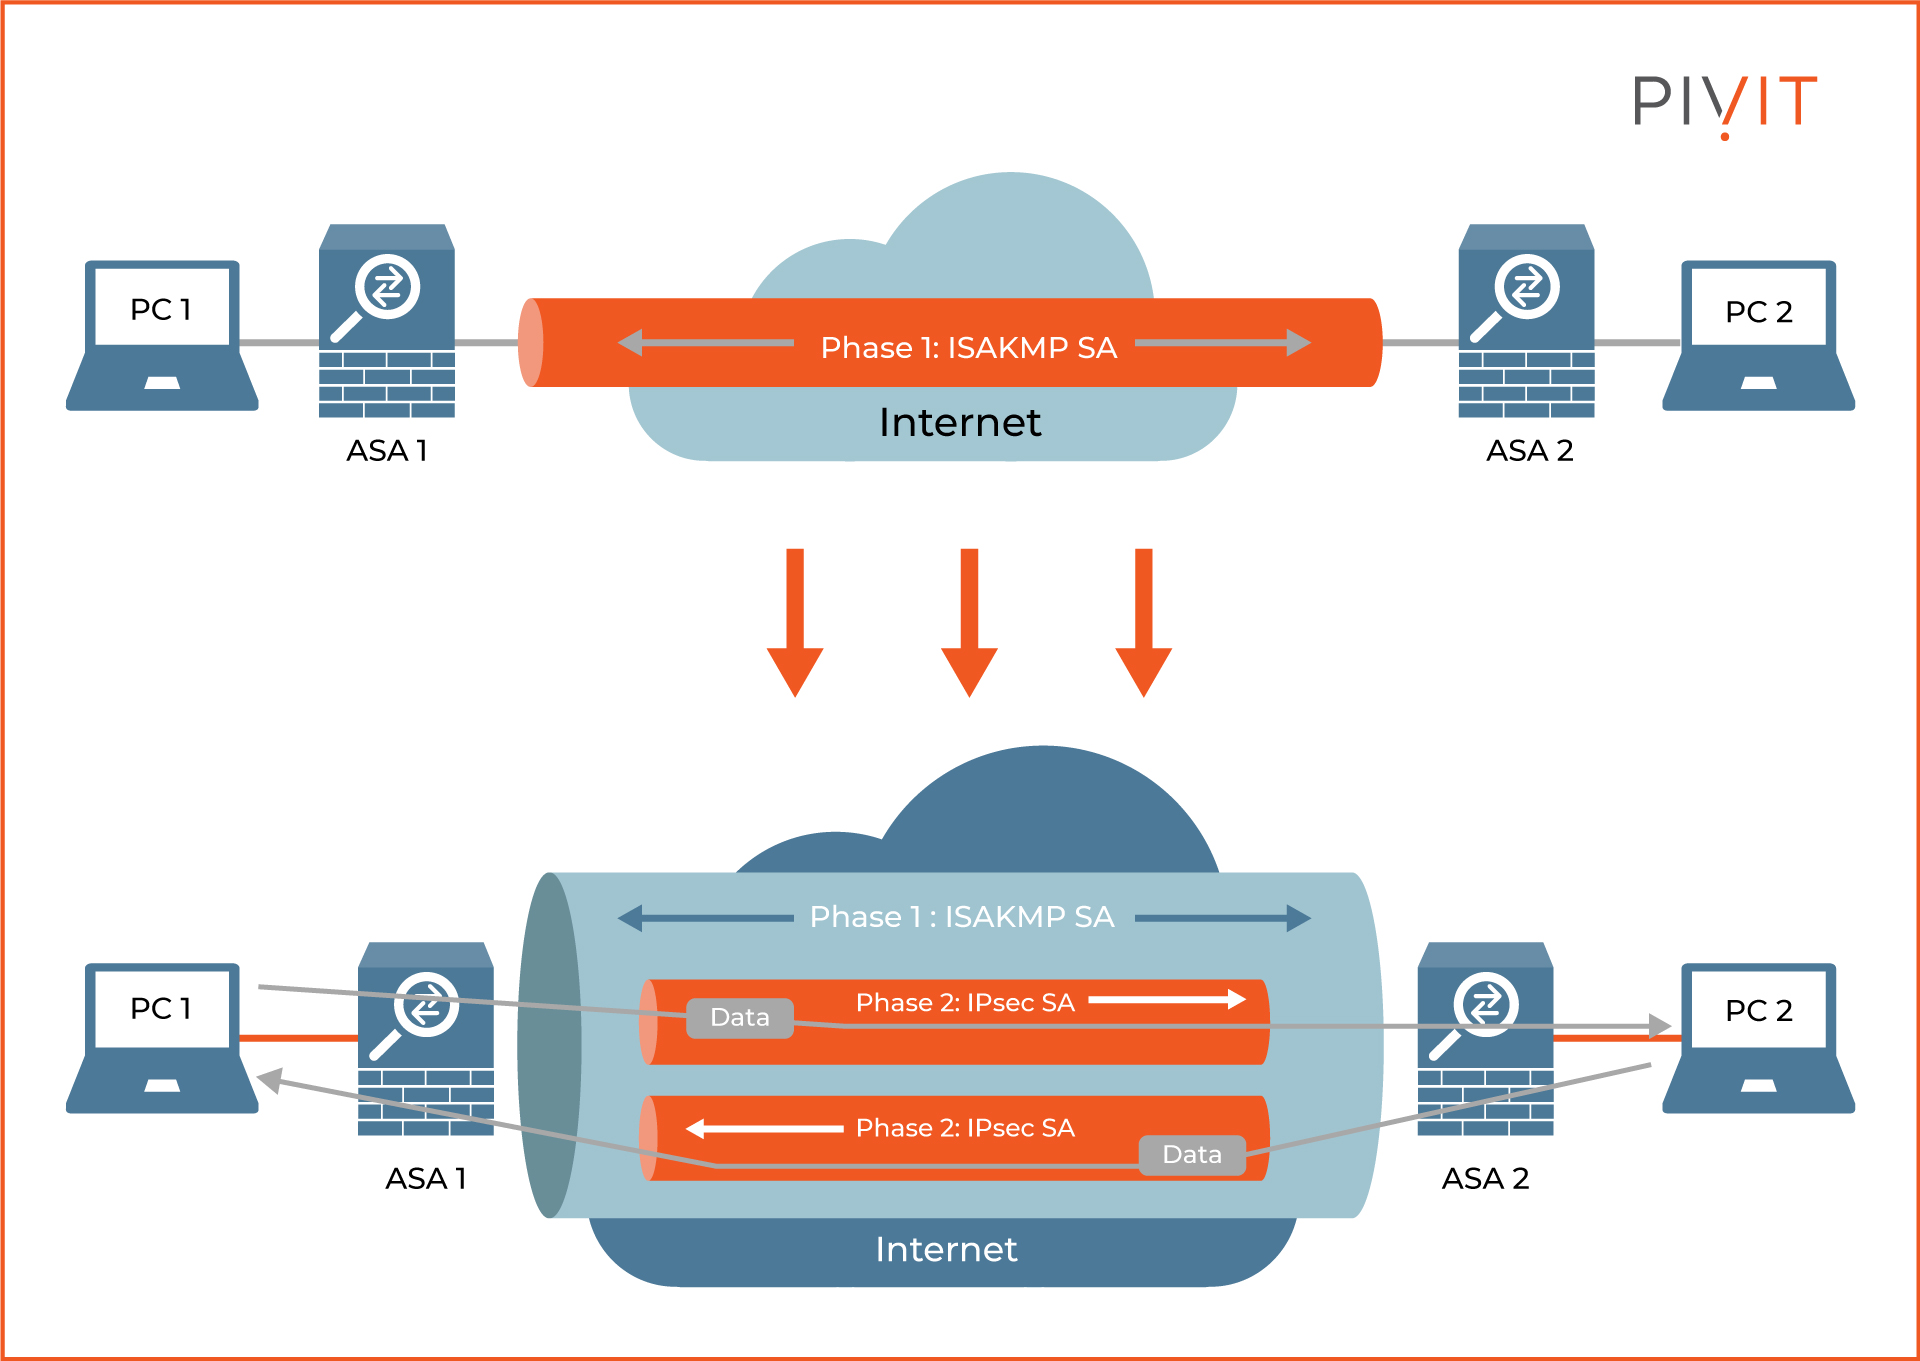
The tunnel negotiation process is quite simple and involves several steps, so let’s take a look at the figure above and find out what those steps are. The main requirement in our use case is for firewalls ASA1 and ASA2 to establish a VPN tunnel so PC1 and PC2 can securely exchange data with each other over the internet.
For the VPN to get established, PC1 must send some data (also known as “interesting traffic”) to PC2 to trigger the negotiation process between the firewalls. The process consists of two phases, and each phase is responsible for building different tunnels.
In Phase 1, ASA1 and ASA2 negotiate security parameters among executing other things to build a secure tunnel. In other words, they need to find common support for cryptographic algorithms that will be used for encryption, authentication, and integrity to protect the data that will be sent through the VPN.
Upon agreement, they build something called ISAKMP Security Association (SA), which represents a bi-directional secure tunnel, through which Phase 2 takes place.
Then, in Phase 2, both firewalls continue with the VPN establishment process and they negotiate security parameters one more time. This step is needed to create the “real” VPN tunnel that will be used to protect the data exchanged between PC1 and PC2.
Keep in mind that the whole communication of Phase 2 is now secured because it goes through the tunnel established in Phase 1. Now, ASA1 uses the active ISAKMP SA to initiate negotiation of an IPsec SA to ASA2, which is the goal of the negotiation process in the first place.
This IPsec SA is a unidirectional tunnel whose responsibility is to protect the real data exchanged from the sender to the receiver. Since Phase 2 IPsec ESP SAs are unidirectional, ASA2 must also negotiate an additional IPsec SA towards ASA1.
To summarize, the result of the negotiation process is to establish a tunnel within a tunnel. The ISAKMP SA is the outer tunnel and is needed to protect the negotiation of the IPsec SAs, while the IPsec SAs represent the inner tunnels and protect the exchanged data. When the existing IPsec SAs expire, they are replaced with new IPsec SAs, negotiated using the ISAKMP SA.
Configuring a Site-to-Site VPN on a Cisco ASA
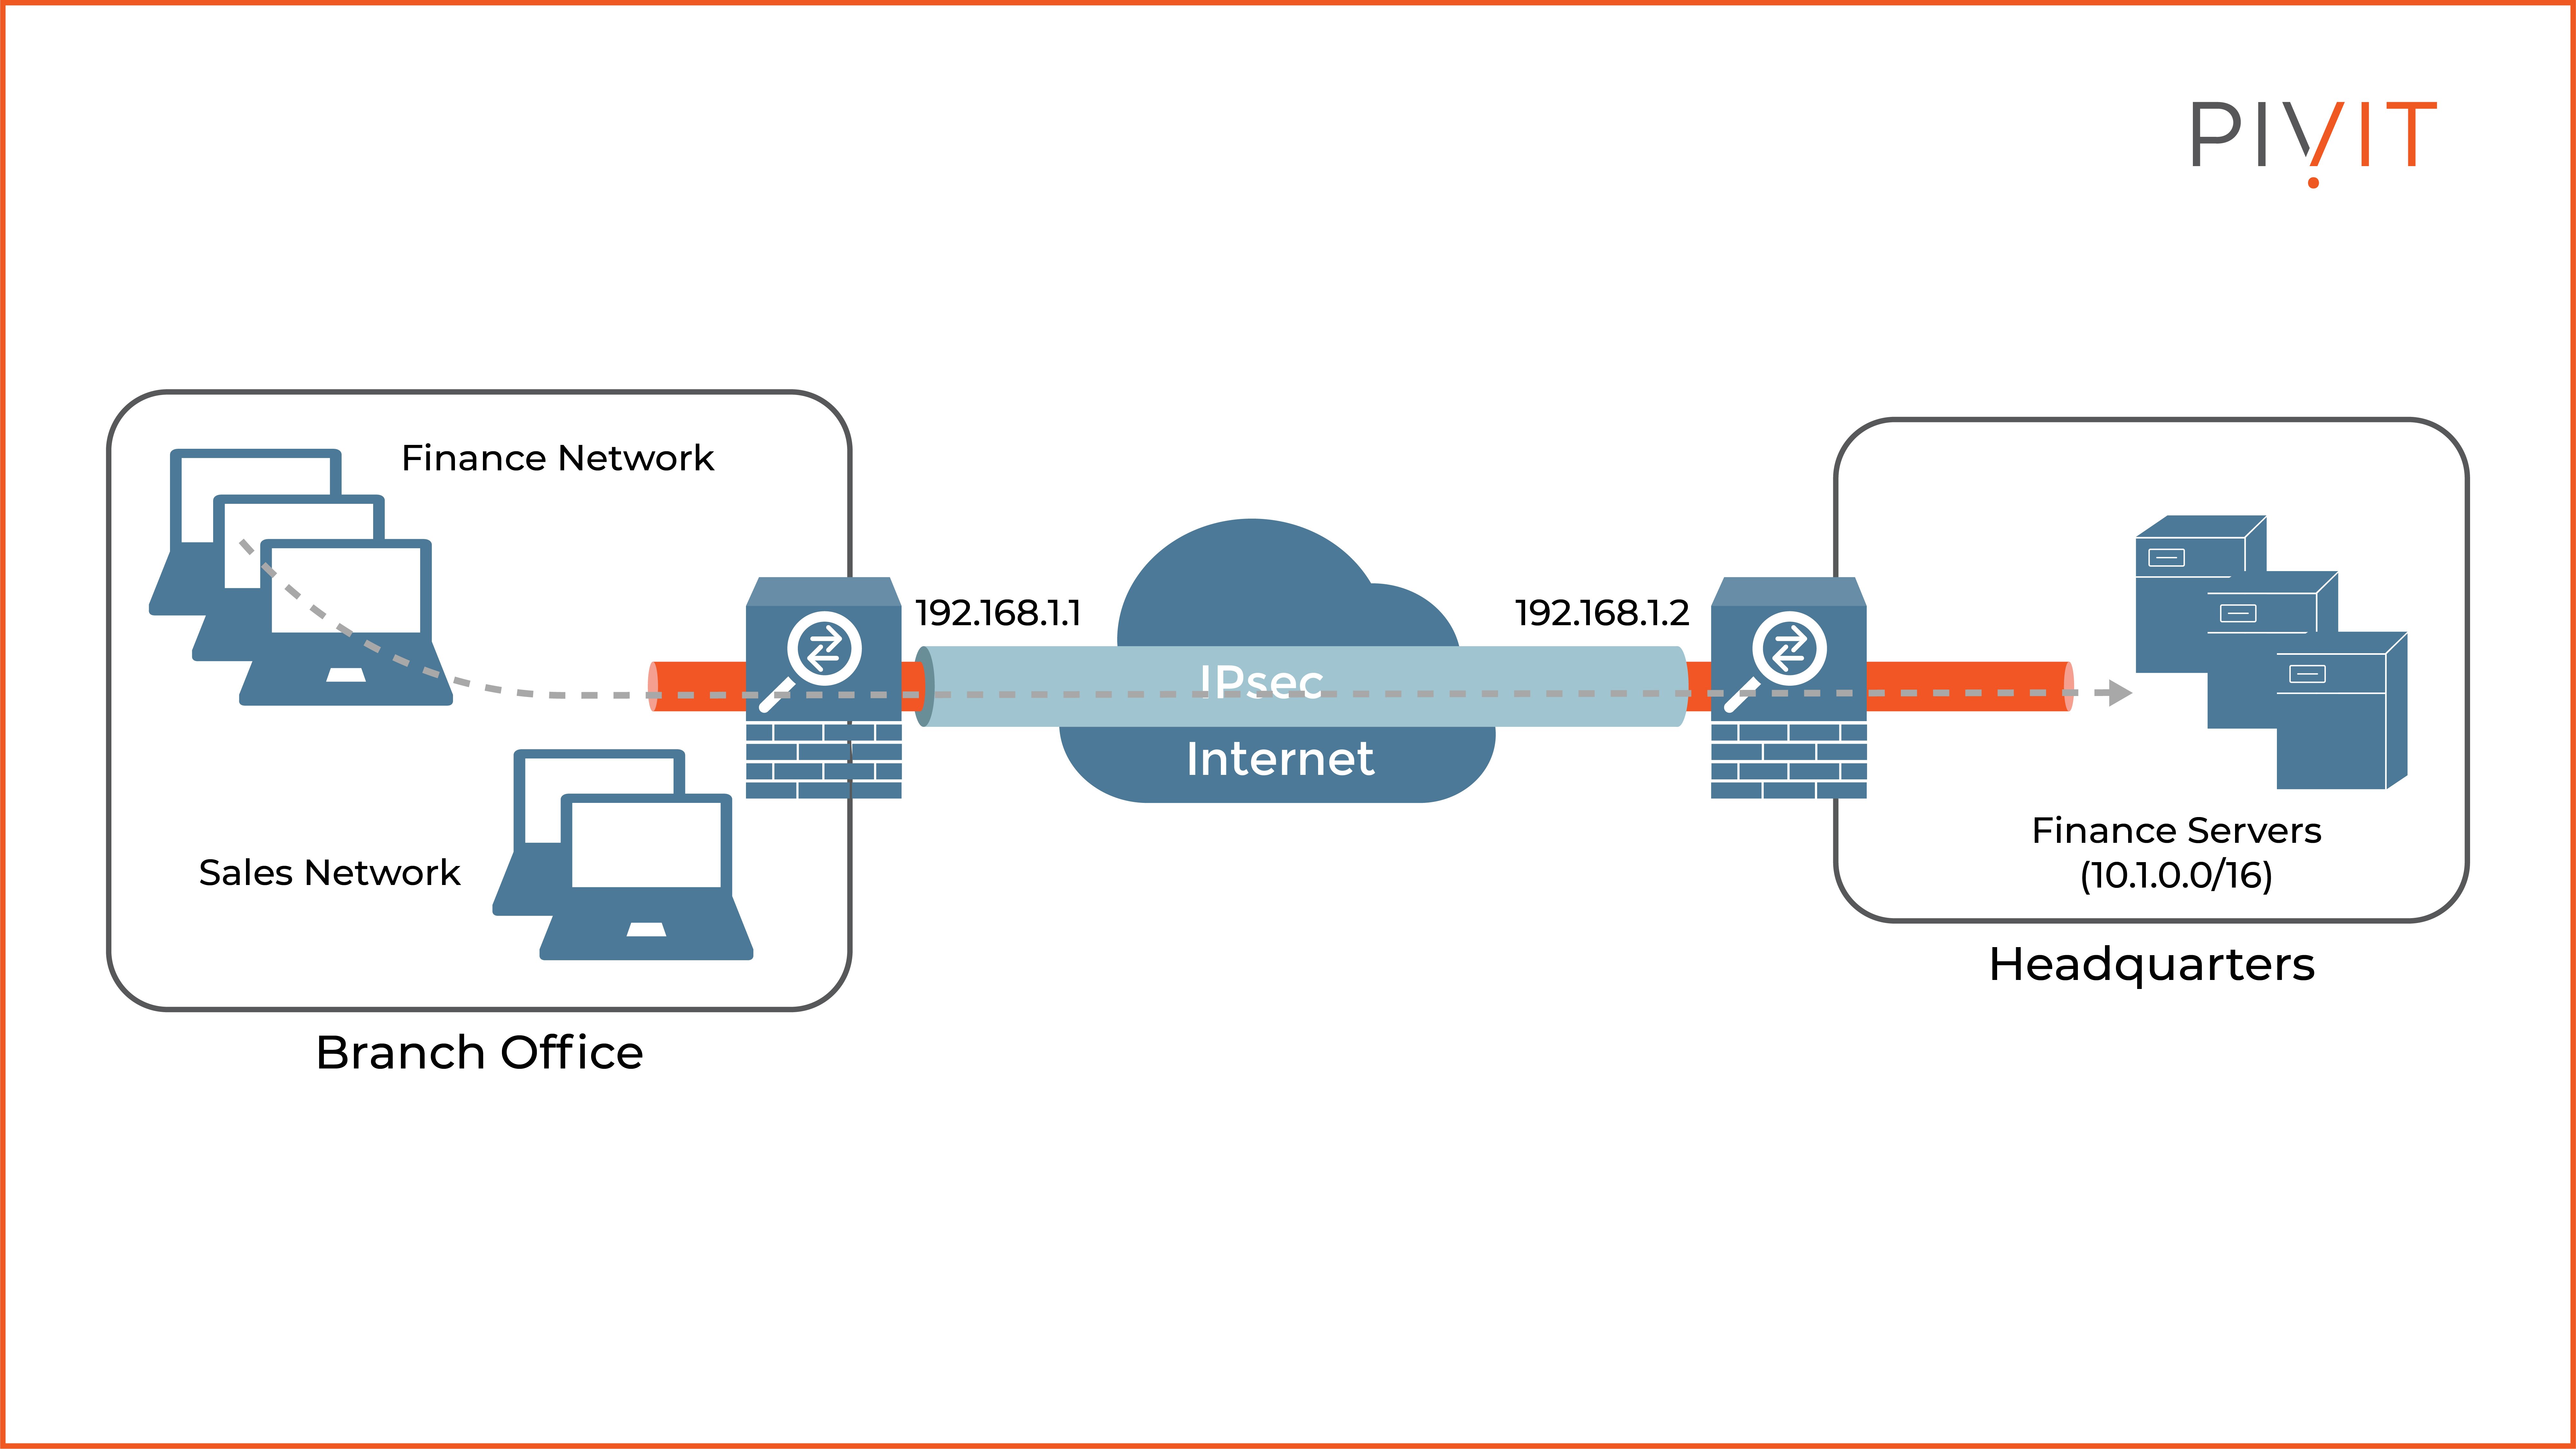
Configuring a site-to-site VPN on a Cisco ASA firewall is no different than configuring it on a Cisco router or Cisco Firepower NGFW firewall. In our use case in the figure below, we will see how it can be deployed on a Cisco ASA in the branch office, so it can establish a VPN to the Cisco ASA in the Headquarters.
This would allow a secure transfer of data between the finance network in the branch office to the finance servers, located behind the ASA firewall at the headquarters.
Recommendation for Pre-deployment
It is very important to have the following information ready before starting with the deployment:
- Peer IP addresses: These are the public IP addresses that both devices will use on the internet. In our case, the branch ASA uses 192.168.1.1, while the headquarters ASA has the IP address of 192.168.1.2.
- Local and remote networks: These are the protected networks. In other words, data going out of these networks will be sent through the VPN tunnel.
- PSK: Peers must have the same pre-shared key to authenticate successfully with each other. However, keep in mind that this authentication solution is not scalable and is suitable for small networks in general. For greater scalability, a preferred authentication method is to use digital certificates.
- ISAKMP policy: A matching policy between the peers must exist for Phase 1 to finish successfully. The matching criteria are encryption, authentication, hashing, Diffie-Hellman Group, and lifetime.
- Transform set: A matching transform set defines how the exchanged data will be protected. It is recommended to use at least AES-128bit for encryption and SHA-256 for hashing.
Configuration Steps on a Cisco ASDM for Implementing Site-to-Site VPN
Configuring a site-to-site VPN on a Cisco ASA firewall can be done in two different ways. The first approach is by using the CLI (which is the more difficult option because you must know the exact commands) while the other is to use the Adaptive Security Device Manager (ASDM) management tool, which allows the Cisco ASA to be managed through a graphical user interface.
However, if the ASDM is selected for configuring the VPN, there are not one but three different approaches that can be used. The first two options rely on a manual configuration and you can use the advanced menus or the connection profiles menus, which most of the time is the preferred method.
The last one offers an automated procedure to get the same result in a much easier way by using the site-to-site VPN wizard. In our use case, we will use this automated option, so let’s go step by step and take a look at how simple the configuration process is.
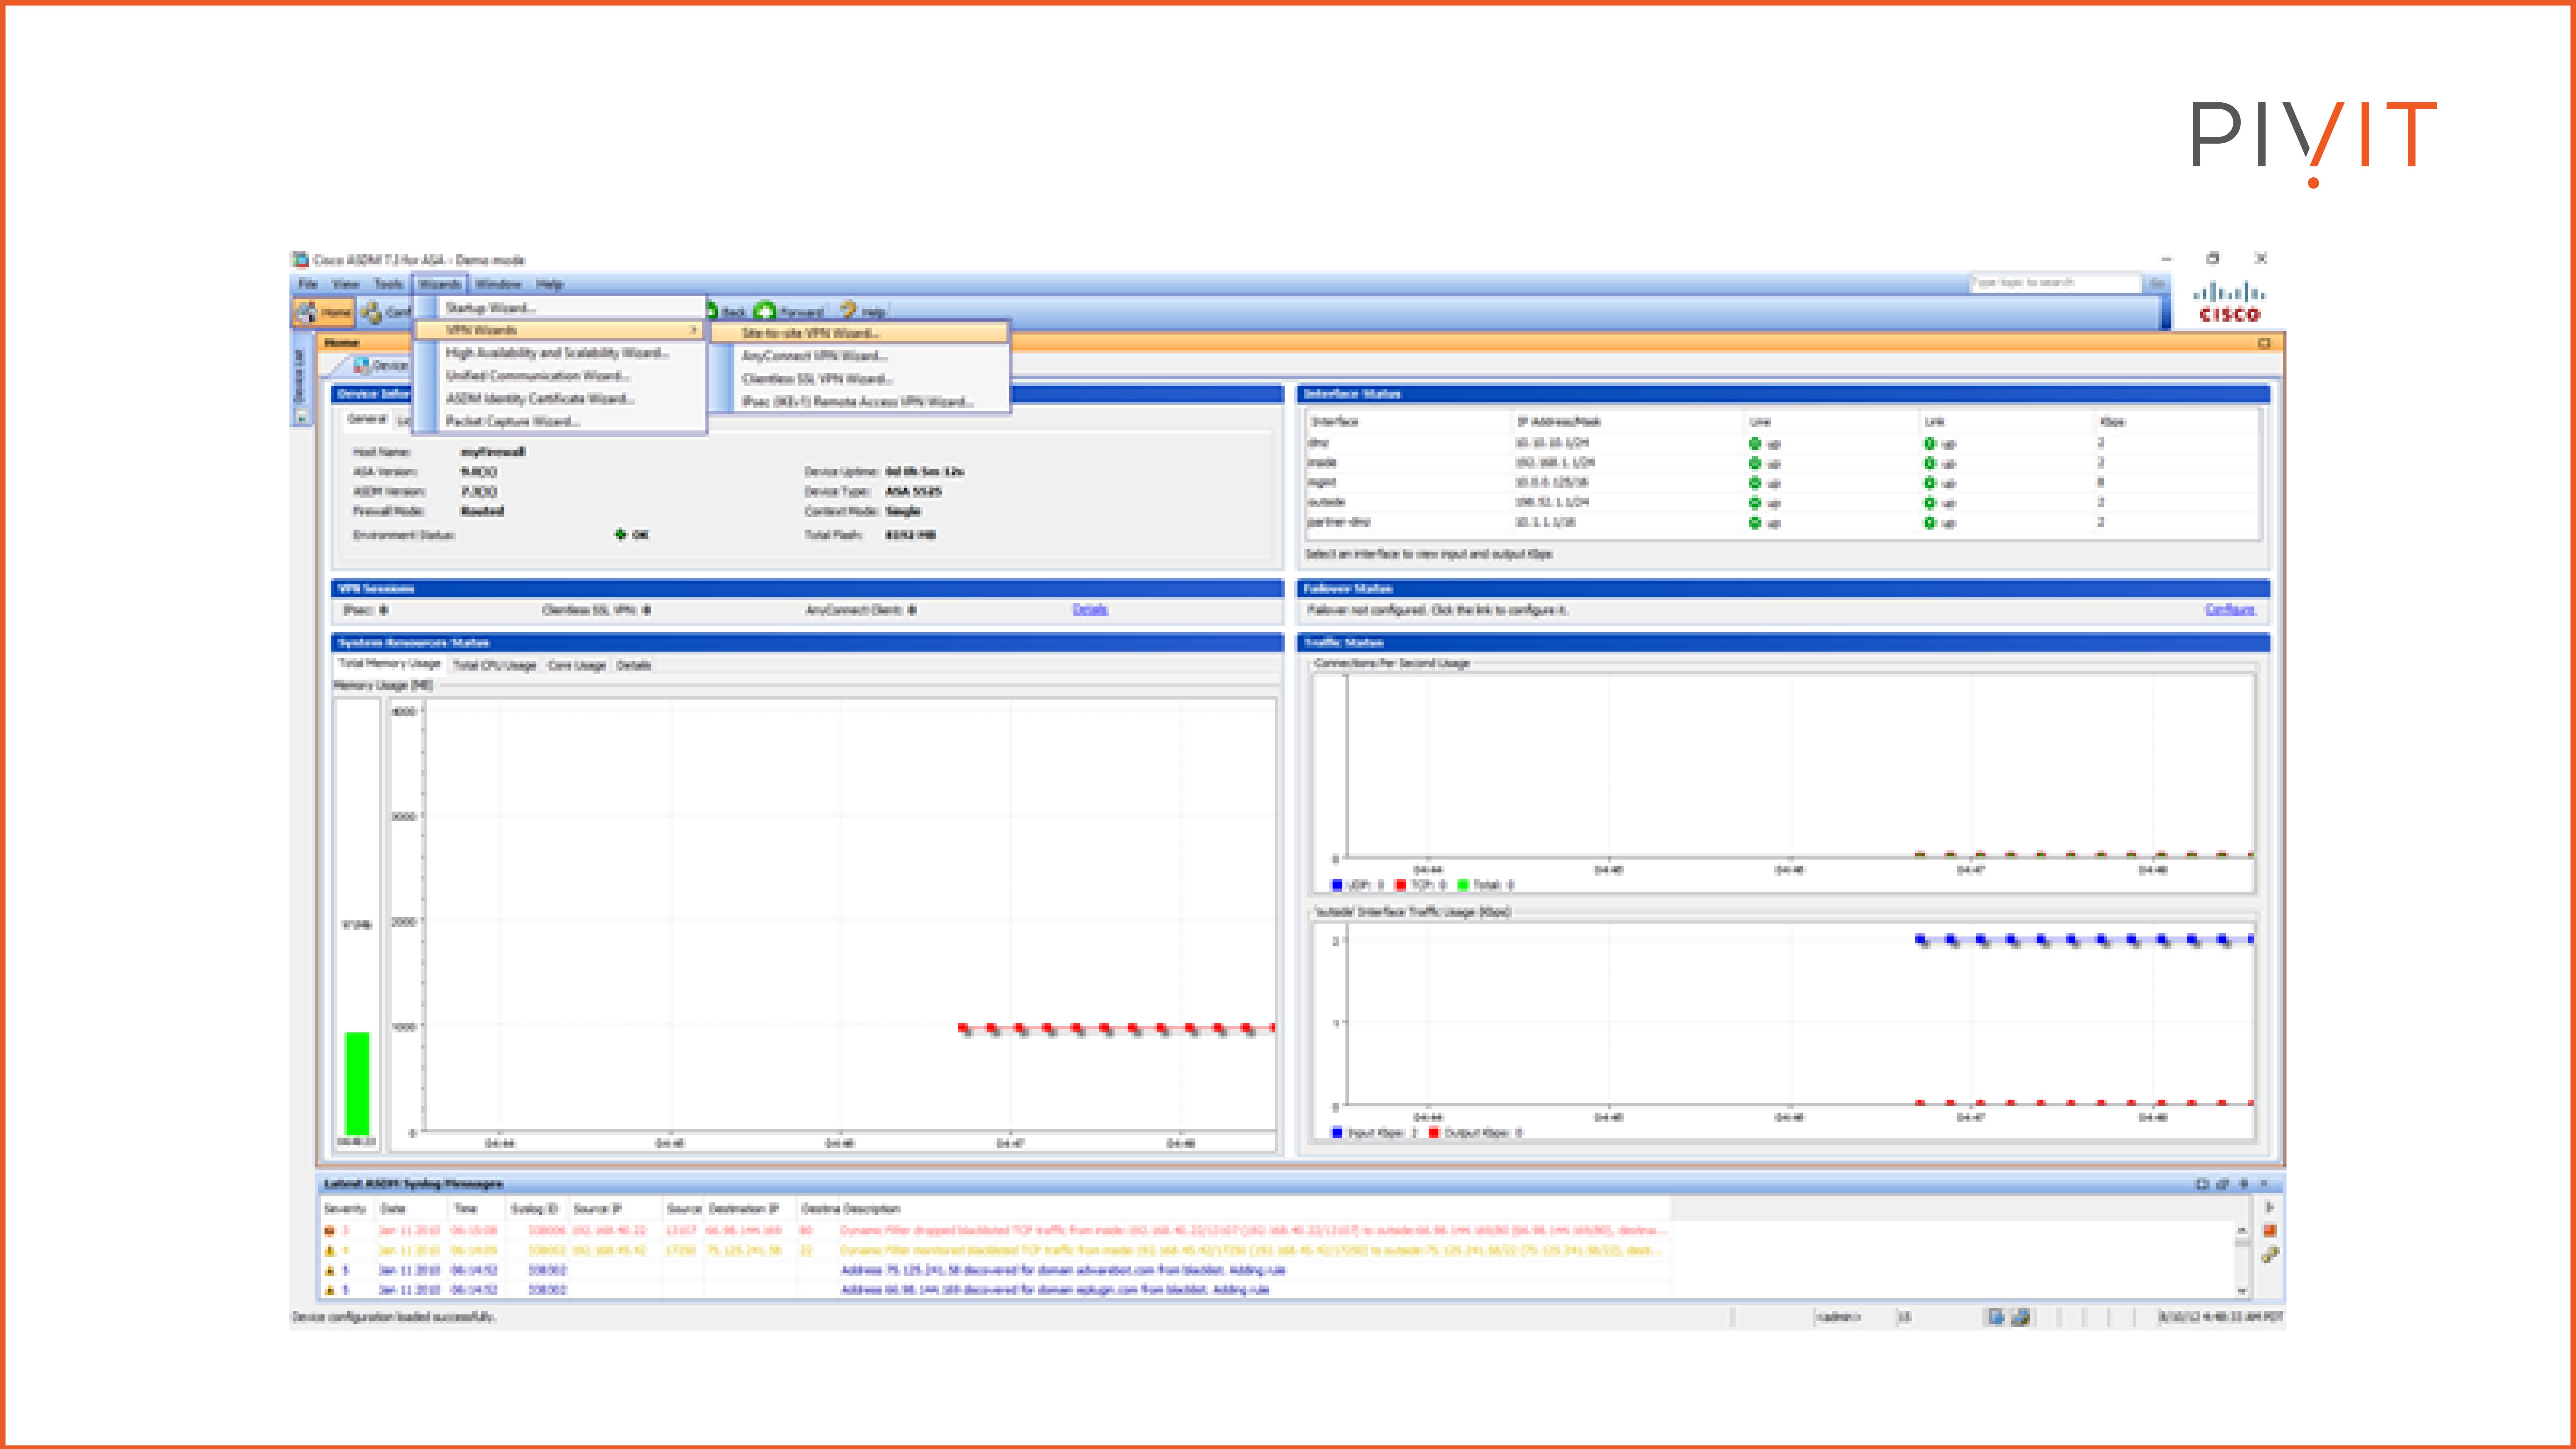
As you can notice, there are multiple VPN wizards available to choose from, however, we will choose the site-to-site VPN wizard.
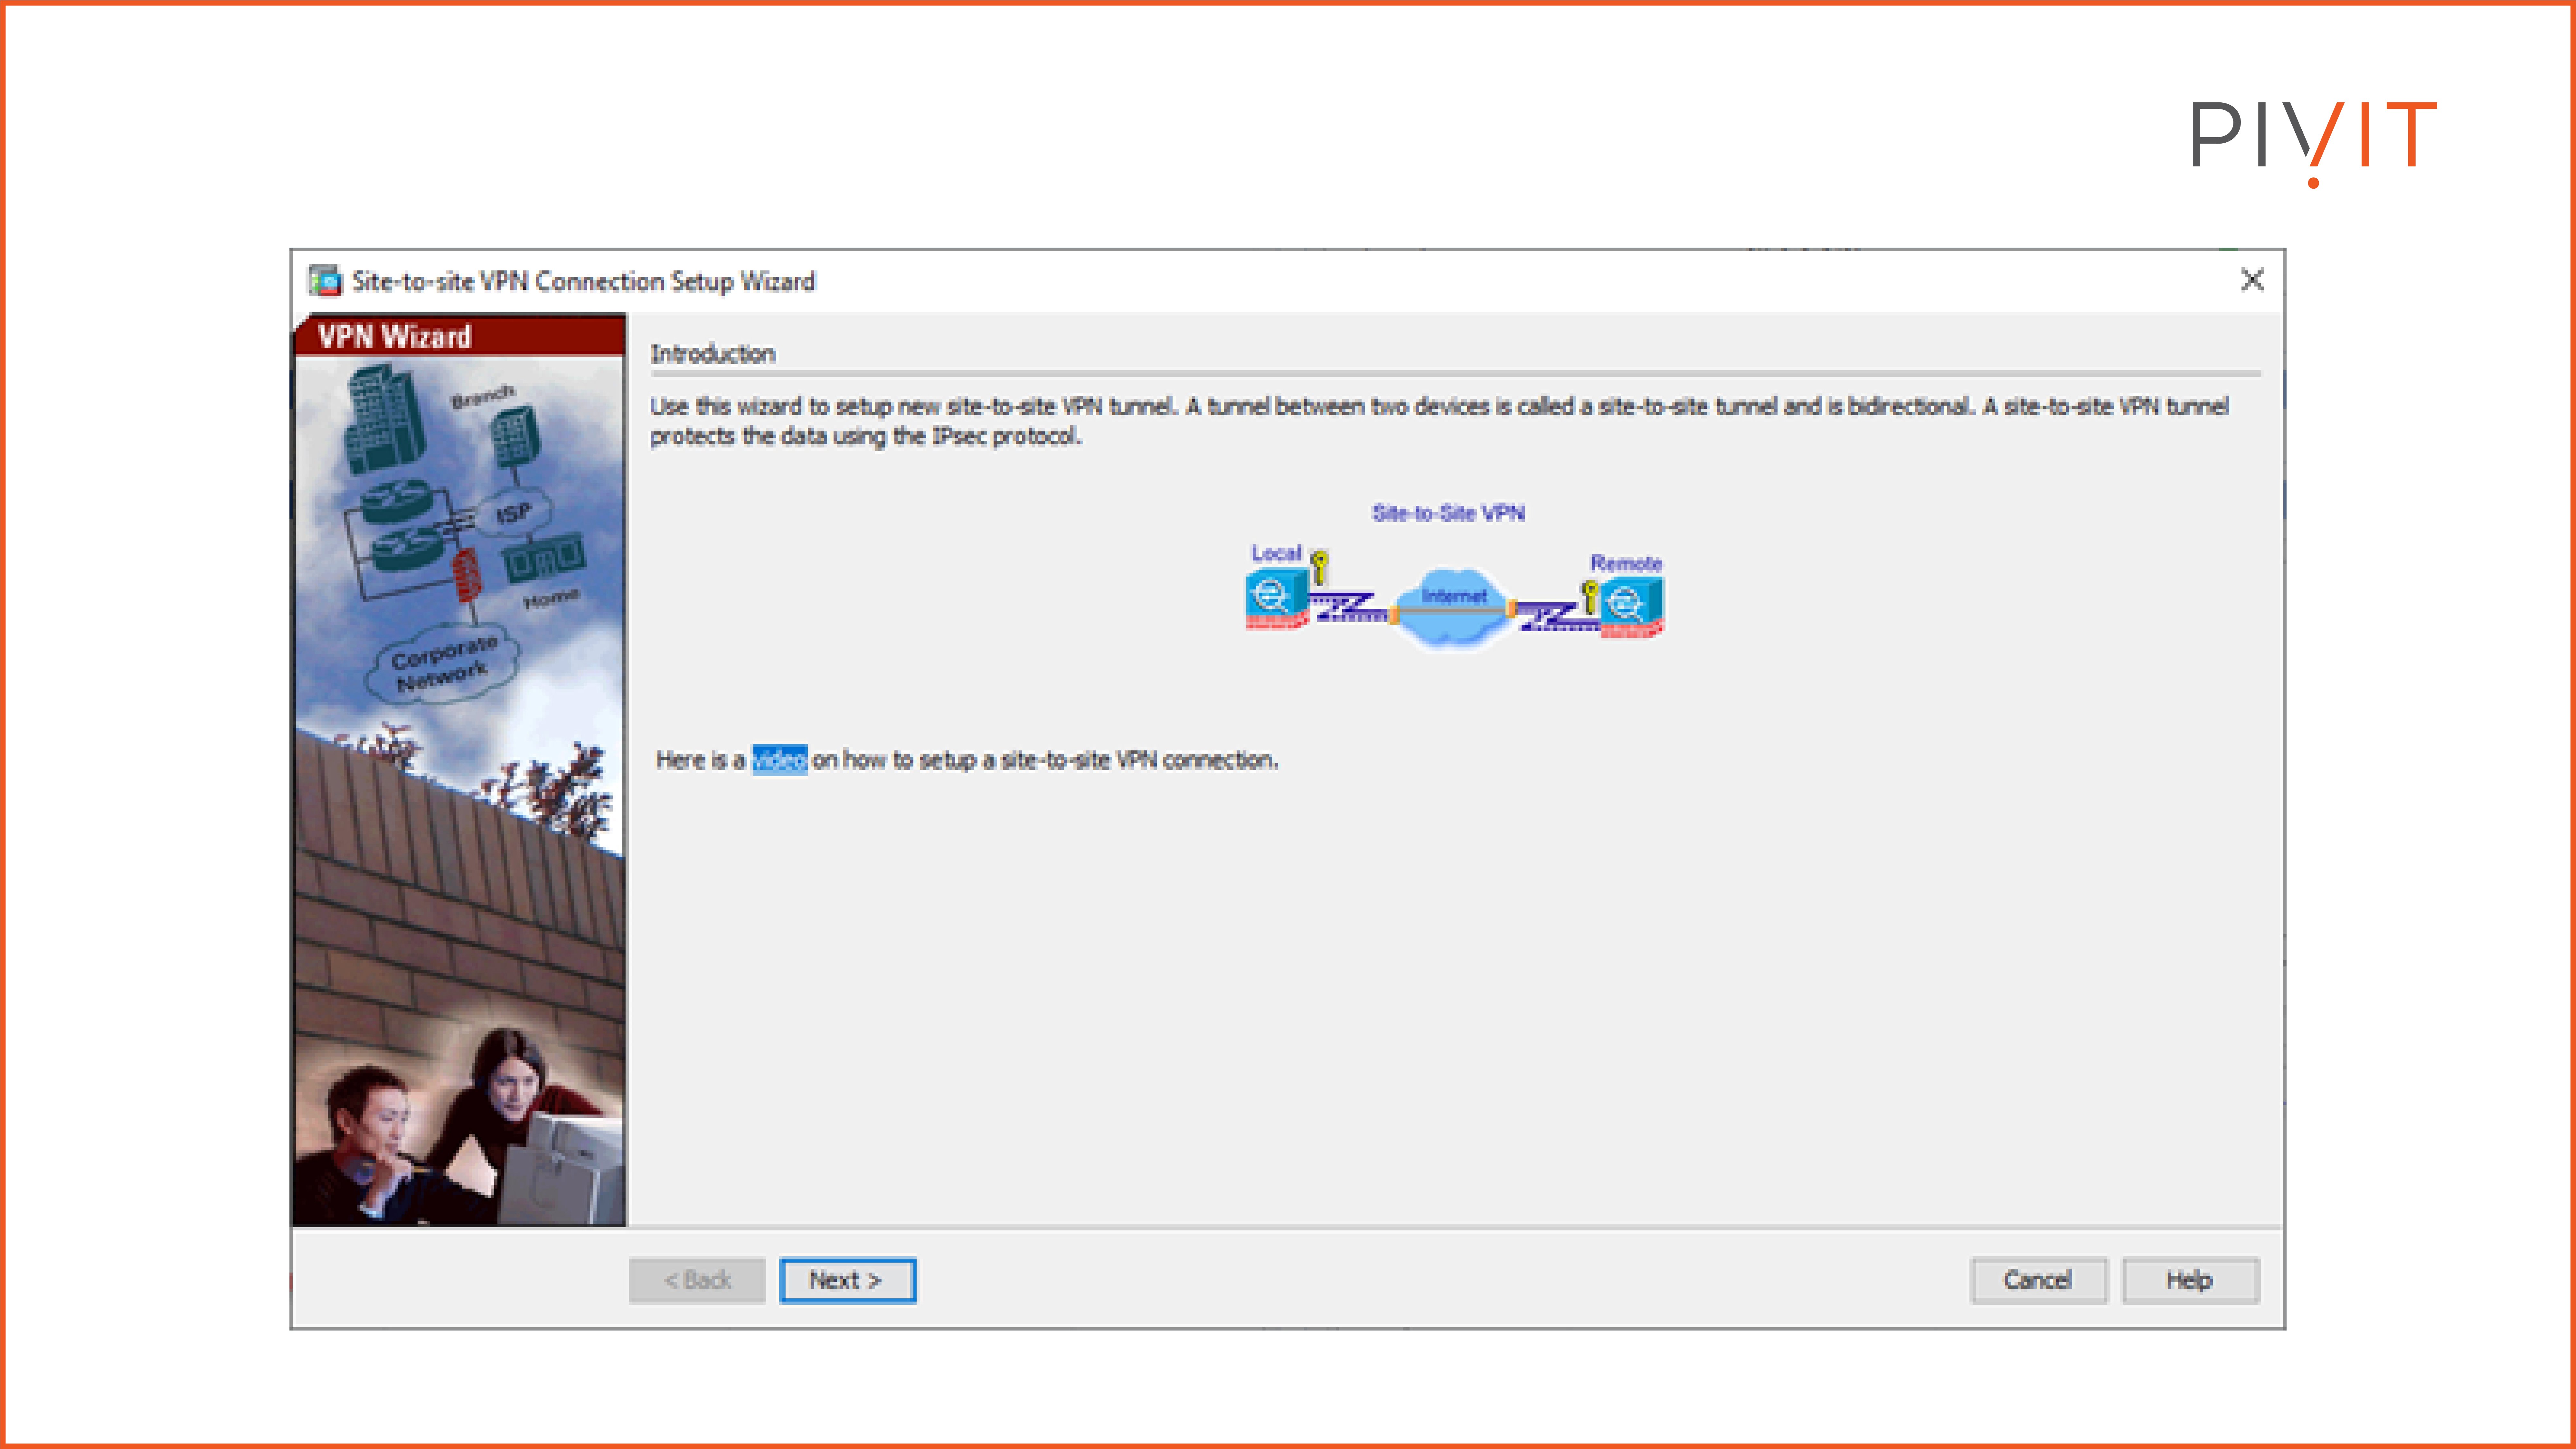
The first step (introduction) after you start the site-to-site VPN wizard provides optional guidance on how to use the wizard, however, we will skip that part and go “next.”
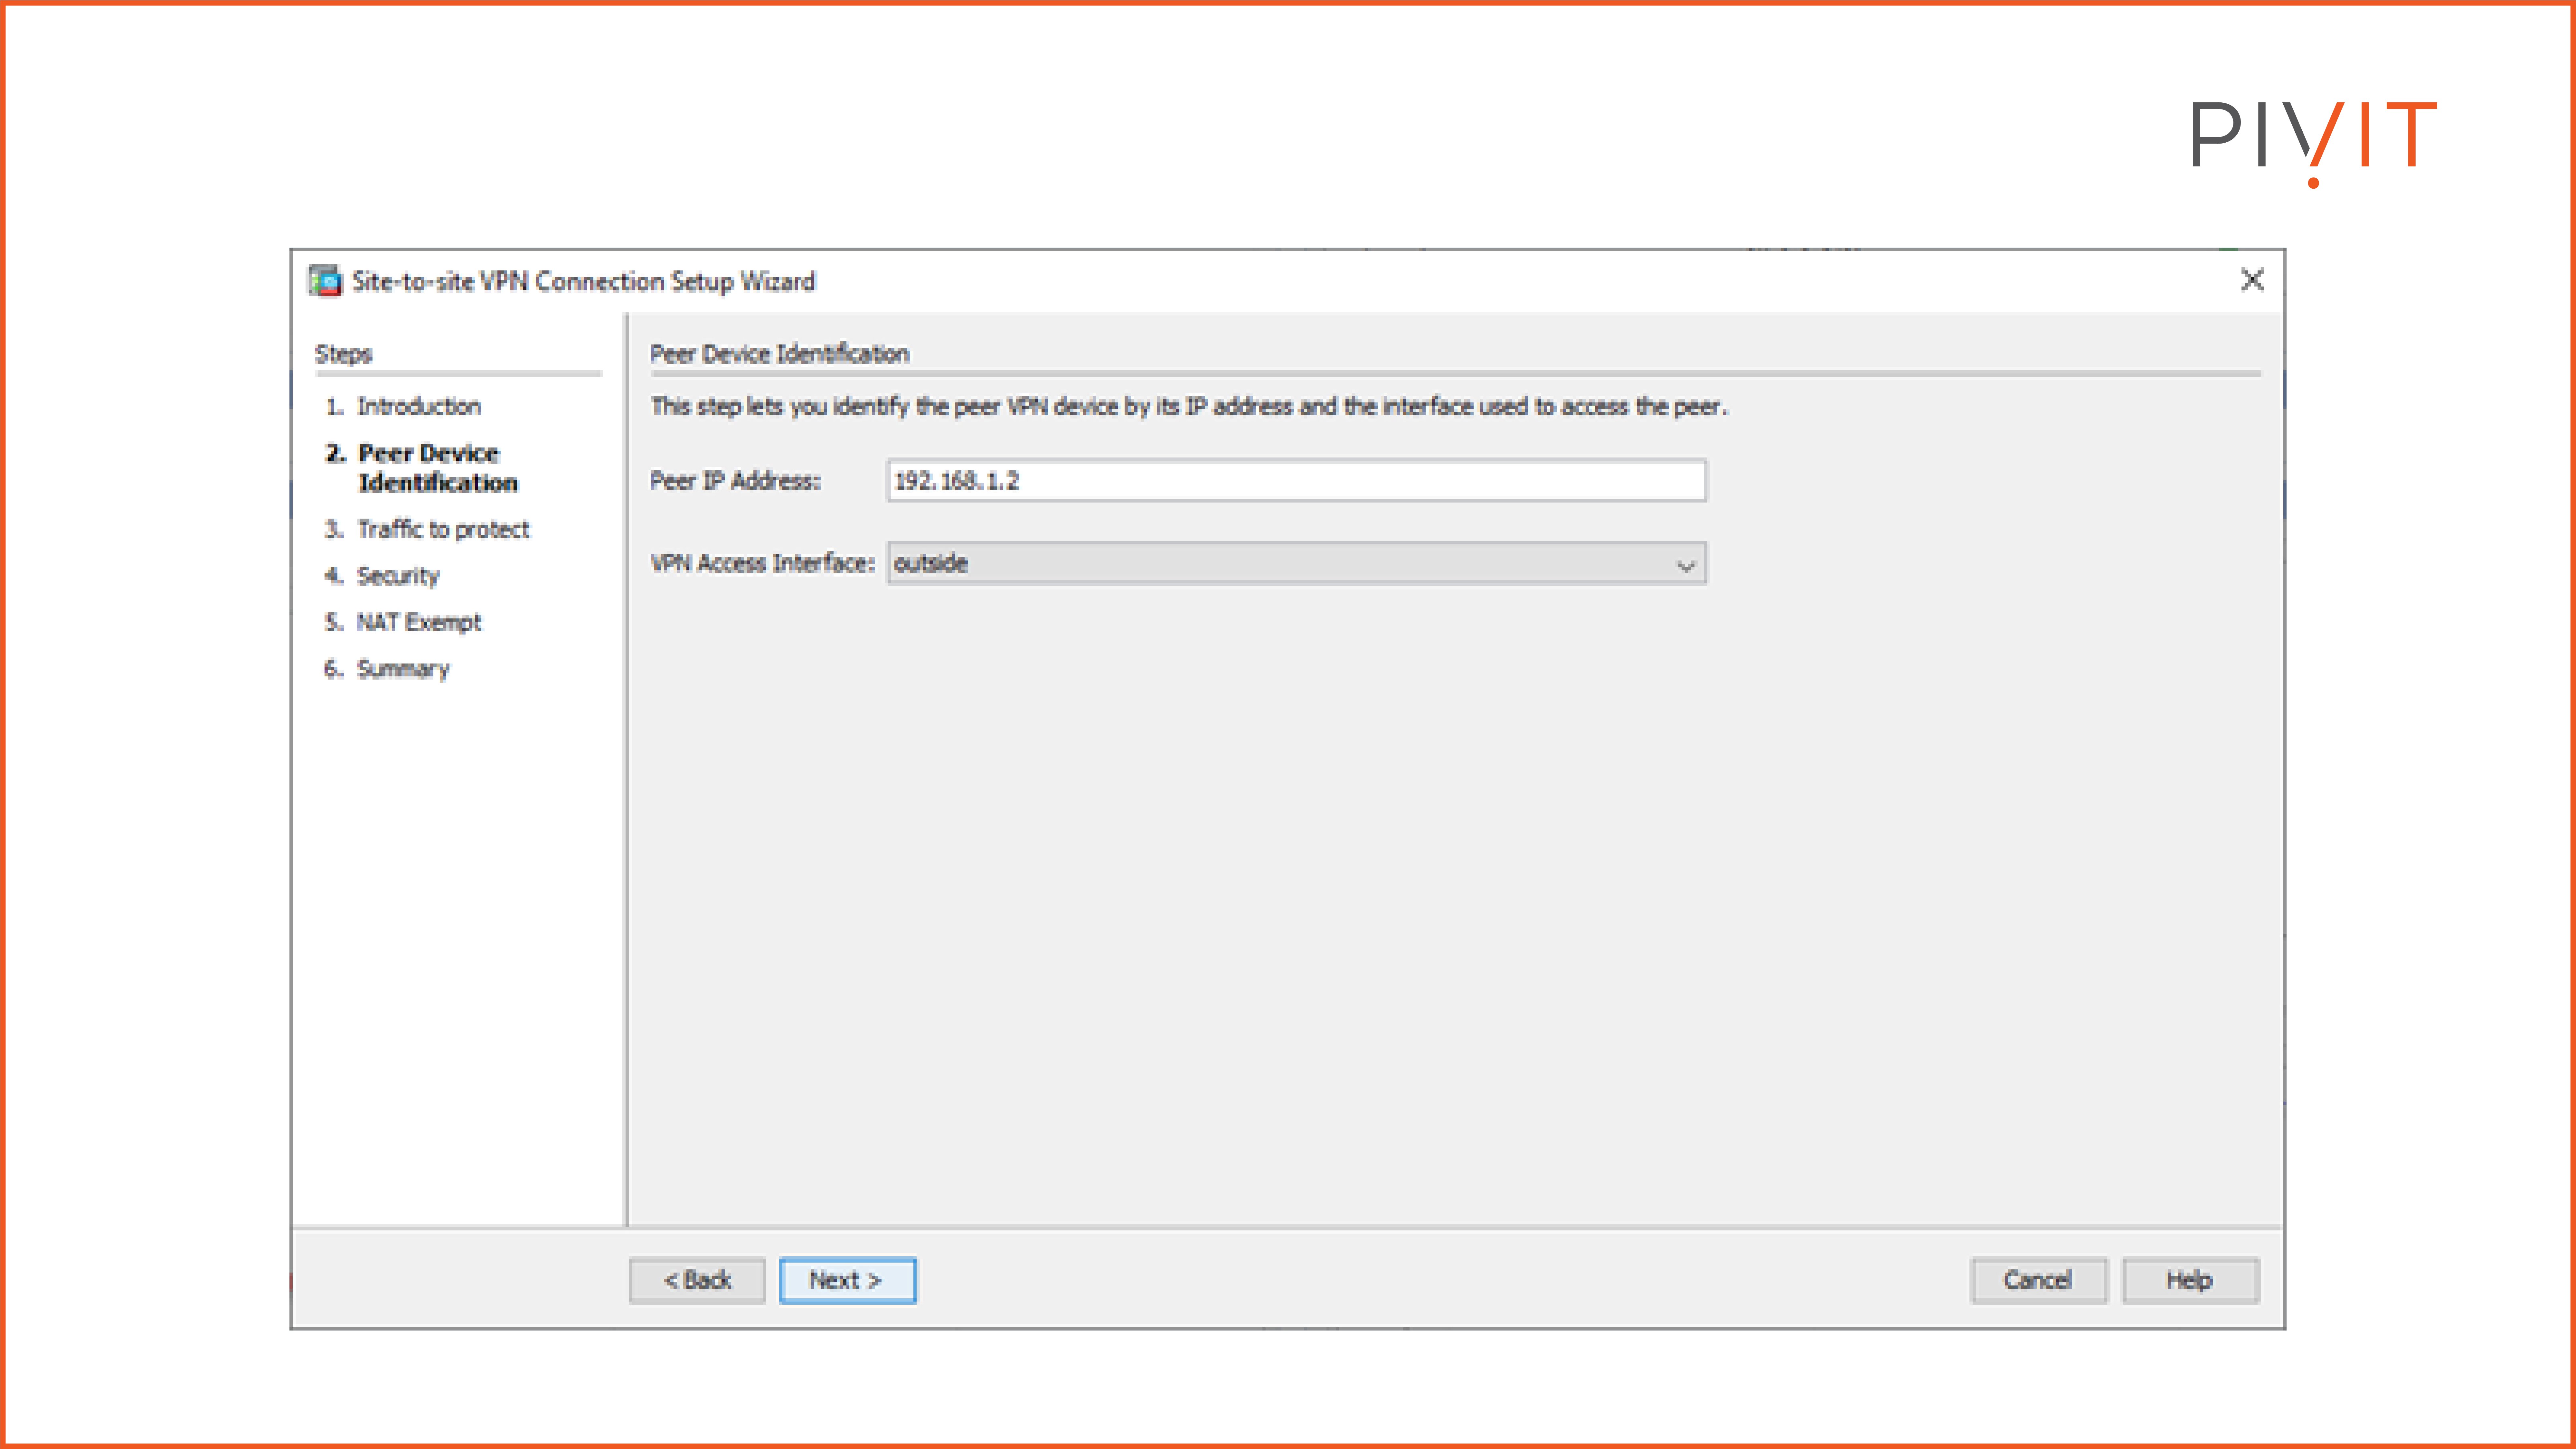
The second step is the start of the site-to-site VPN configuration. It requires providing the peer IP address and the local exit interface that will be used to connect to the peer.
In our case, the IP address of the peer device (headquarters ASA) is 192.168.1.2 and the local interface that will be used on the branch ASA is “outside.” Keep in mind that when using Cisco ASA, the interfaces are represented by names.
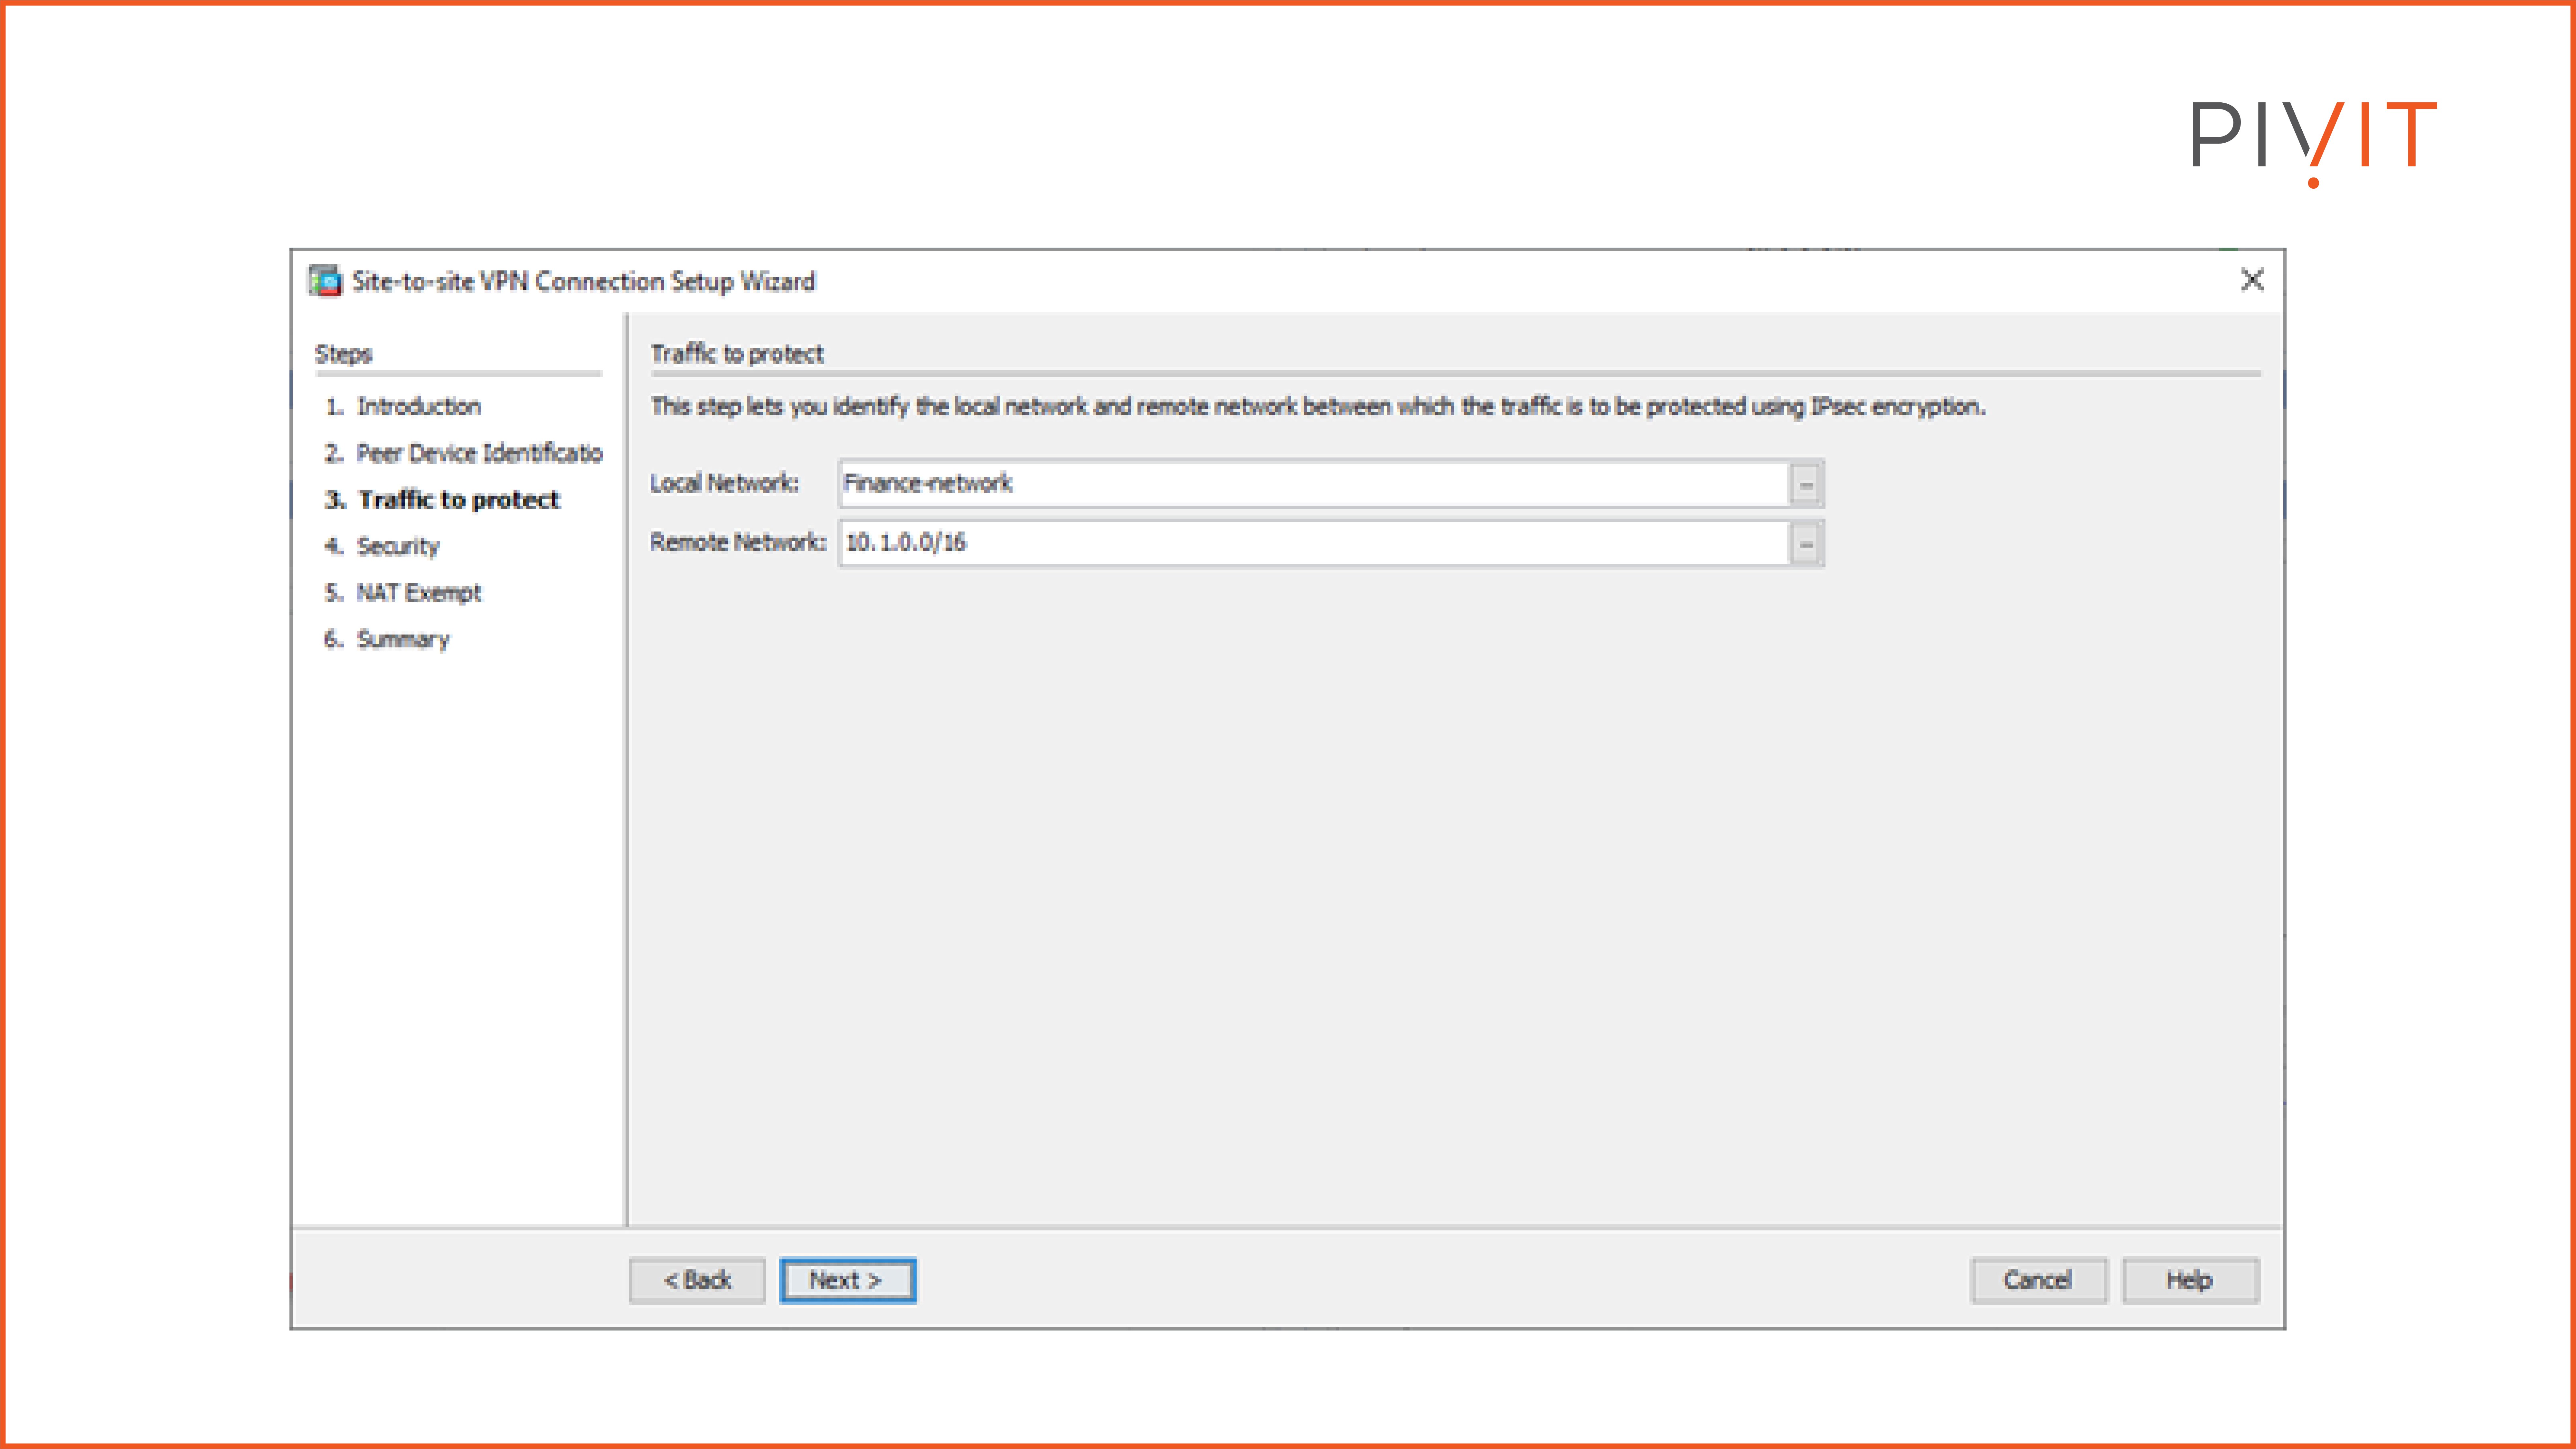
In the third step, we need to define the local and remote networks that will be protected by the IPsec VPN. In our case, the local network behind the branch ASA is the Finance network (an object that represents the IP network), while the remote network behind the headquarters ASA is 10.1.0.0/16, where the finance servers belong.
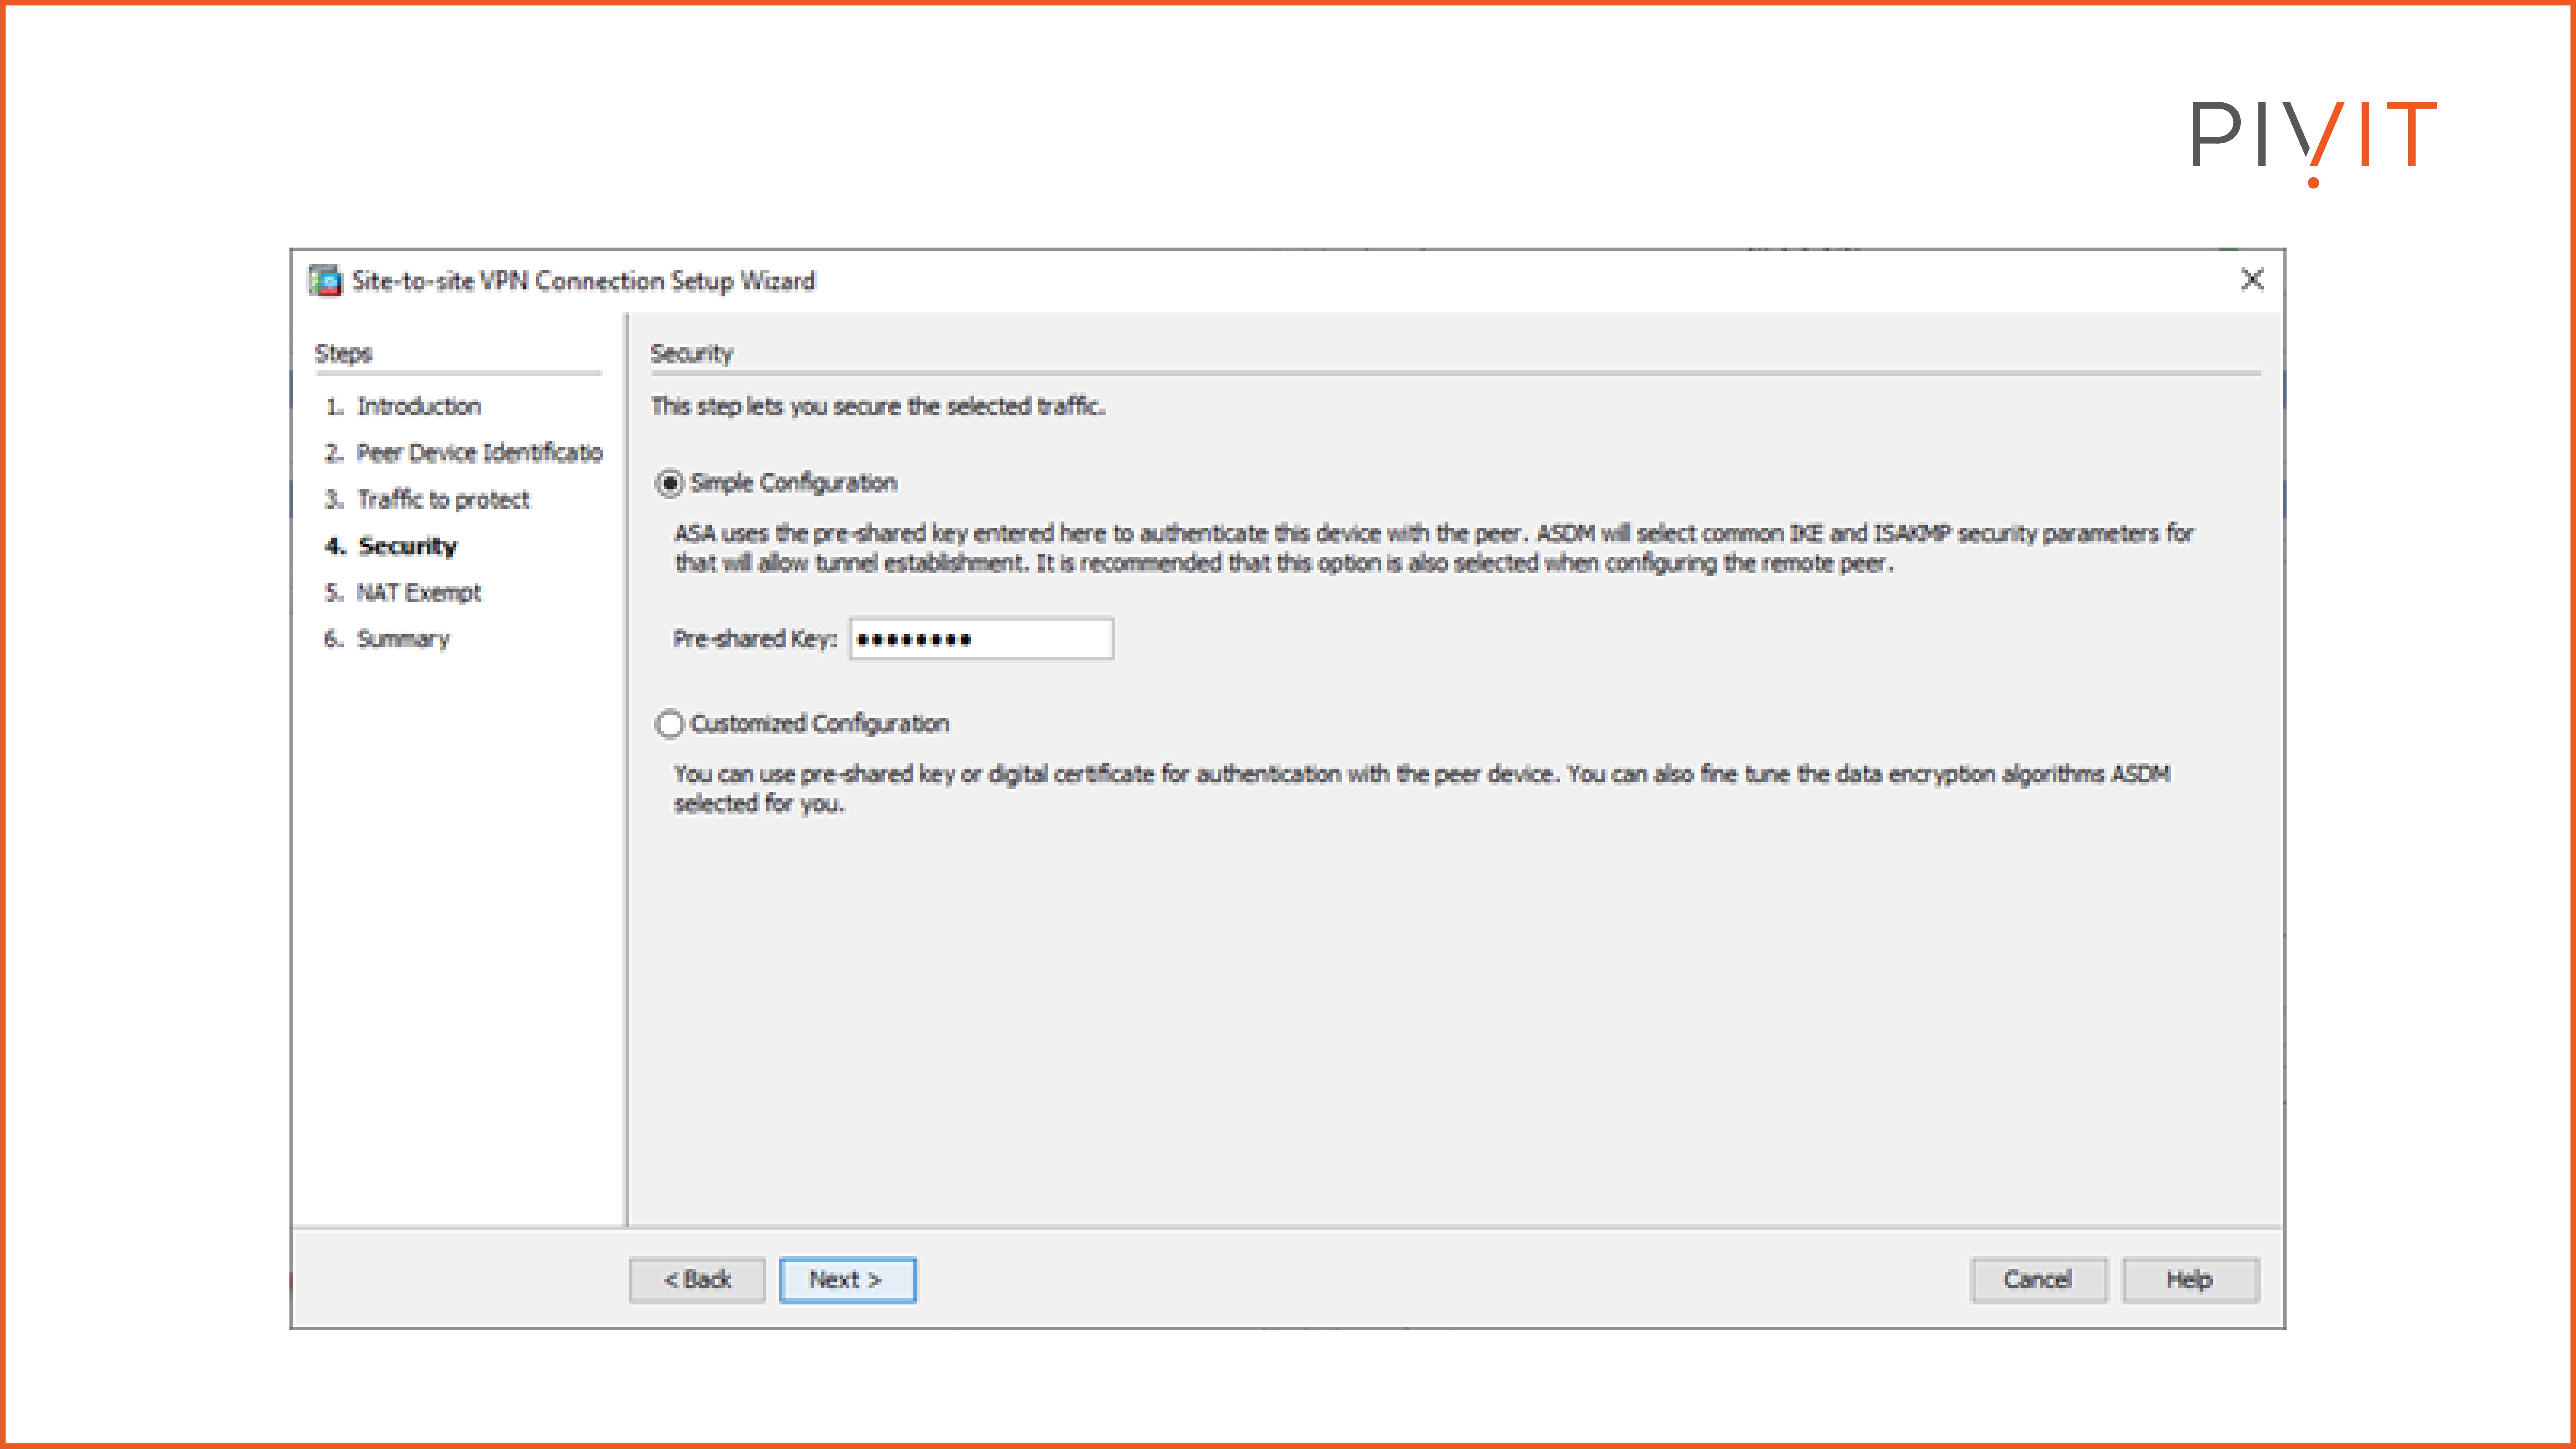
The fourth step is about defining the authentication method. In our case, we will choose a simple configuration, therefore the correct pre-shared key must be applied.
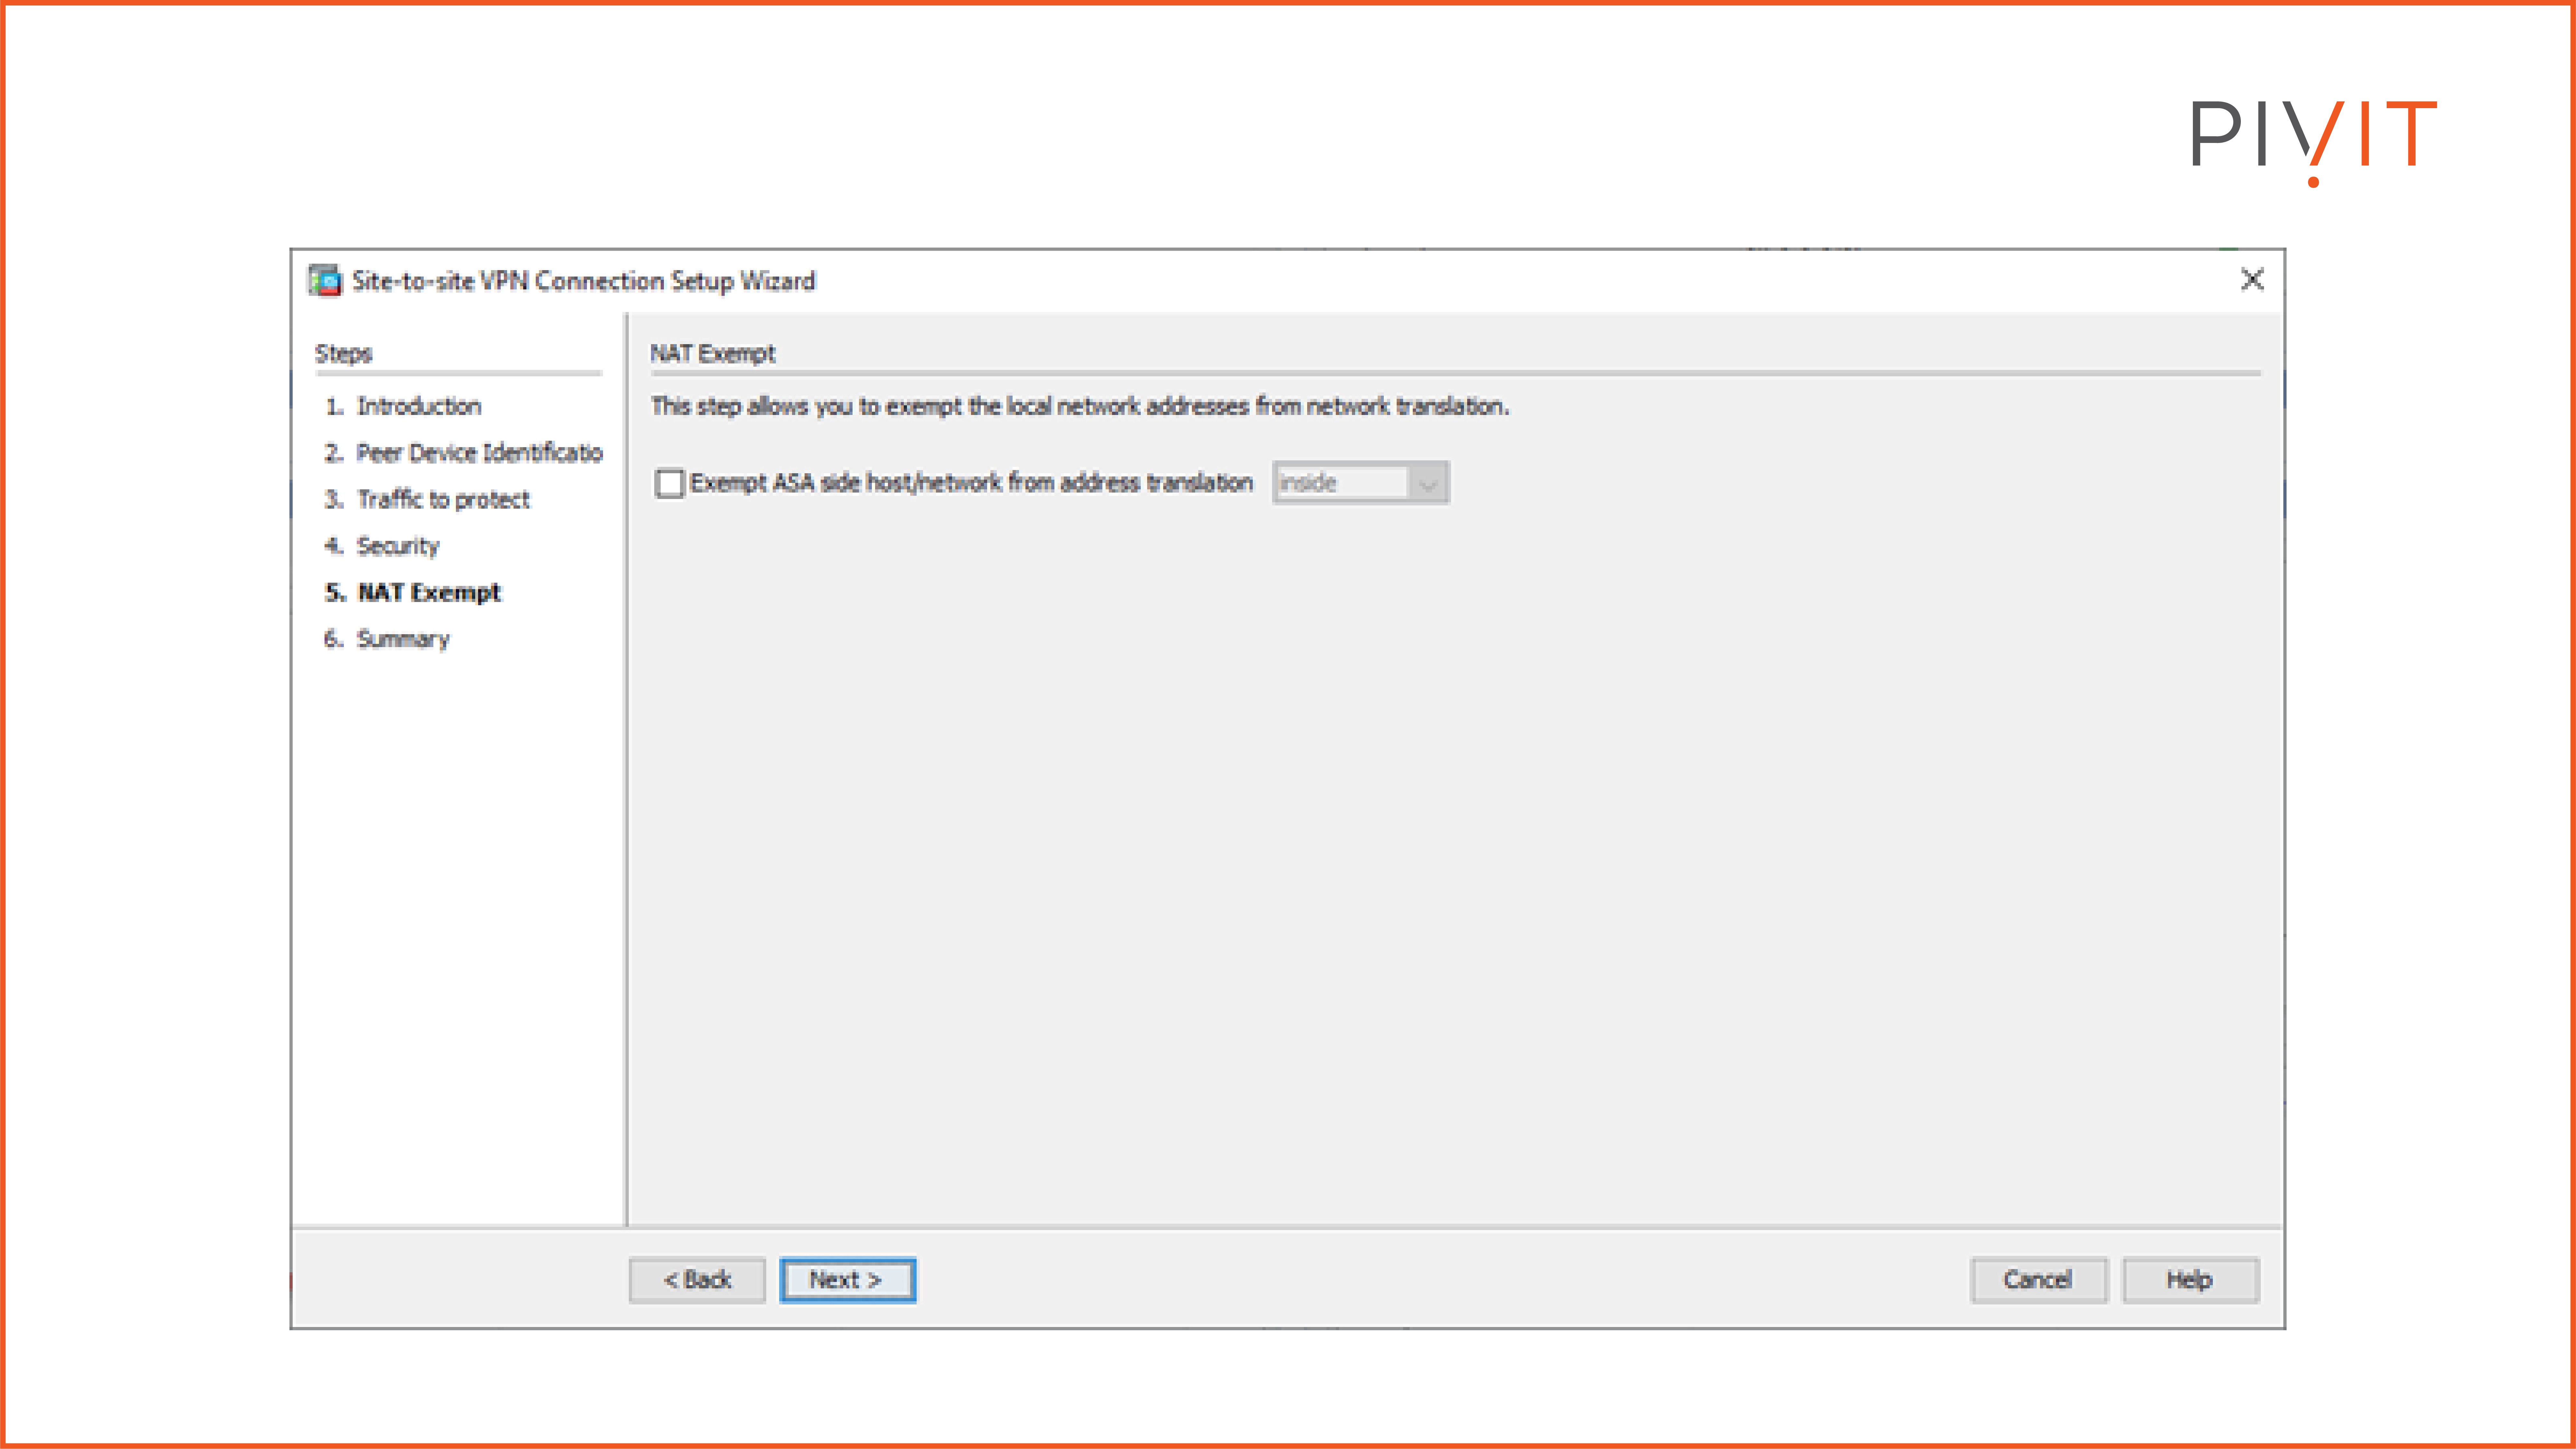
The last step is all about network address translation (NAT). If it is required, here you can exempt local hosts or networks from NAT.
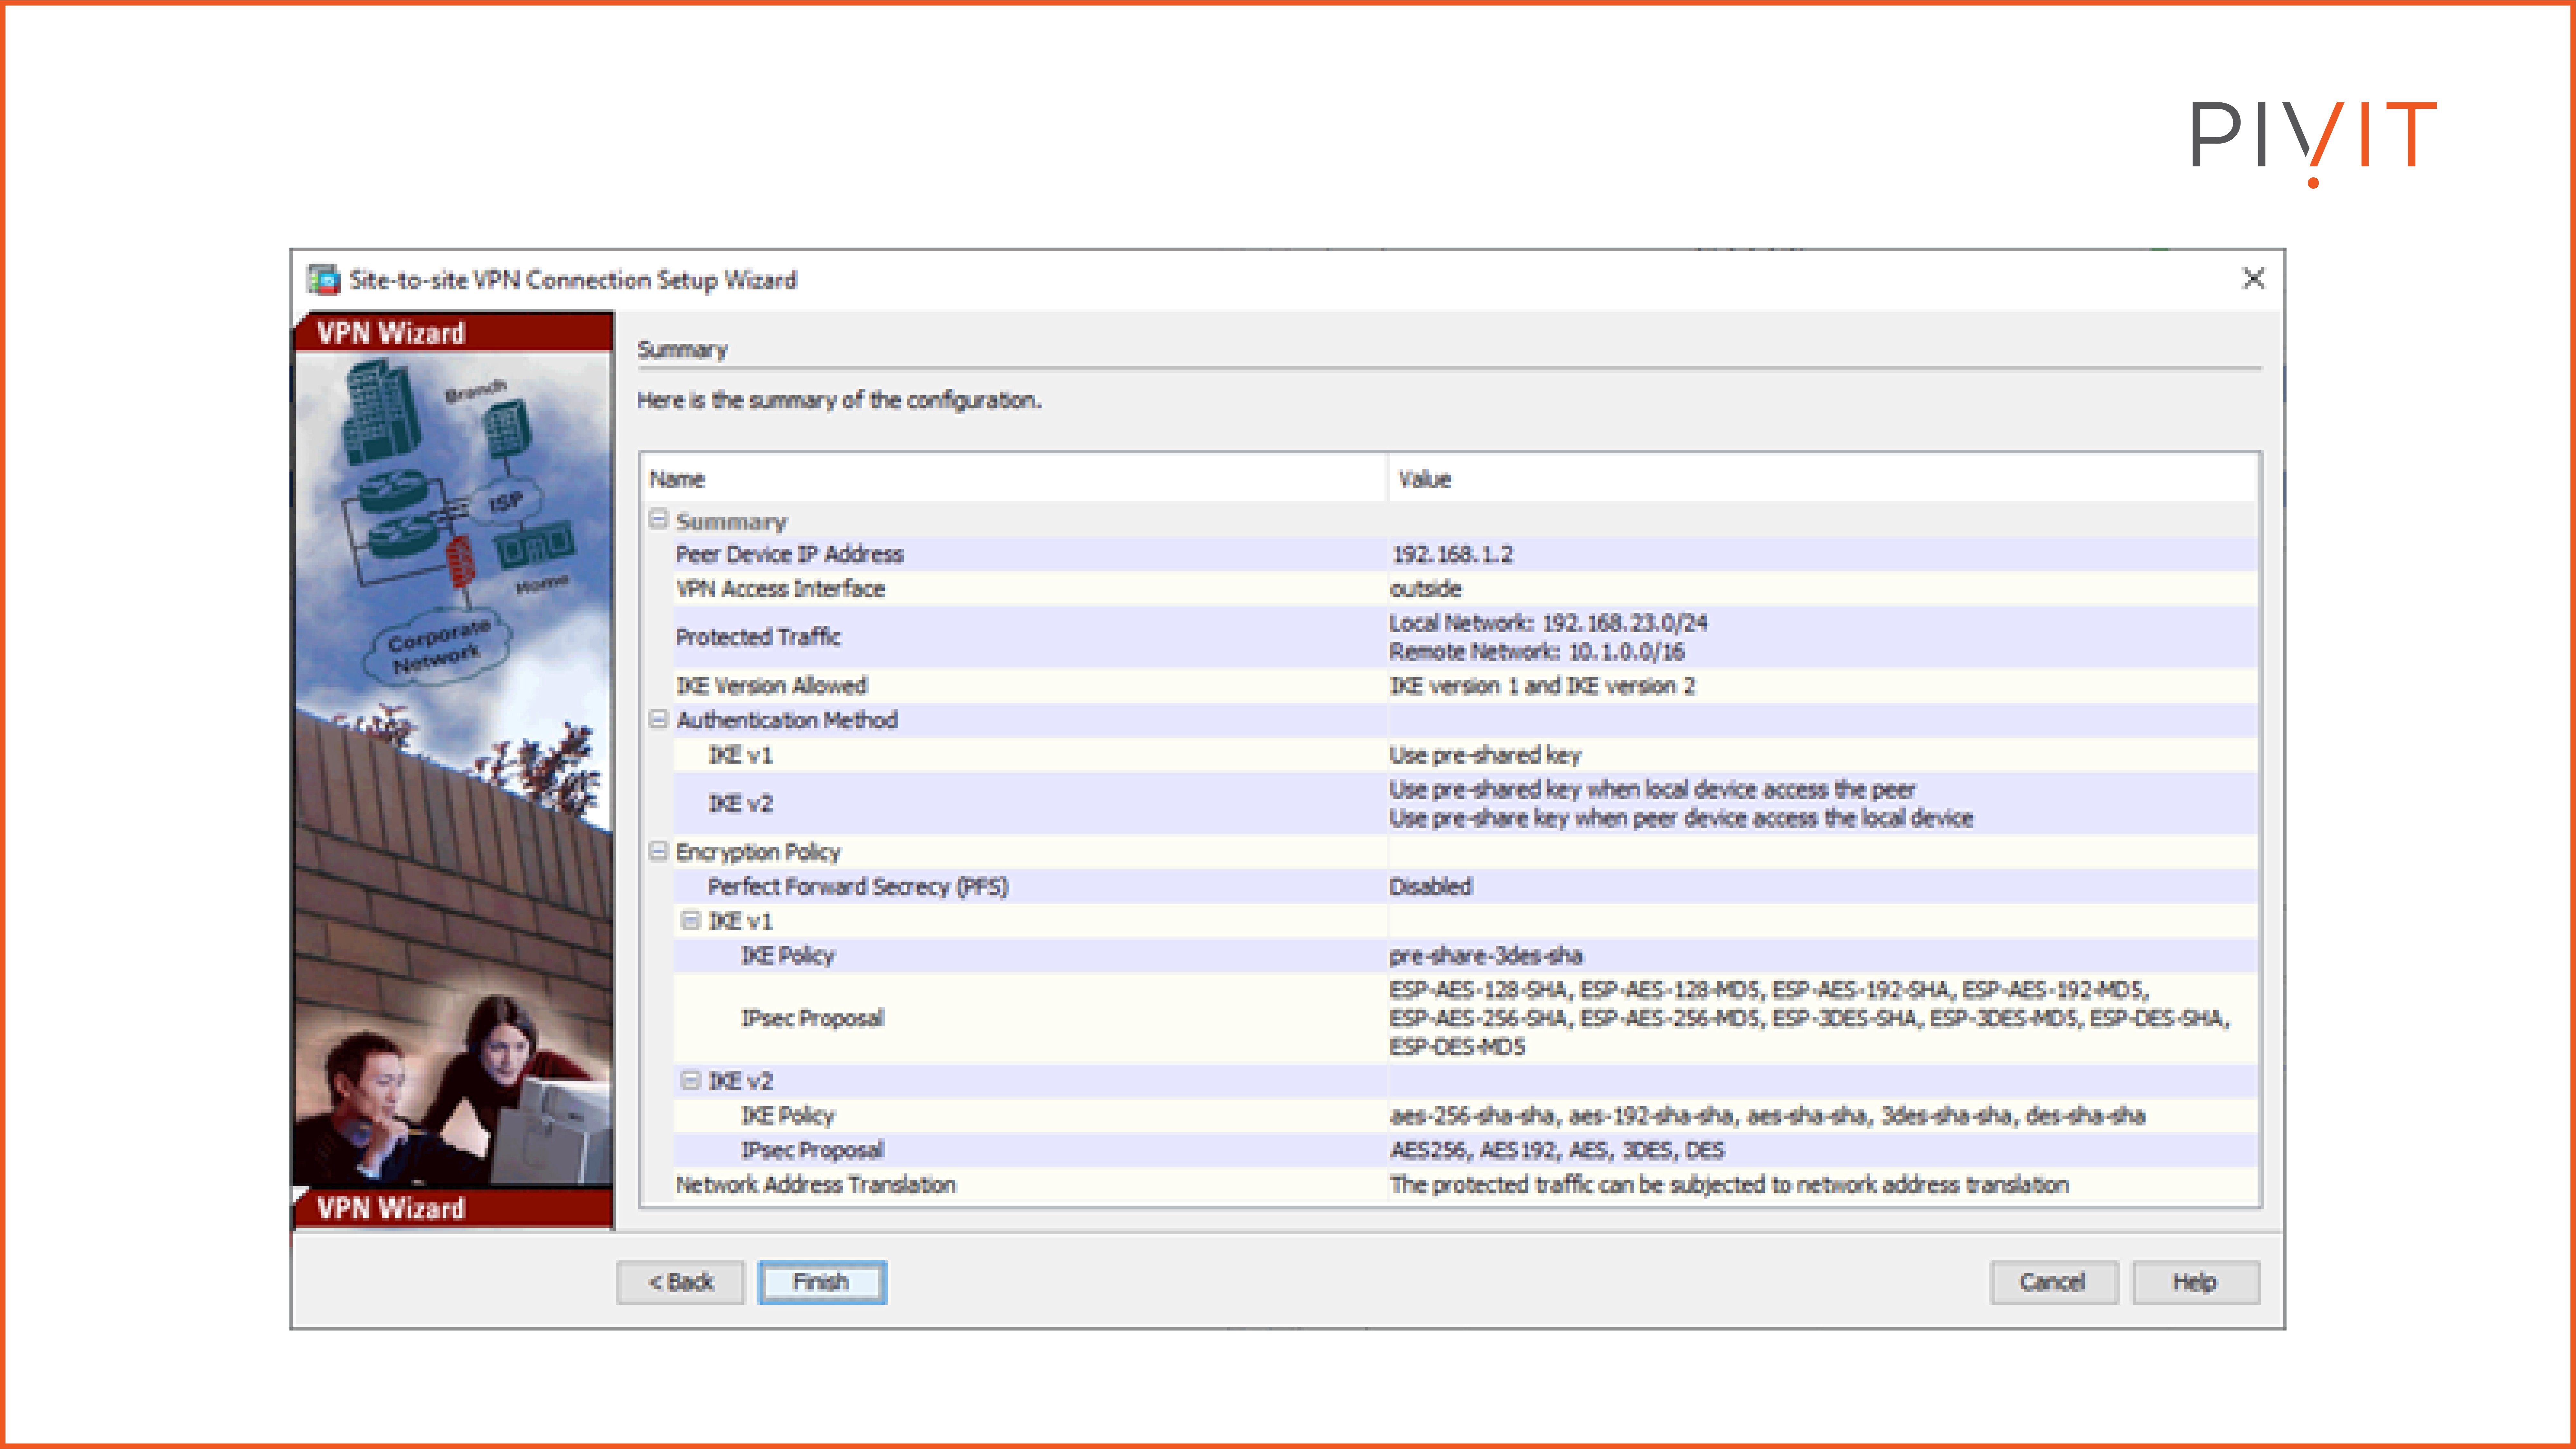
When we finish with the configuration steps, a summary of the configuration is displayed. It contains all data that has been defined during the configuration steps and the cryptographic algorithms that are supported and can be used in the VPN deployment.
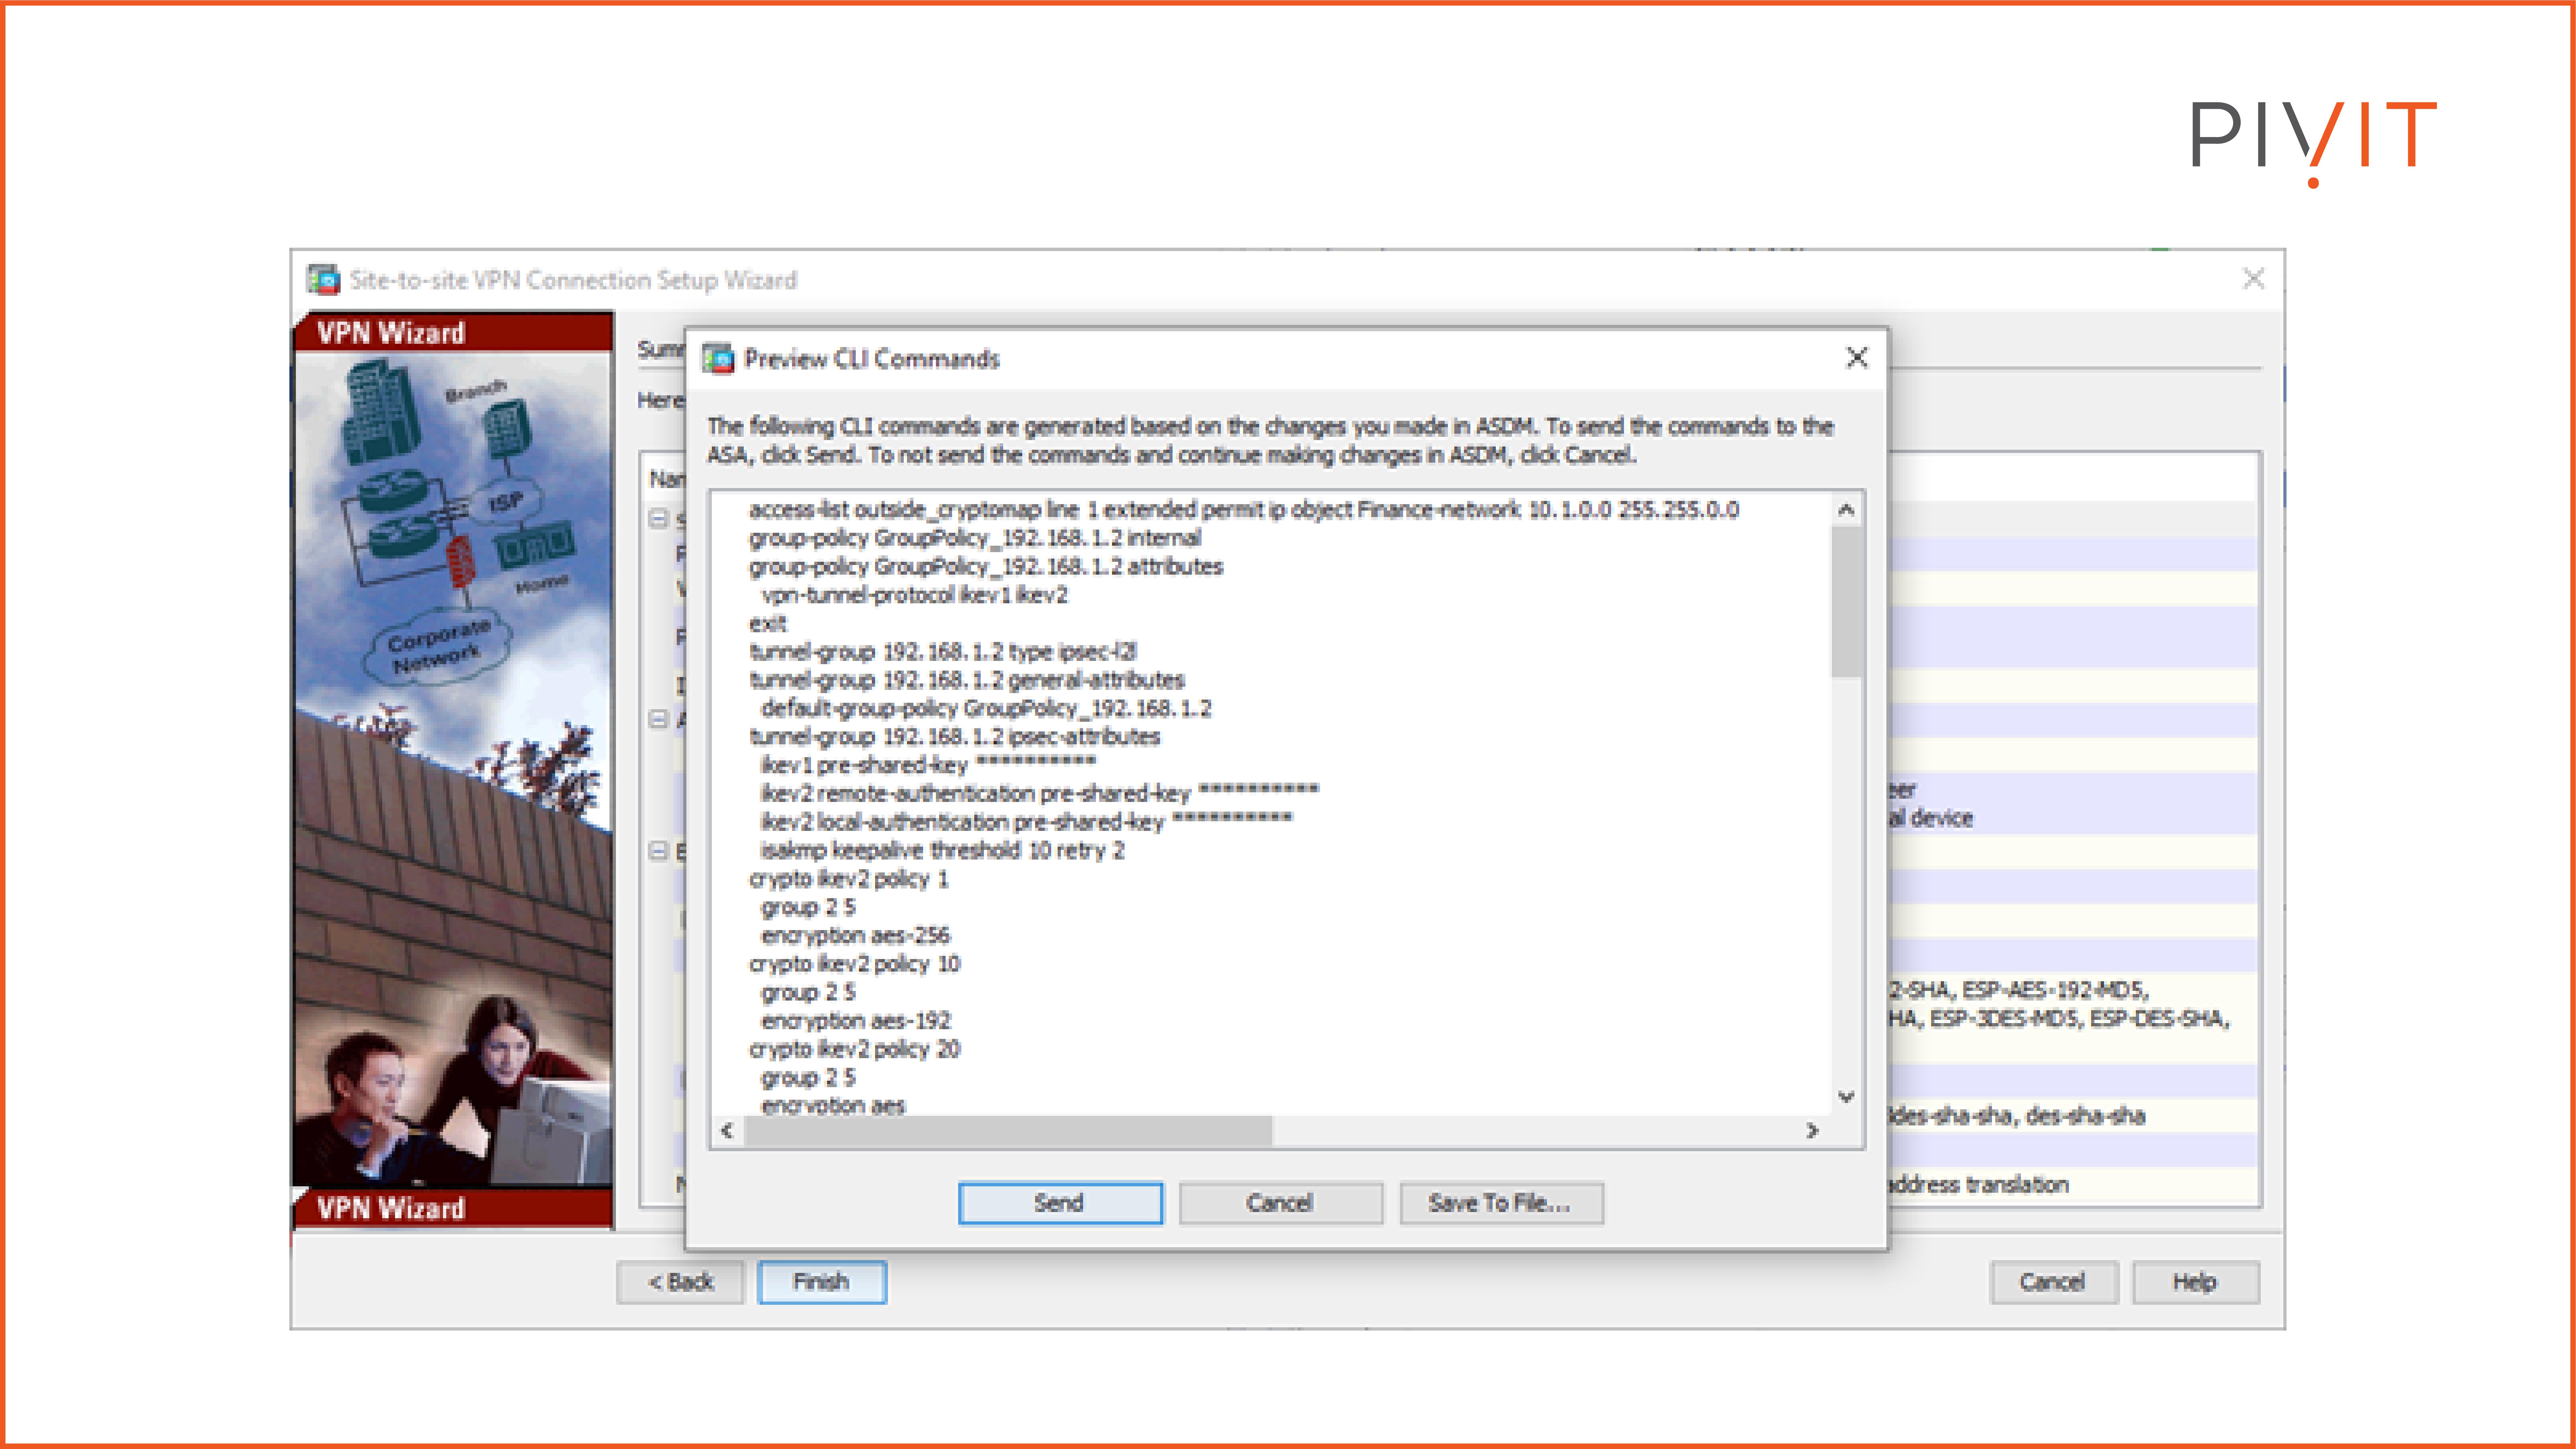
The last part provides a preview of the CLI commands that will be sent to the Cisco ASA.
As you can notice from the configuration example above, using the wizard is not a difficult process at all, and in just a few steps you can easily set up your Cisco ASA firewall with a VPN tunnel to the peer device on the other side.
A Look Ahead
Once the site-to-site VPN is successfully established, the Cisco ASA and the peer on the other side can securely exchange data without any risk of eavesdropping or man-in-the-middle attacks.
By following these helpful tips, you’ll understand the basics of utilizing site-to-site VPN technology — the best way to capitalize on evolving trends and for your organization, providing protection for transferred data and equipping you to worry about more important things.
With an extensive list of Cisco models, PivIT has a comprehensive portfolio of security hardware solutions—for an average of 65% savings.
PivIT also offers OneCall, which gives you top-to-bottom, all-inclusive support of new and legacy hardware. And with PivIT’s EXTEND, you have certified pros at your disposal for everything from installation to troubleshooting and beyond (including VPN configurations!).
Share this
- Configuration Guides (47)
- Cisco Routers (29)
- Switches (27)
- Network Security (23)
- Cisco Switches (21)
- Routing Protocols (21)
- Routers (20)
- Cisco (19)
- Product Comparisons (19)
- Firewall (18)
- Cisco Security (17)
- Cisco Technical Information (17)
- IT Hardware Solutions (17)
- Network Protocols (17)
- Wireless (17)
- Security (15)
- OneCall (13)
- Servers (12)
- cisco asa (12)
- Cisco Wireless (11)
- Router Protocols (11)
- Cisco Catalyst (9)
- Cisco UCS (9)
- Upgrading Network (9)
- Cisco Servers (8)
- Product Highlight (8)
- Access Control Lists (7)
- Fortinet (7)
- Server Comparisons (7)
- Access Points (6)
- Arista Networks (6)
- OSPF (6)
- Wireless APs (6)
- Cisco ASR (5)
- Cloud Solutions (5)
- HPE-Aruba Wireless (5)
- Juniper Mist (5)
- Network Management (5)
- SD-WAN (5)
- Storage (5)
- Switch Comparison (5)
- Back To Basics (4)
- Cybersecurity (4)
- EIGRP (4)
- Firewall Architecture (4)
- HSRP (4)
- Juniper Networks (4)
- Network Automation (4)
- Network Servers (4)
- OEM Comparison (4)
- Aruba Central (3)
- Cisco Telephony (3)
- DHCP (3)
- DHCP Snooping (3)
- Dell EMC PowerEdge (3)
- Internet (3)
- Maintenance (3)
- Maintenance Renewal (3)
- Network Accessories (3)
- TPM (3)
- Telephony (3)
- aruba (3)
- Cisco NX-OS (2)
- Cisco Nexus (2)
- Dell Servers (2)
- Fortinet NGFWs (2)
- IT Trends (2)
- LAN Networks (2)
- Network Time Protocol (2)
- Palo Alto NGFWs (2)
- Rapid PVST+ (2)
- Remote Configuration (2)
- Software Defined Networking (2)
- WLAN (2)
- Ways to Save (2)
- fortigate (2)
- Asset Management (1)
- CPU Usage (1)
- Cisco AIR-CT (1)
- Cisco Aironet (1)
- Cisco DNA (1)
- Cisco ISR (1)
- Cisco Supervisor Engines (1)
- Cisco UCS Manager (1)
- Cognitive Campus (1)
- Cost of Downtime (1)
- Dell EMC Data Domain (1)
- Edge Switches (1)
- Fabric Extenders (1)
- GRE Tunnel (1)
- HPE BL (1)
- Juniper SRX (1)
- Nexus Switches (1)
- Nutanix (1)
- Optics (1)
- PowerEdge R740xd (1)
- STP Extension (1)
- Sparing Integrity Program (1)
- Switched Virtual Interface (1)
- TCP (1)
- UCS Fabric Interconnects (1)
- hyperconverge (1)
- April 2024 (2)
- March 2024 (1)
- February 2024 (2)
- January 2024 (1)
- December 2023 (1)
- November 2023 (2)
- October 2023 (1)
- September 2023 (3)
- August 2023 (5)
- July 2023 (2)
- June 2023 (4)
- May 2023 (5)
- April 2023 (8)
- March 2023 (7)
- February 2023 (5)
- January 2023 (2)
- December 2022 (3)
- November 2022 (3)
- October 2022 (8)
- September 2022 (9)
- August 2022 (9)
- July 2022 (8)
- June 2022 (9)
- May 2022 (5)
- April 2022 (3)
- March 2022 (1)
- February 2022 (2)
- November 2021 (2)
- October 2021 (1)
- September 2021 (2)
- August 2021 (2)
- July 2021 (3)
- June 2021 (2)
- May 2021 (4)
- April 2021 (4)
- March 2021 (2)
- February 2021 (1)
- January 2021 (2)
- December 2020 (2)
- November 2020 (2)
- October 2020 (2)
- September 2020 (2)
- August 2020 (4)
- July 2020 (5)
- June 2020 (4)
- May 2020 (6)
- April 2020 (2)
- March 2020 (1)
- February 2020 (2)
- January 2020 (2)
- December 2019 (1)
- May 2019 (2)
- April 2019 (5)
- February 2019 (1)
- January 2019 (3)
- December 2018 (1)


No Comments Yet
Let us know what you think