A QuickStart Guide to Authenticating EIGRP, OSPF, and BGP
Cyberattacks have become commonplace, which has made it even more vital to protect network hardware from known and unknown attacks. Moreover, vulnerabilities in hardware continue to be found, which leaves them open to attack.
In 2020, Cisco warned of a vulnerability in some of their routers when running an older version of their IOS XR Network OS (source). Thankfully, these vulnerabilities have been fixed.
Communications from routers (and firewalls) must be protected against these potential cyberattacks. This is when the routing protocols authentication feature comes into play. It allows routers to exchange routing updates securely with authenticated peers and deny any other unauthorized communication.
__________________
Struggling to get your hands on the right hardware due to worldwide OEM shortages? Here's what one recent customer had to say:
"We ask for gear, your team sources, and give us delivery dates you fulfill. We appreciate having a team that is responsive."
- James T. (IT Director)
__________________
In this article, we will provide the following:
- An overview of the authentication process in routing protocols such as:
- EIGRP authentication,
- OSPF authentication,
- BGP authentication,
- A step-by-step authentication configuration example for each routing protocol.
Be sure to check out our other routing protocol articles:
- A Quick Guide to EIGRP Configuration with Stub Routing
- Interior Routing Protocols Comparison: RIP vs EIGRP vs OSPF vs IS-IS
Authenticating Routing Protocols
By default, routers are only aware of the networks they connect directly to. Two options are available for learning remote networks: static routing and dynamic routing. Static routing requires manual configuration of the routes and is used only in specific situations, such as in smaller network topologies.
On the other hand, dynamic routing is typically used in most enterprise networks as it allows routers to exchange information dynamically. But, can this information be trusted?
Well, that is the tricky part. When these routes are learned from legitimate peers, the communications work perfectly, and no issues are experienced. However, when the source is rogue, many things can go the wrong way.
Nowadays, an attacker can easily run a protocol on a workstation and form a routing protocol relationship with the routers in a network. This would allow the attacker to inject rogue routes into routing tables and override the legitimate ones. As a result, it can lead to man-in-the-middle attacks, denial of service, or even black holes in the network.
Implementing routing protocol authentication is the best solution to prevent unauthorized systems from participating in routing protocol communications. This way, only authenticated peers can exchange routing information, and everything else gets discarded.
This method configures a shared secret authentication key (password) on each router. When the router needs to send an update, it generates a hash by running the update and the password through a hash algorithm. After that, this hash (also known as HMAC) is appended to the update and sent to the peer.
Then, the receiving router creates a hash from the received update and locally stored password and compares it to the received hash. If the computed hash matches the received hash, the update is accepted; otherwise, the router rejects the routing update.
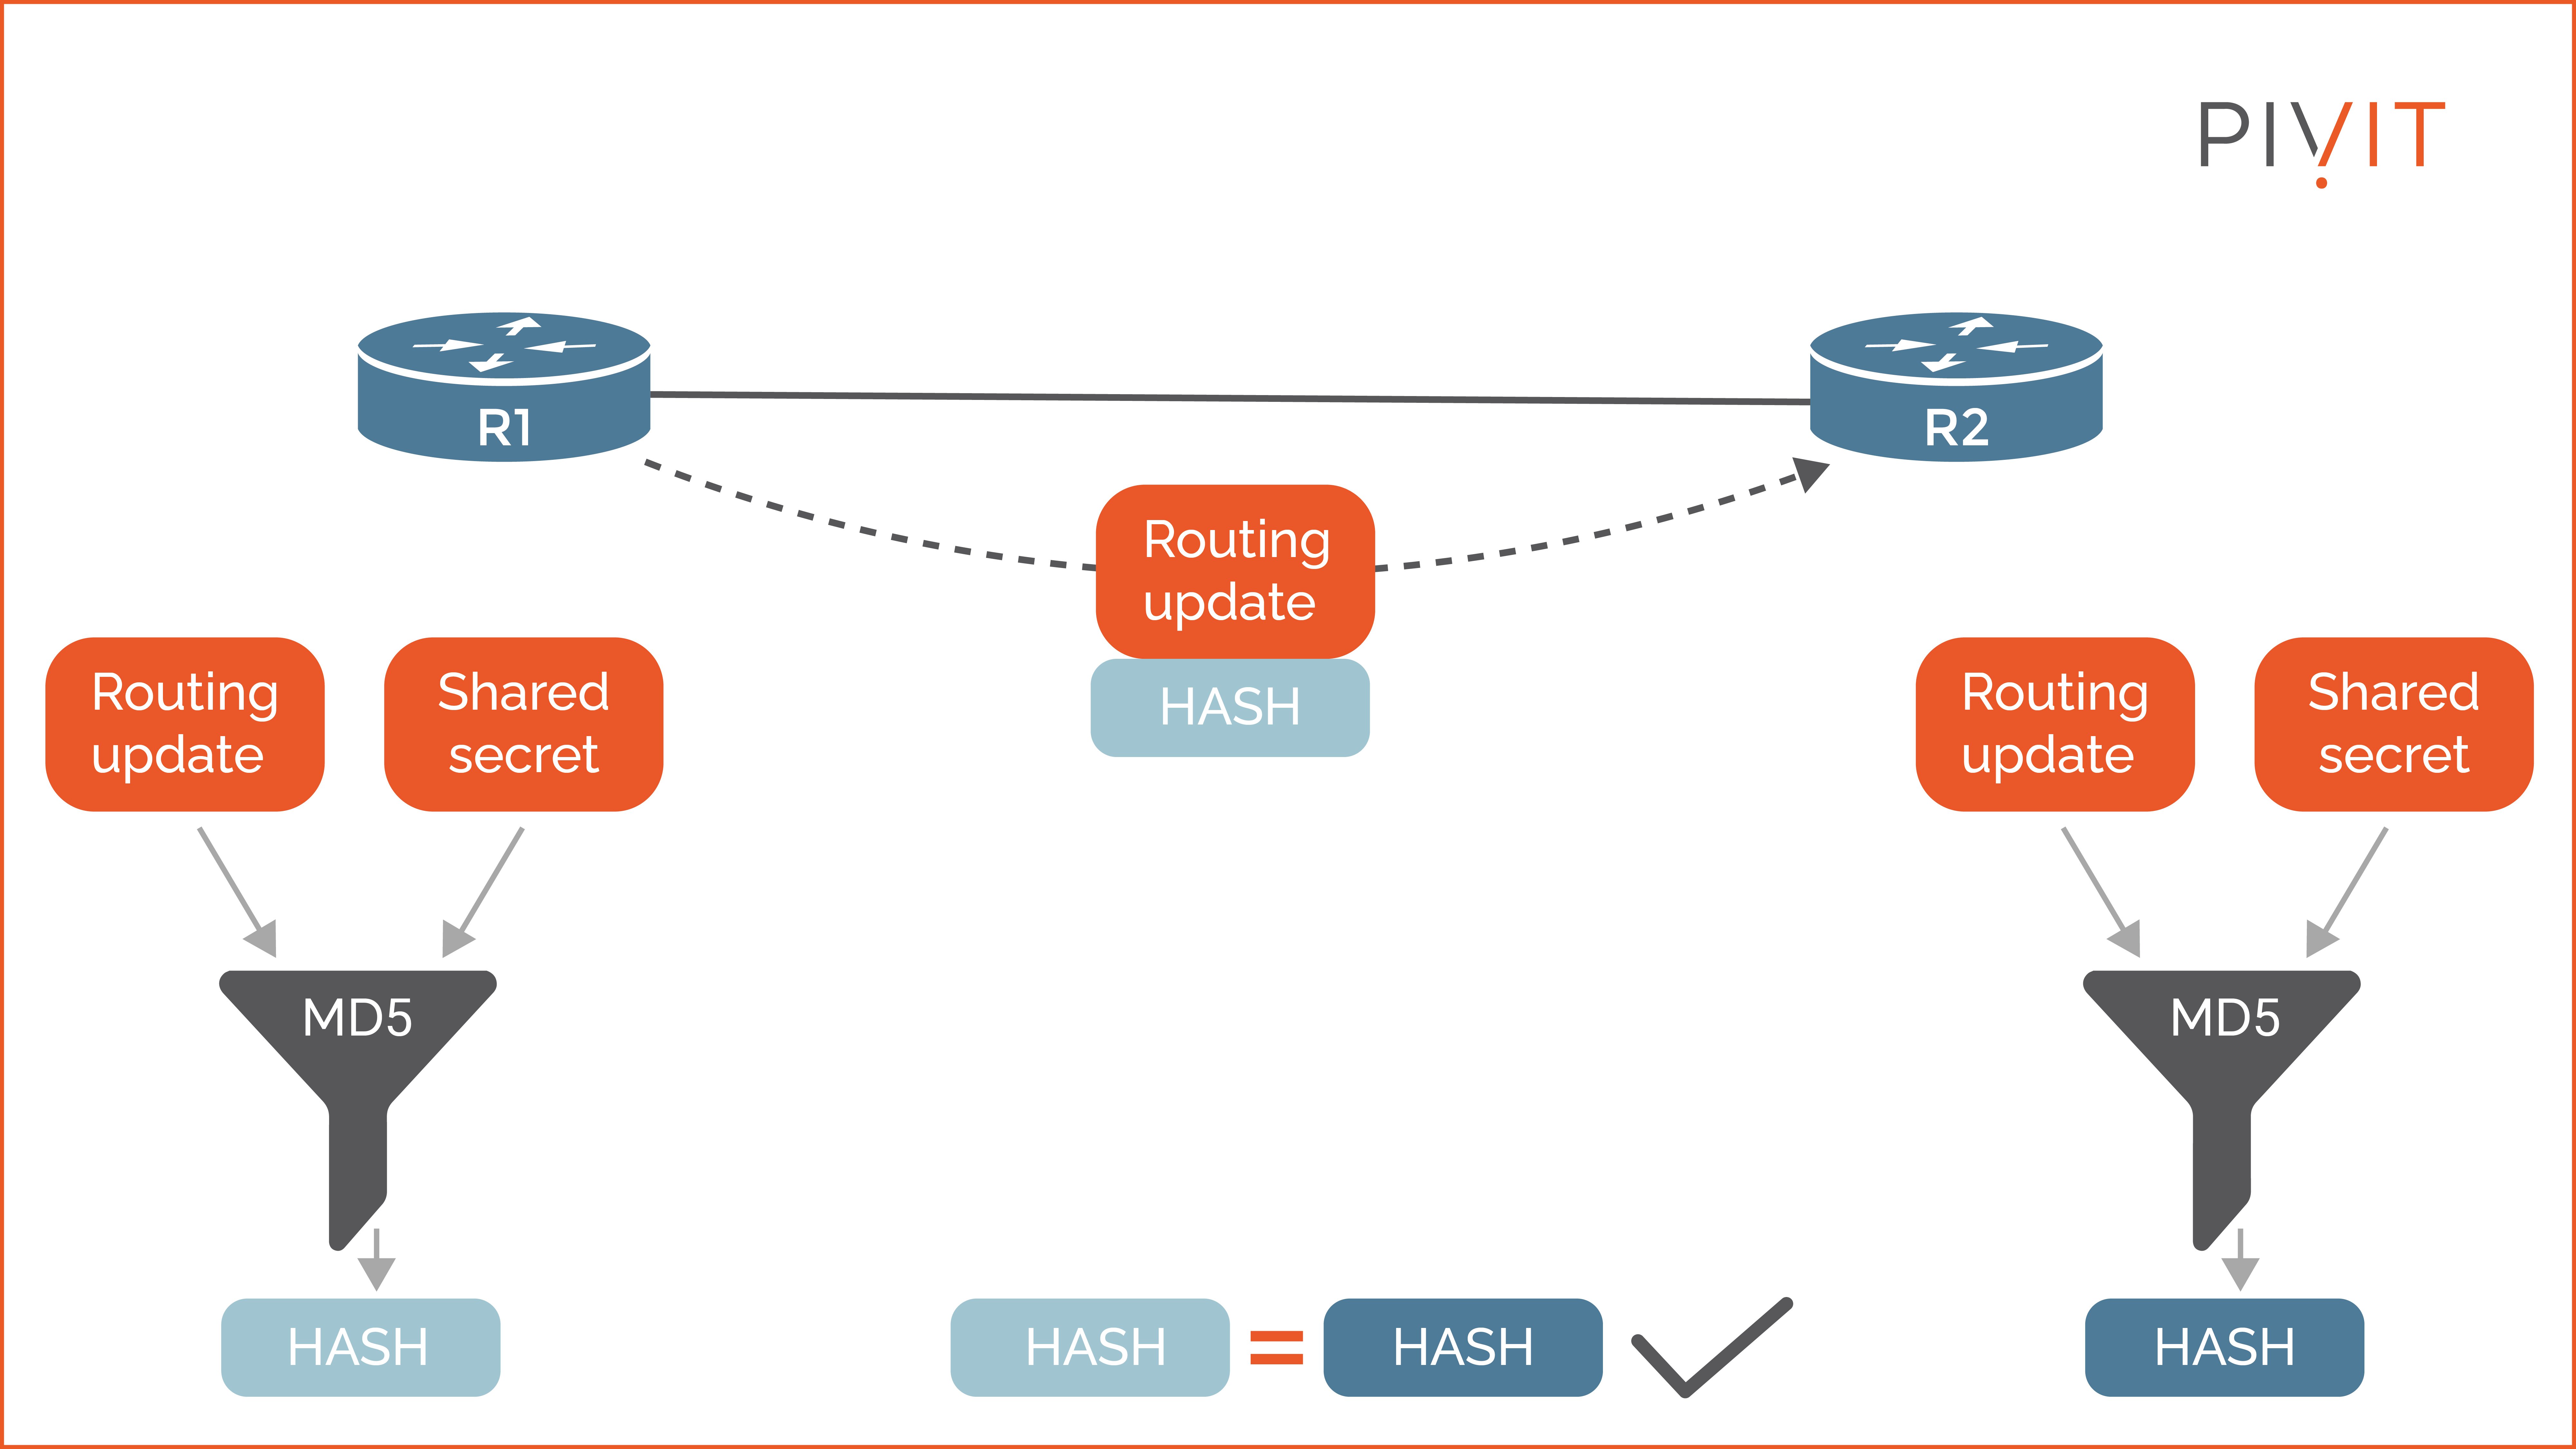
As you can see in the image above, routers R1 and R2 successfully authenticate with each other because they use the same shared secret key. Keep in mind that authentication is secure as long as the shared secret is secured. However, suppose the attacker knows the secret key. In that case, all malicious updates generated by the attacker will be accepted by the routers in the network.
EIGRP and OSPF are the most commonly deployed routing protocols inside networks, and BGP is the only exterior routing protocol. Let's look at how you can implement authentication for each.
EIGRP Authentication
After authentication is enabled, each EIGRP packet that is exchanged between the routers is authenticated to ensure their identities. This is done by configuring the same authentication key in the interface configuration mode on each router.
EIGRP authentication can be implemented using Message Digest 5 (MD5) or HMAC-SHA-256 (SHA-256) hashing algorithms. Although MD5 can be used in classic mode and named mode, SHA-256 can only be used in EIGRP named mode.
When configuring SHA-256 authentication in EIGRP named mode, you can use an interface password only or include a key chain. Although using a password is simpler, it is not as flexible as using a key chain because the neighbor adjacency drops when the password is changed. A key chain allows several passwords to be active simultaneously, so the neighbor adjacency with the EIGRP peer does not drop during a password change.
Configuring EIGRP Authentication
We will use the basic network topology example below to walk through the EIGRP authentication process.
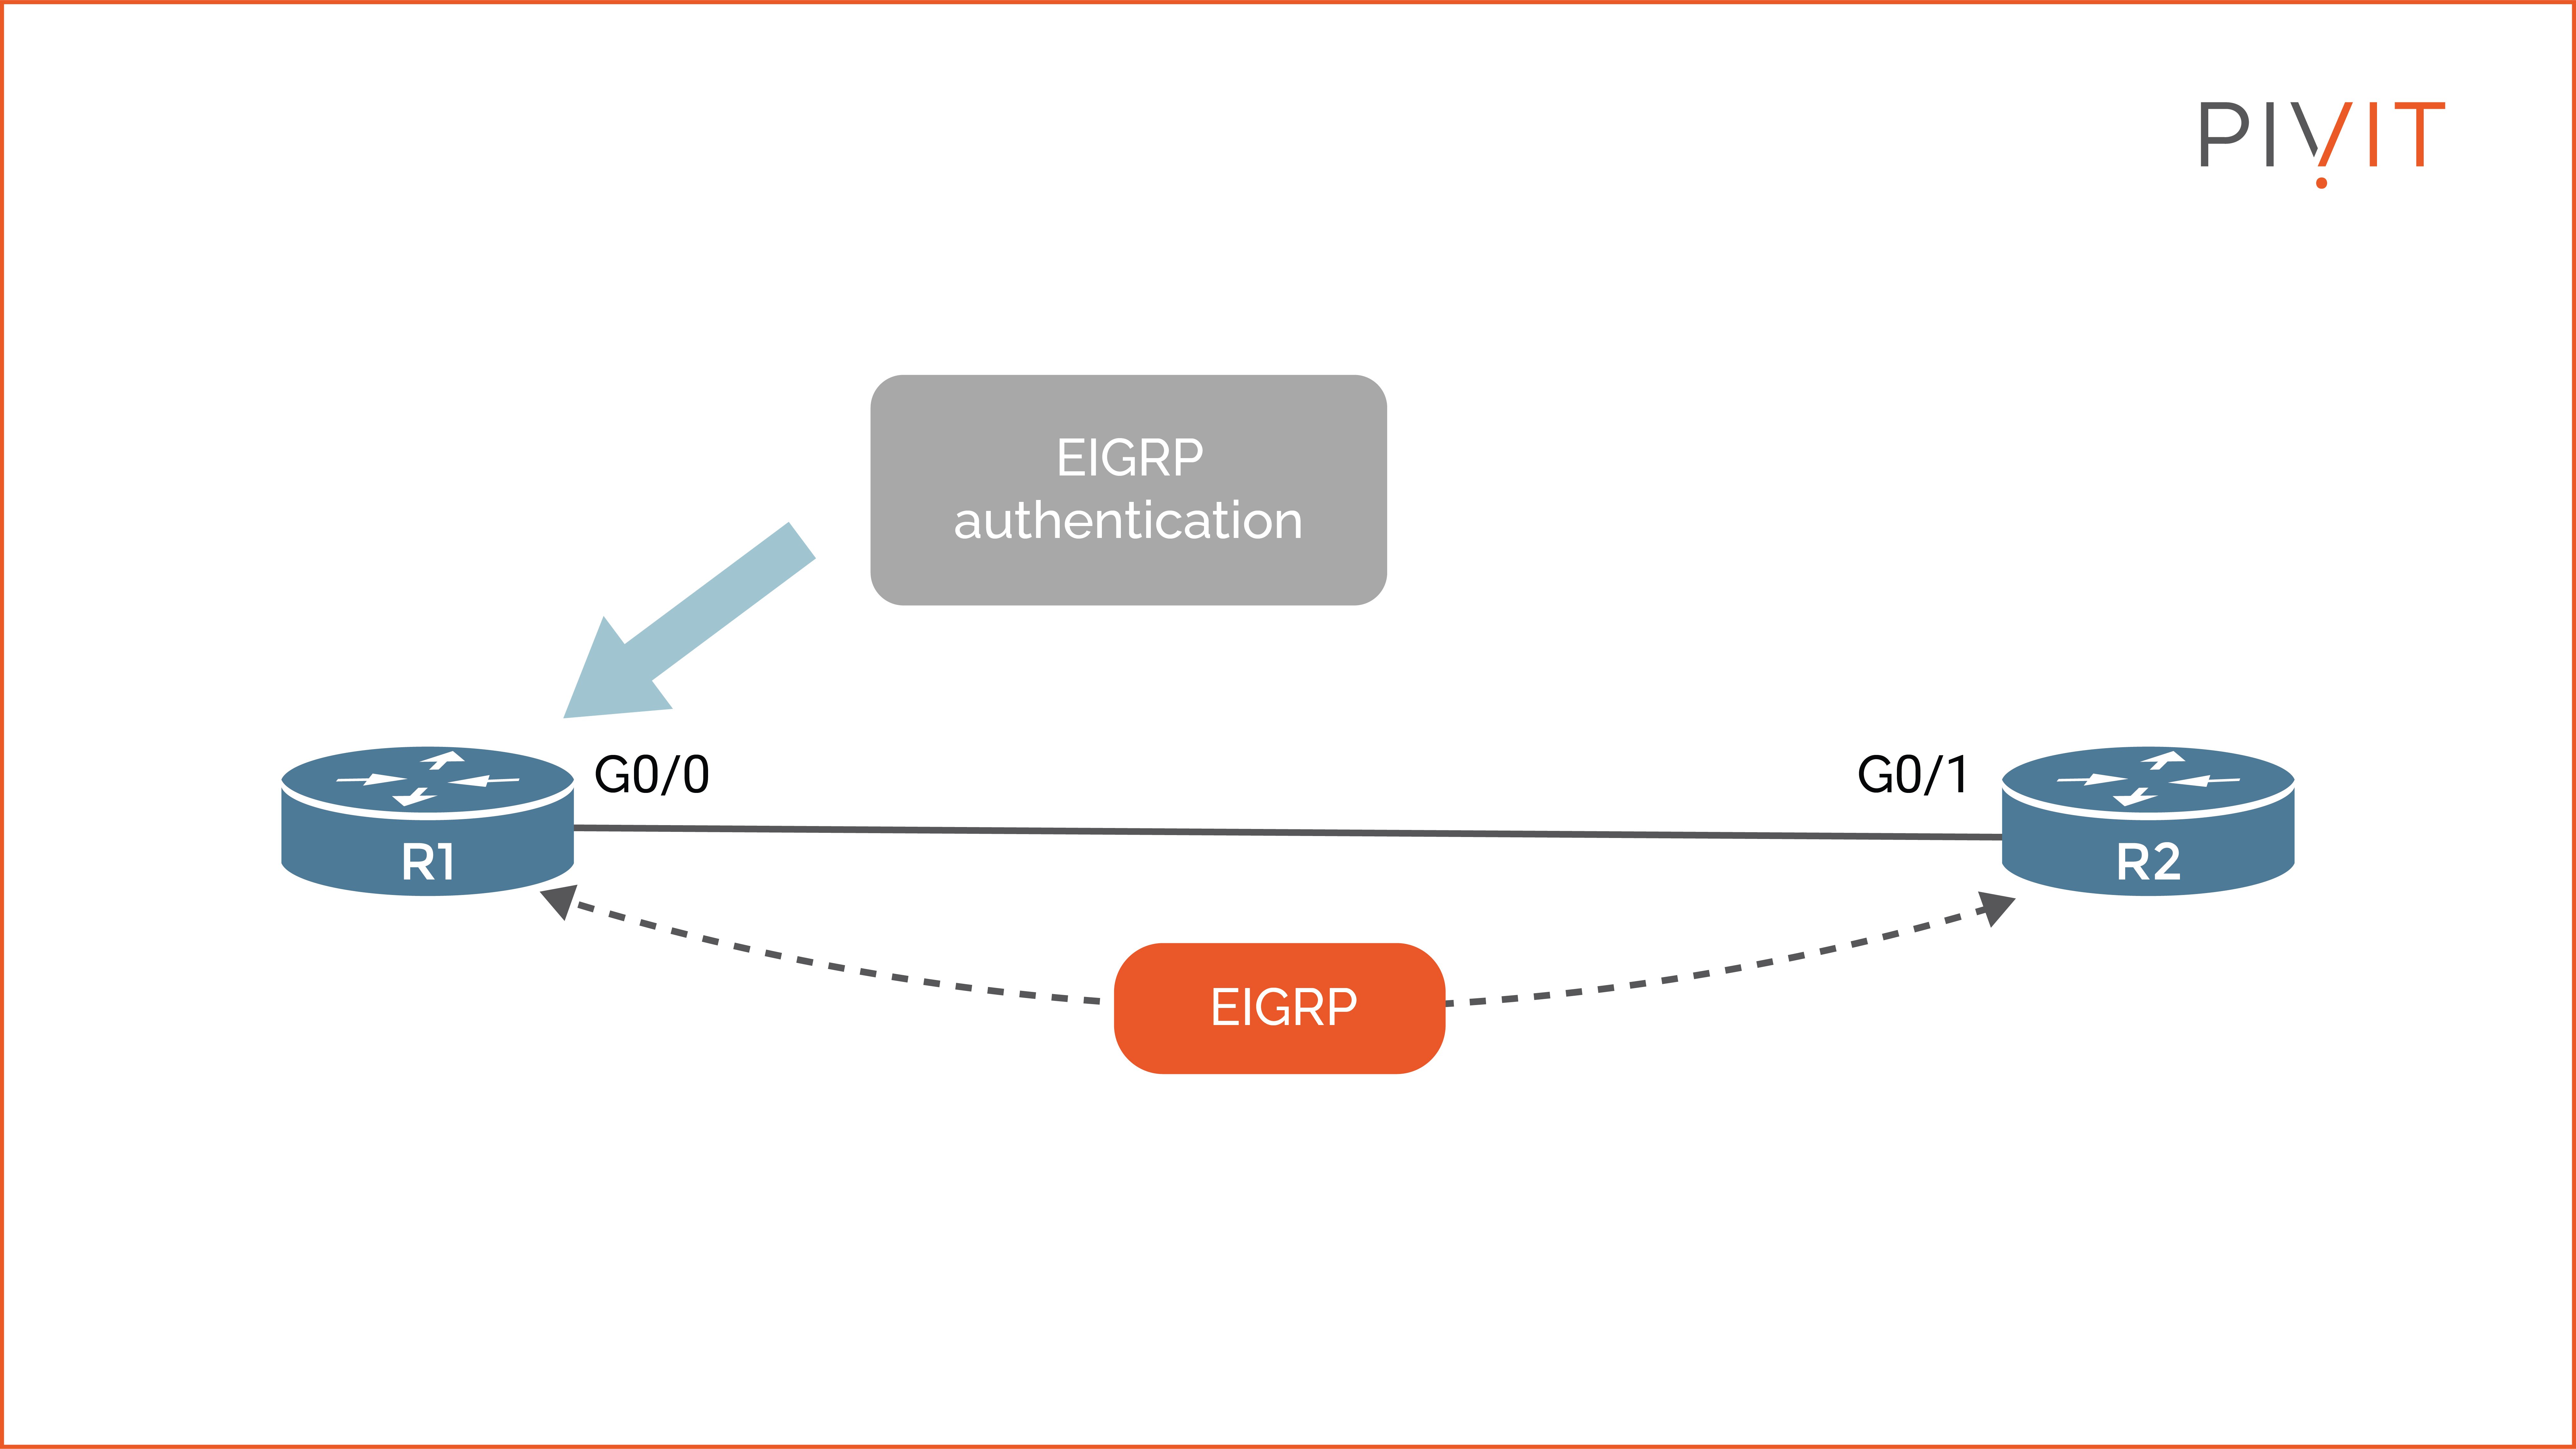
The whole process consists of three steps:
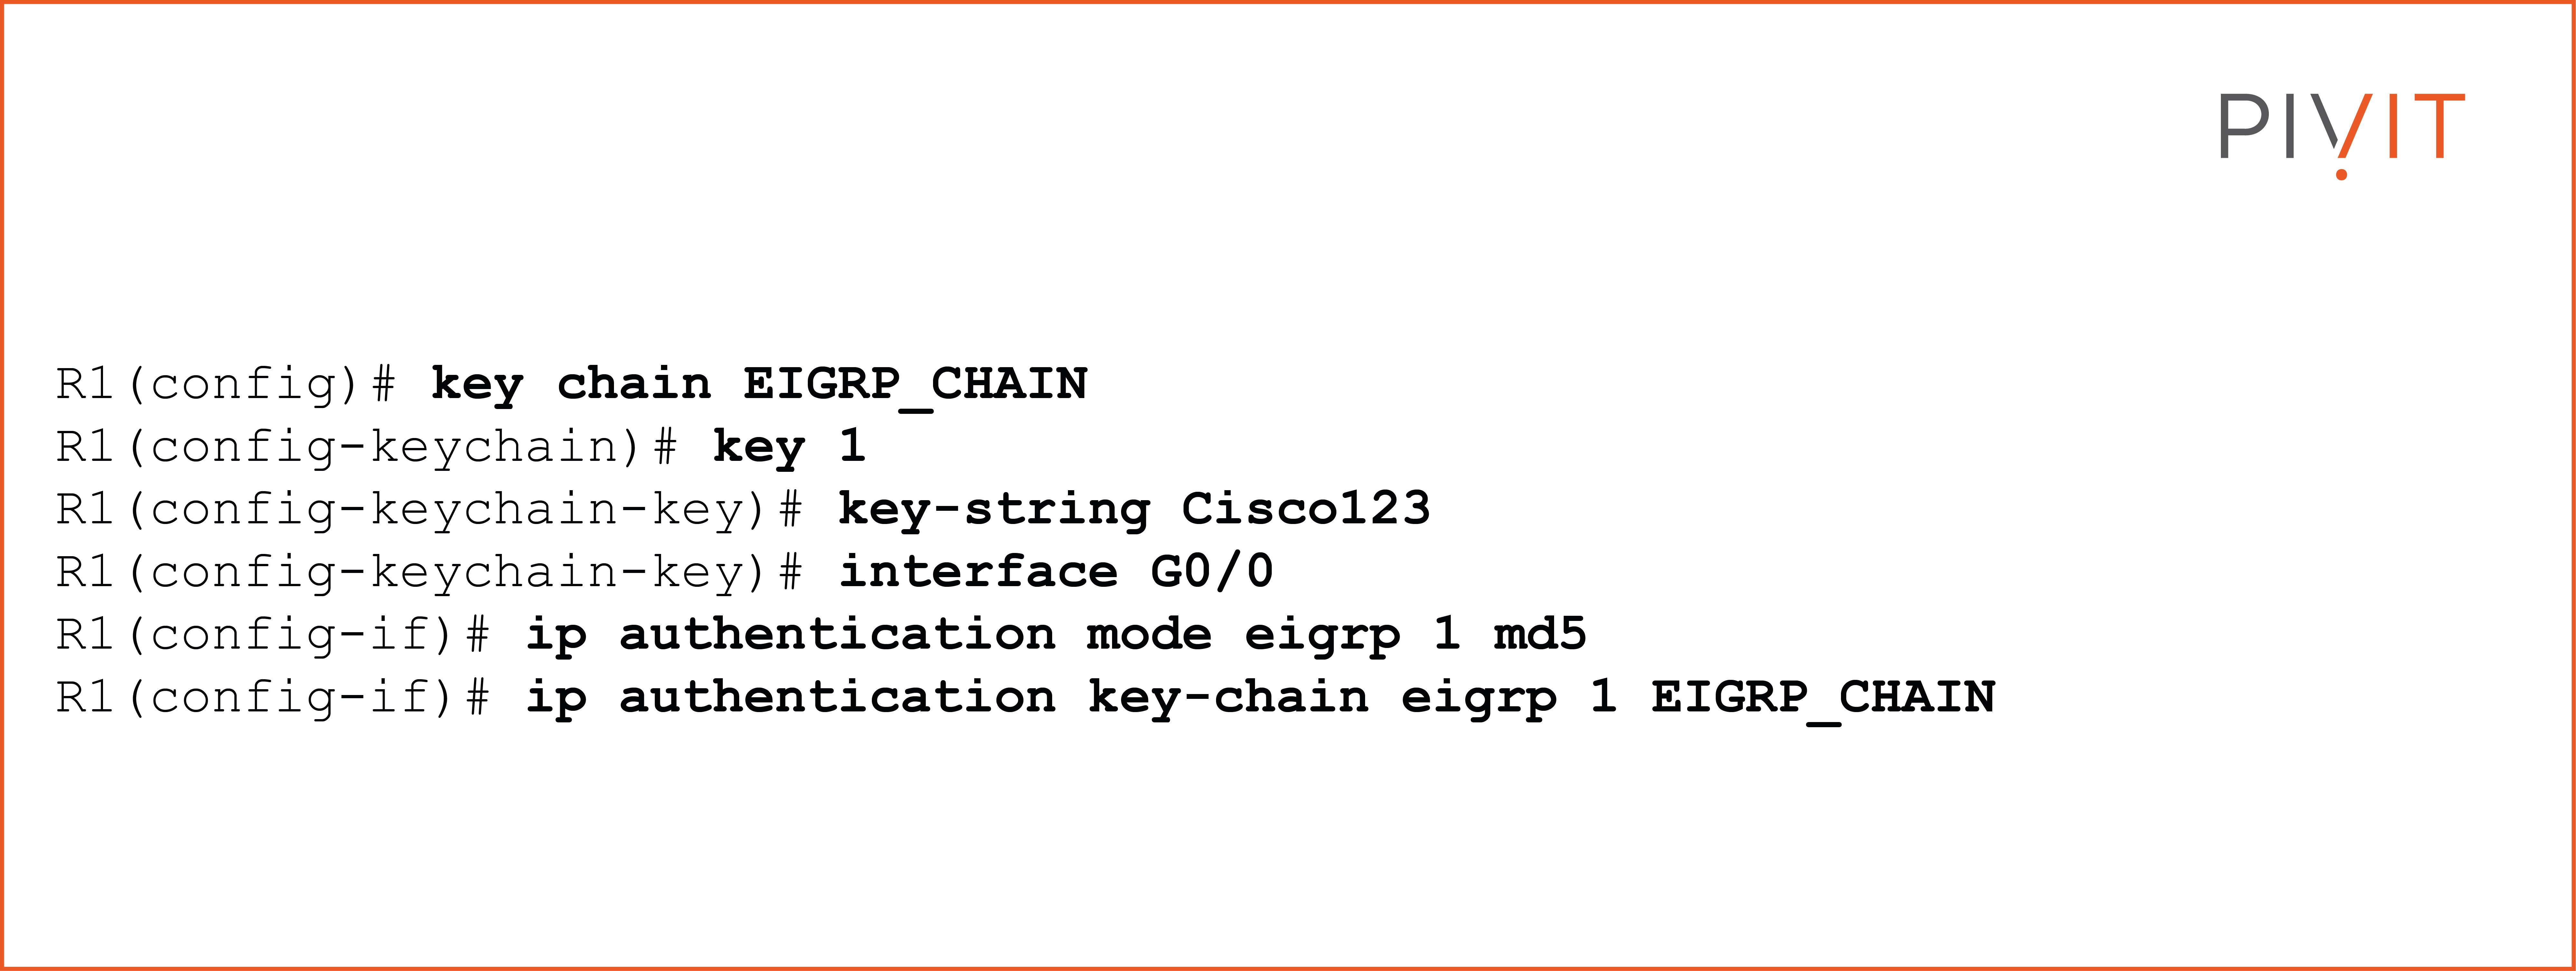
- Step 1: Configure a key chain and define the pre-shared authentication key. Optionally, you can configure the lifetime of each key in the key chain. In the example, the key chain is named "EIGRP_CHAIN," and the pre-shared key is "Cisco123."
- Step 2: Enable MD5 authentication mode inside the desired interface configuration mode for the existing EIGRP process number (in our case, AS 1).
- Step 3: Reference the key chain in the same interface mode for the EIGRP process number so the EIGRP authentication process can start using the authentication key.
View the commands below.
Suppose you want to use SHA-256 instead of MD5. In that case, you must:
- use the named EIGRP mode,
- enter the desired address family,
- enable hmac-sha-256 hashing, and
- set a password under the desired interface.
View the commands below.
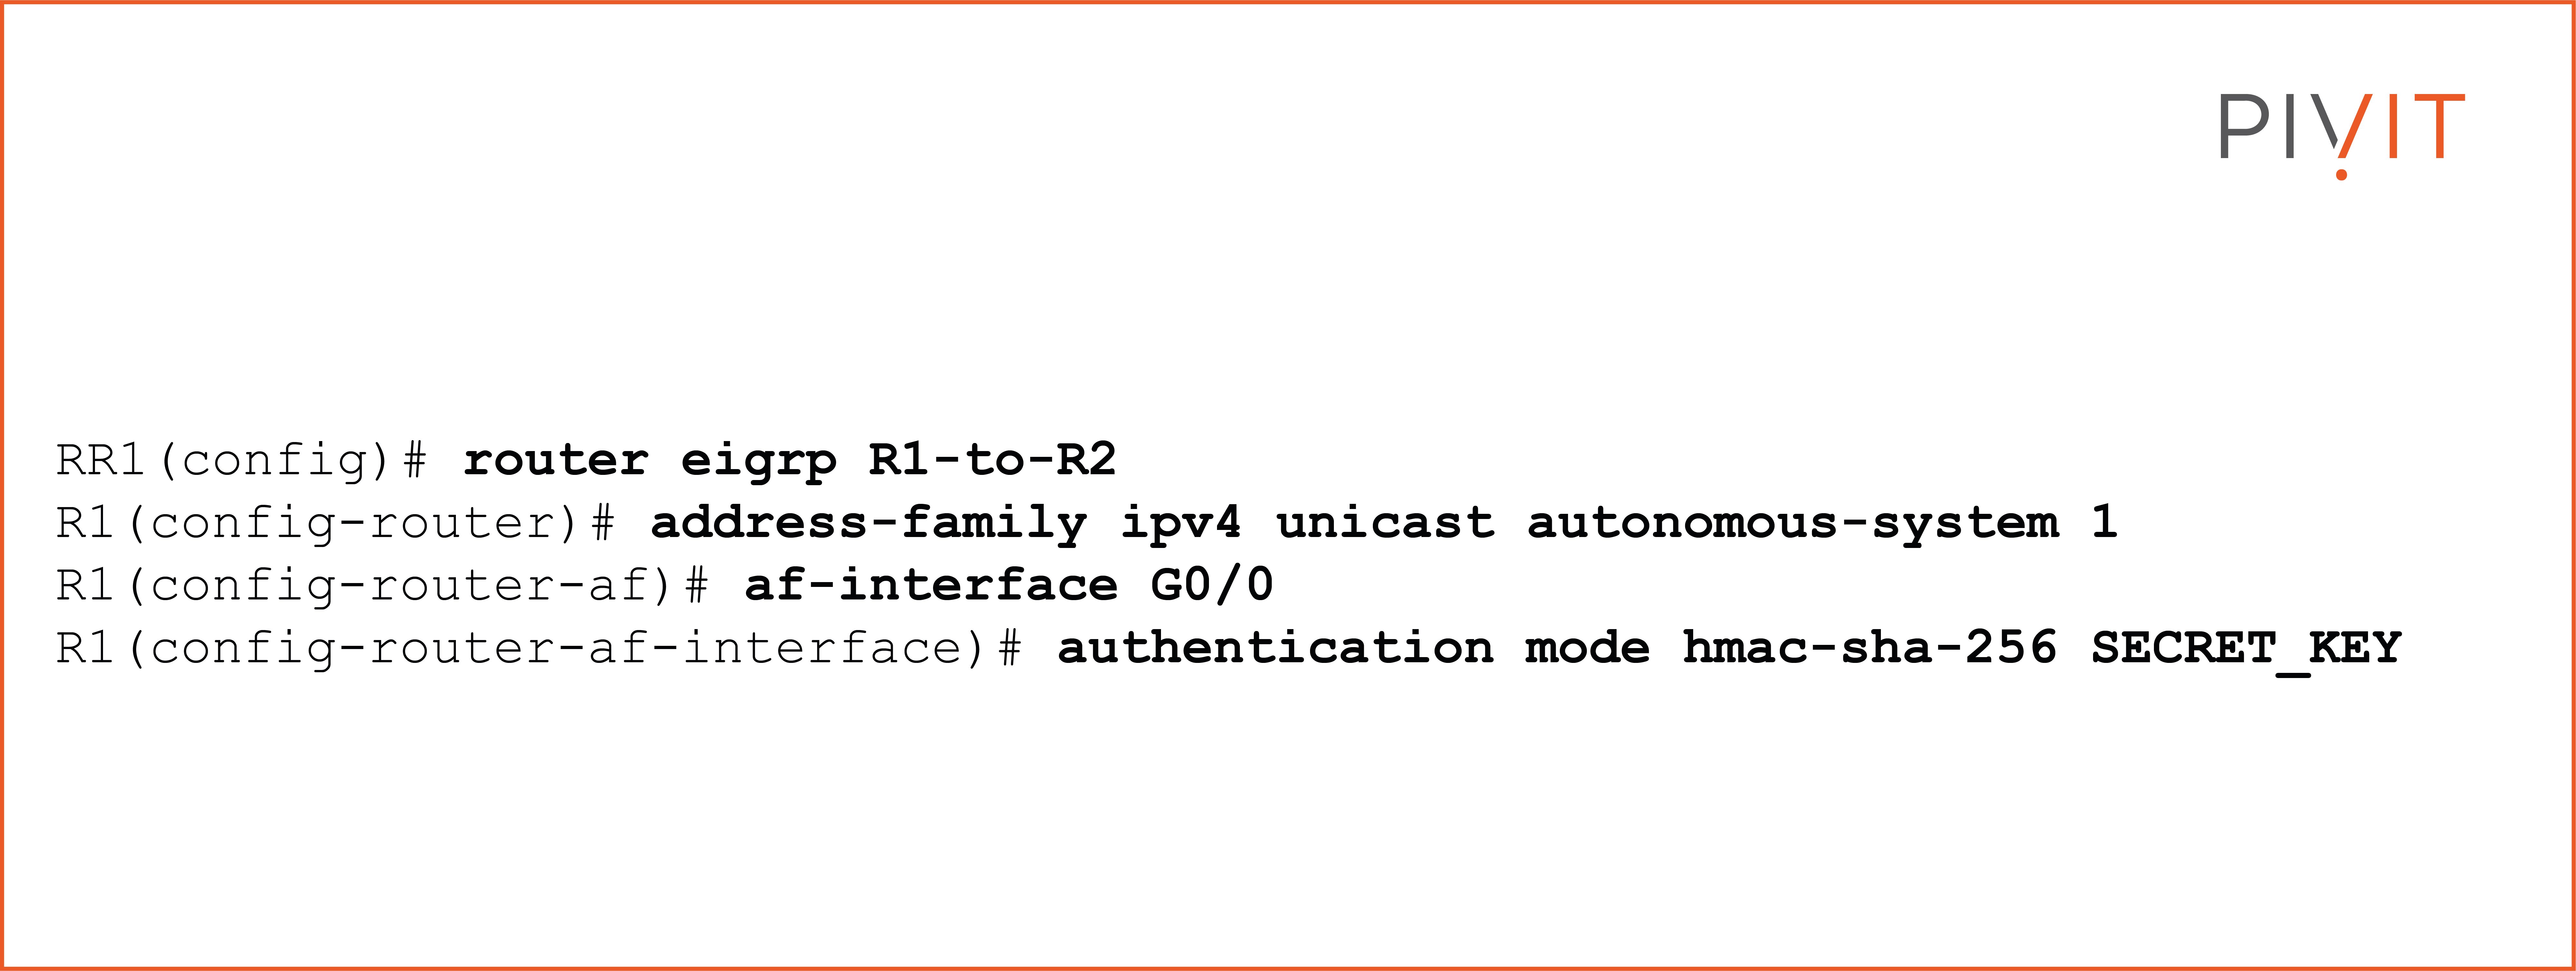
In addition, you can also use the same key chain in the interface mode under the IPv4 address family instead of the locally configured password.
OSPF Authentication
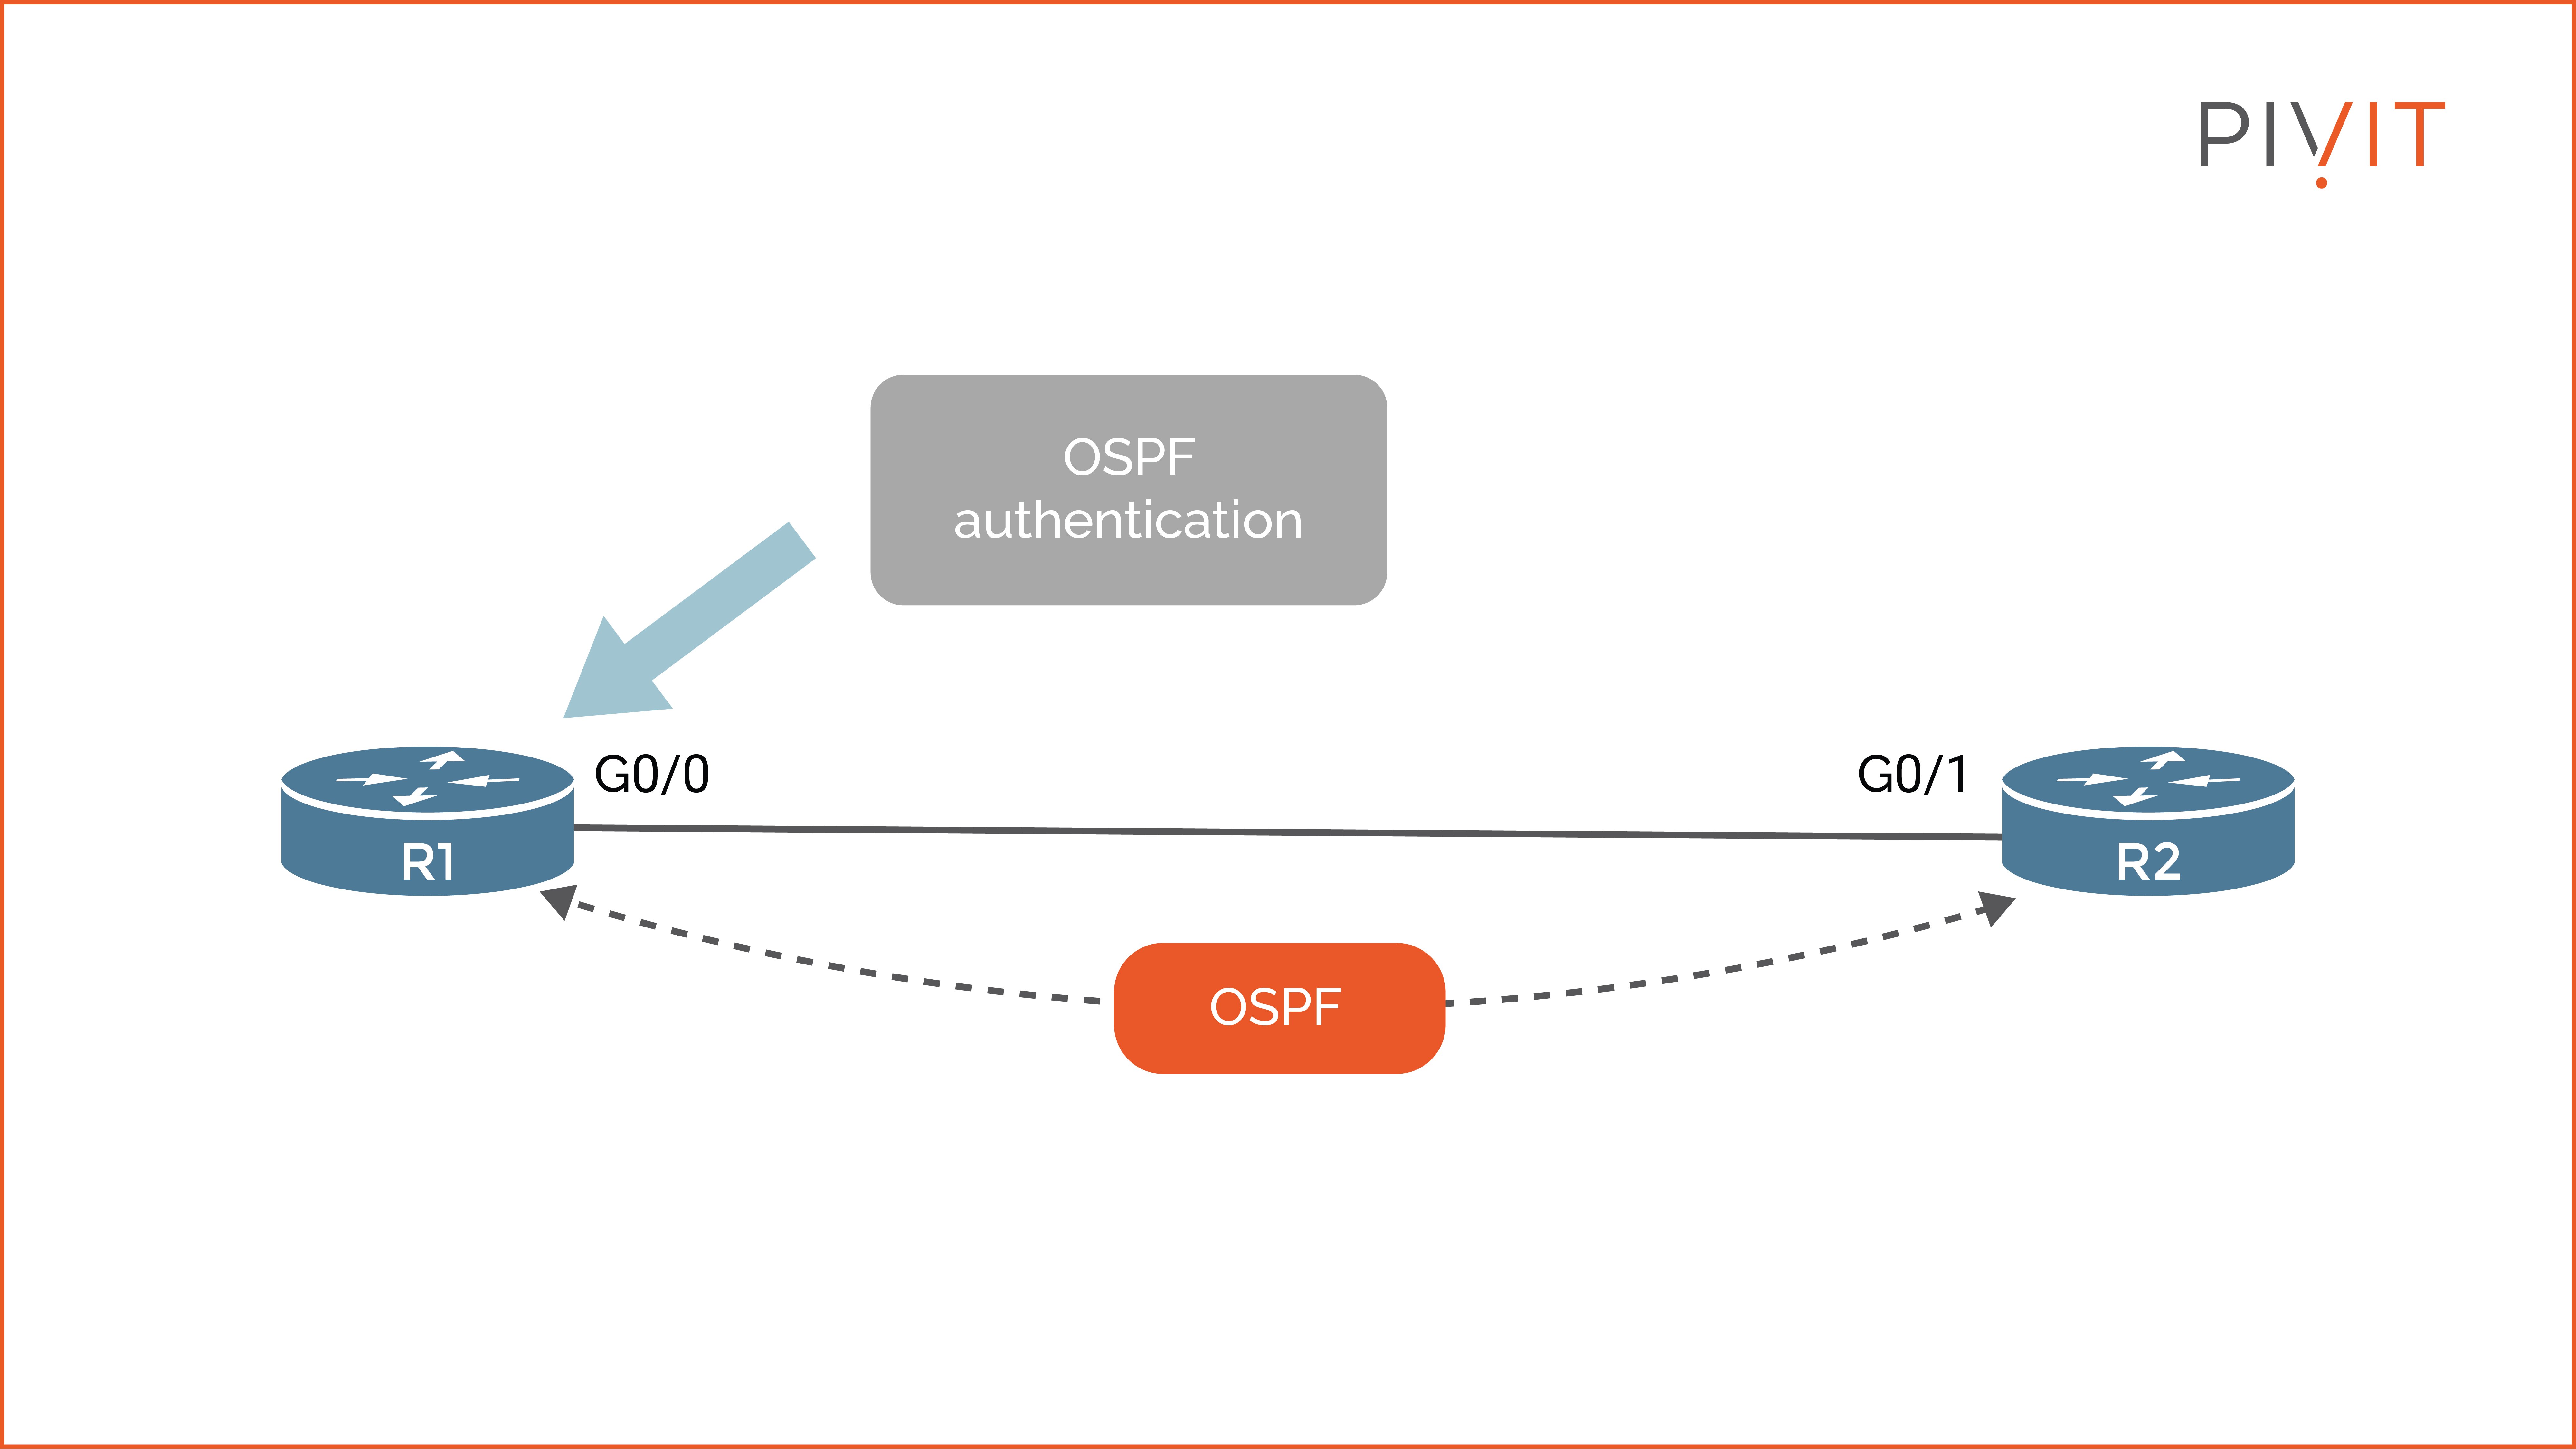
When OSPF authentication is enabled on a router, it authenticates the source of each received routing update from the neighbors. Simultaneously, it sends a key or password along with each OSPF packet sent to peers.
Two steps are needed to enable OSPF authentication: enable the authentication process per interface or OSPF area and configure the authentication key per interface.
OSPF supports three authentication methods:
- Simple Password or Plaintext Authentication: The authentication key is sent in plaintext. As a result, this method is not considered very safe and is vulnerable to packet sniffing.
- MD5 Authentication: The key is cryptographically protected using the MD5 hashing algorithm. Therefore, the computed hash is sent in the packet along with a key ID instead of sending the key in plaintext. As a result, it provides better overall protection than simple password authentication.
- SHA-256 HMAC: This approach is similar to the previous one. However, a much stronger hashing algorithm is used to protect the keys. Since using the SHA-256 HMAC hashing algorithm is relatively new to OSPF, the algorithm might not be supported on all devices.
Configuring OSPF Authentication
Simple Password Authentication
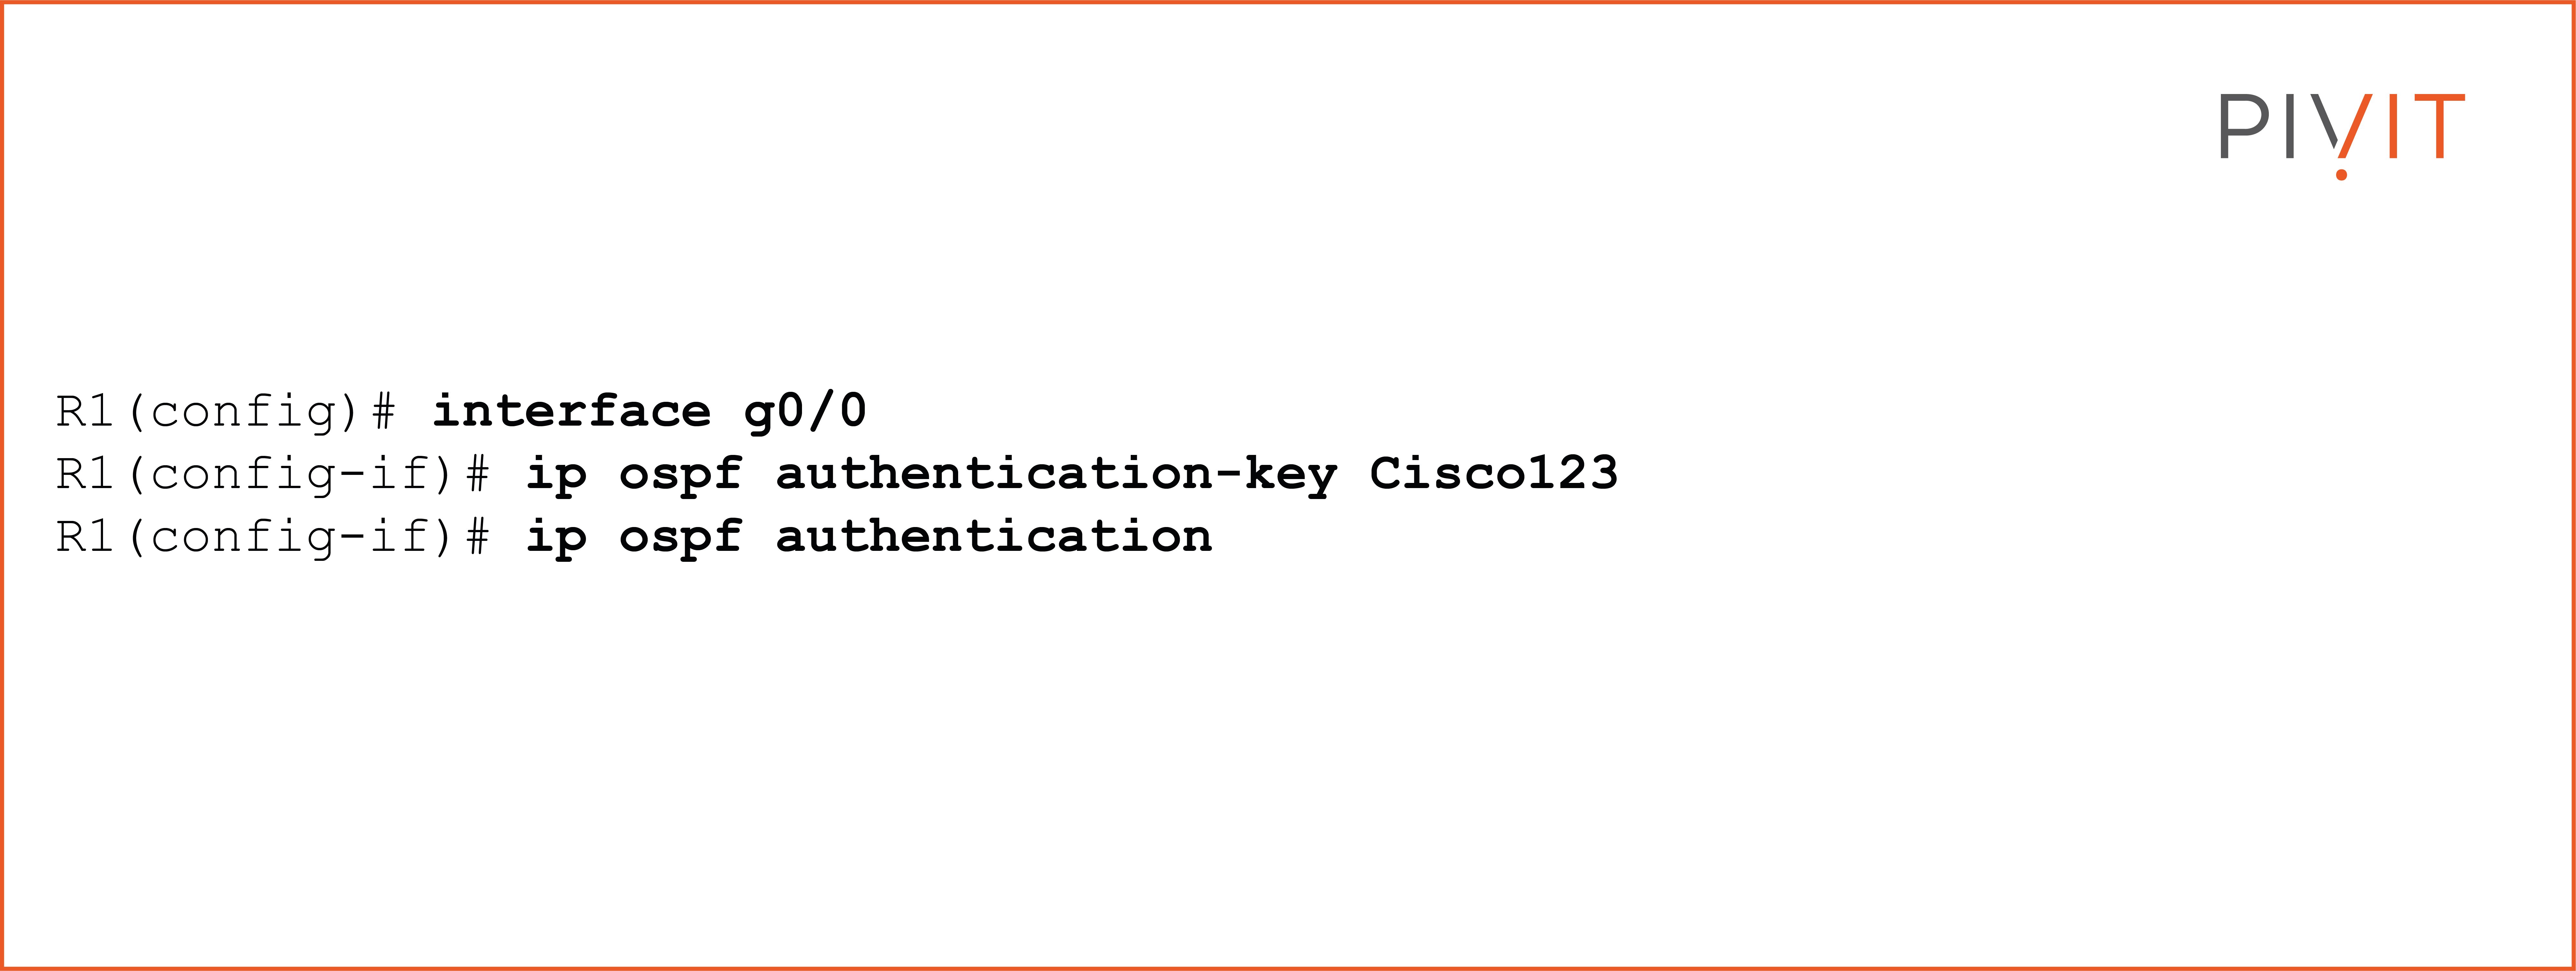
To implement simple password authentication, you must configure an authentication key under the desired interface and enable OSPF authentication.
View the commands below.
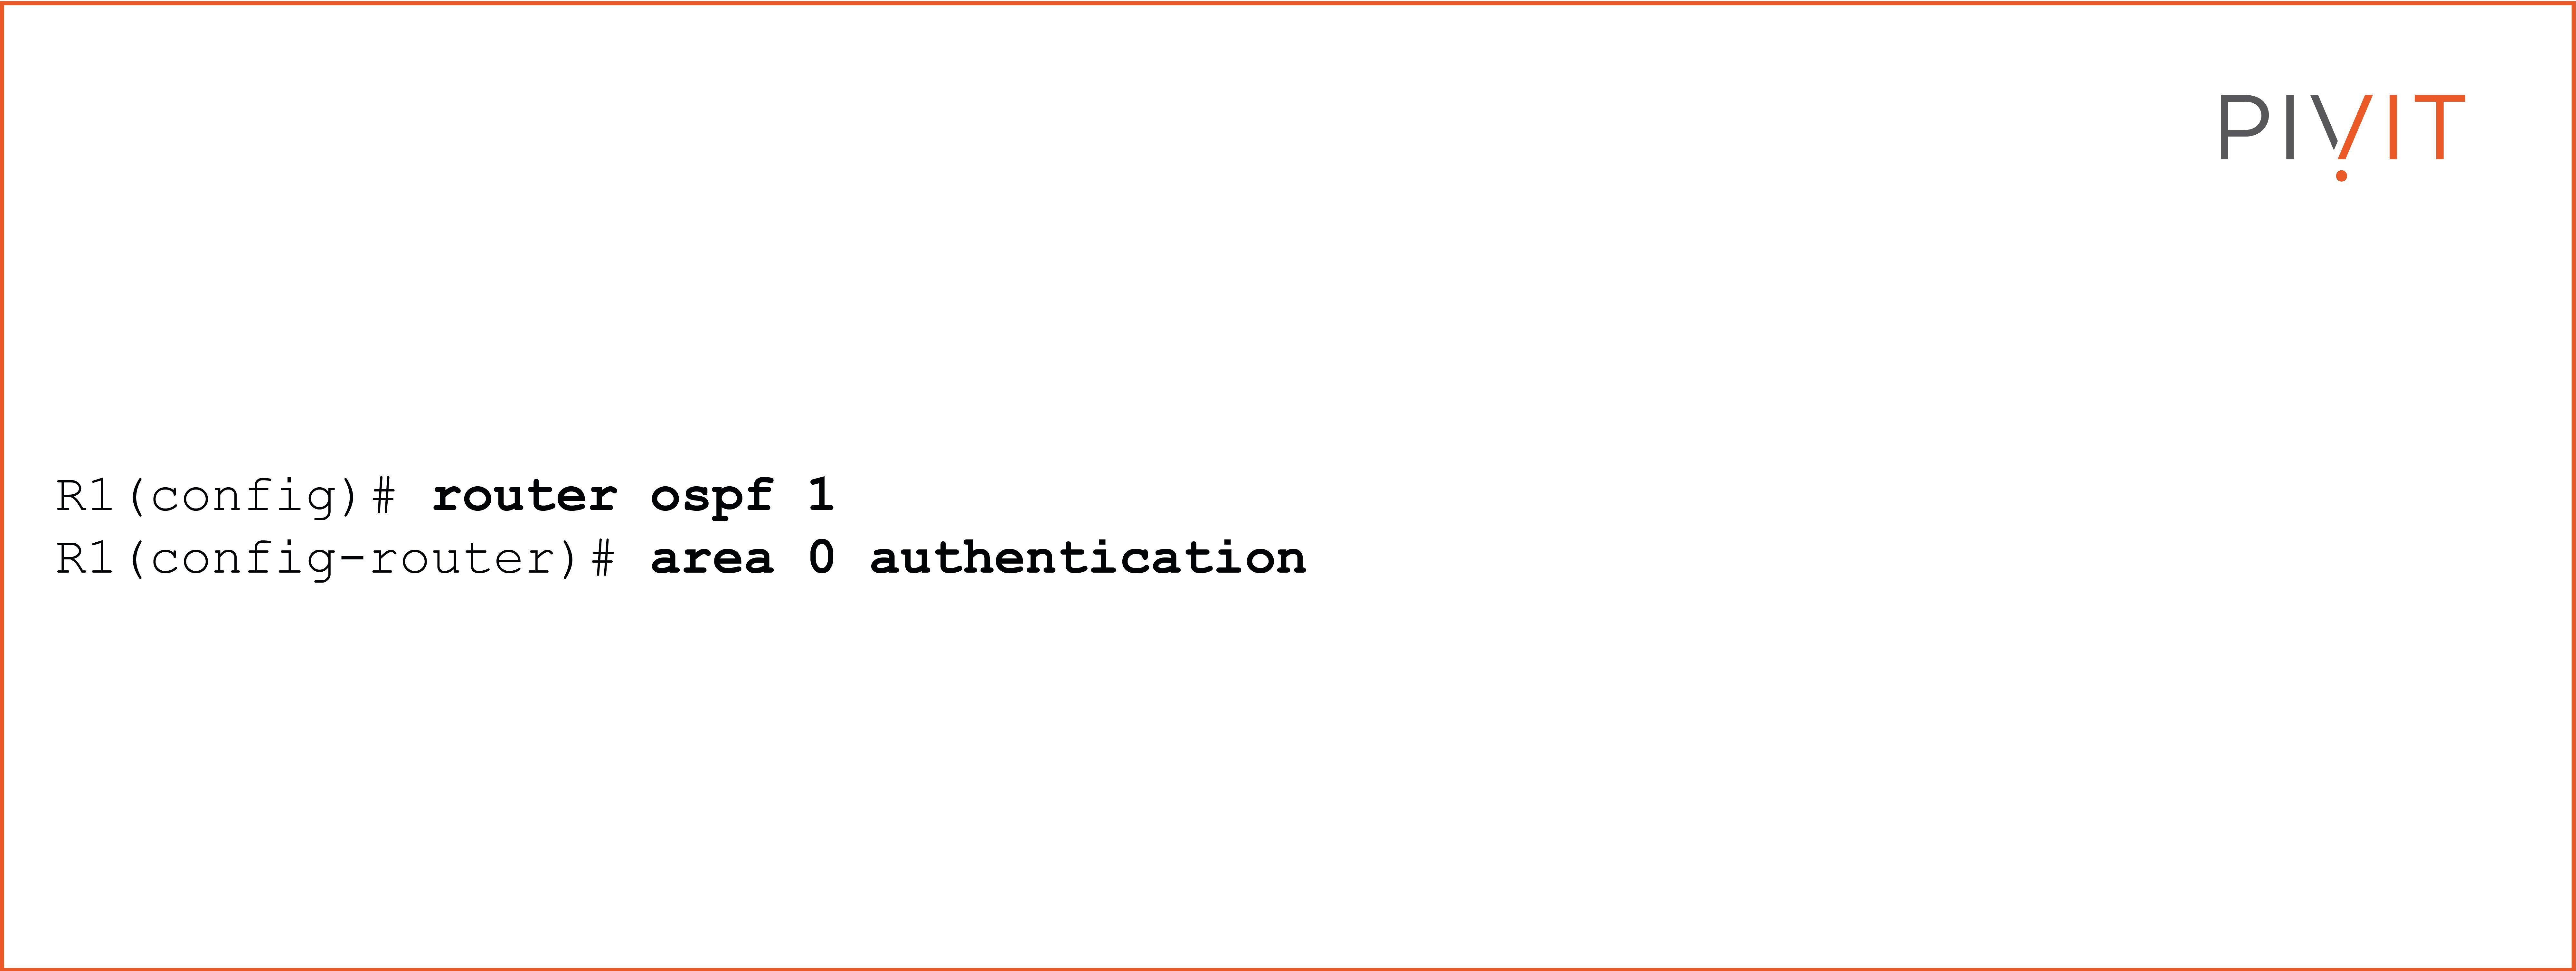
To enable authentication per area instead of an interface, you must enter the command "area [number] authentication" in the OSPF configuration mode. View the commands below.
MD5 Authentication
The process for enabling MD5 authentication is the same as for plaintext authentication. The only difference is the commands, where you need to define that MD5 authentication will be used and configure the MD5 key. View the commands below that show MD5 authentication enabled in interface mode with a key set to "SECRETKEY."
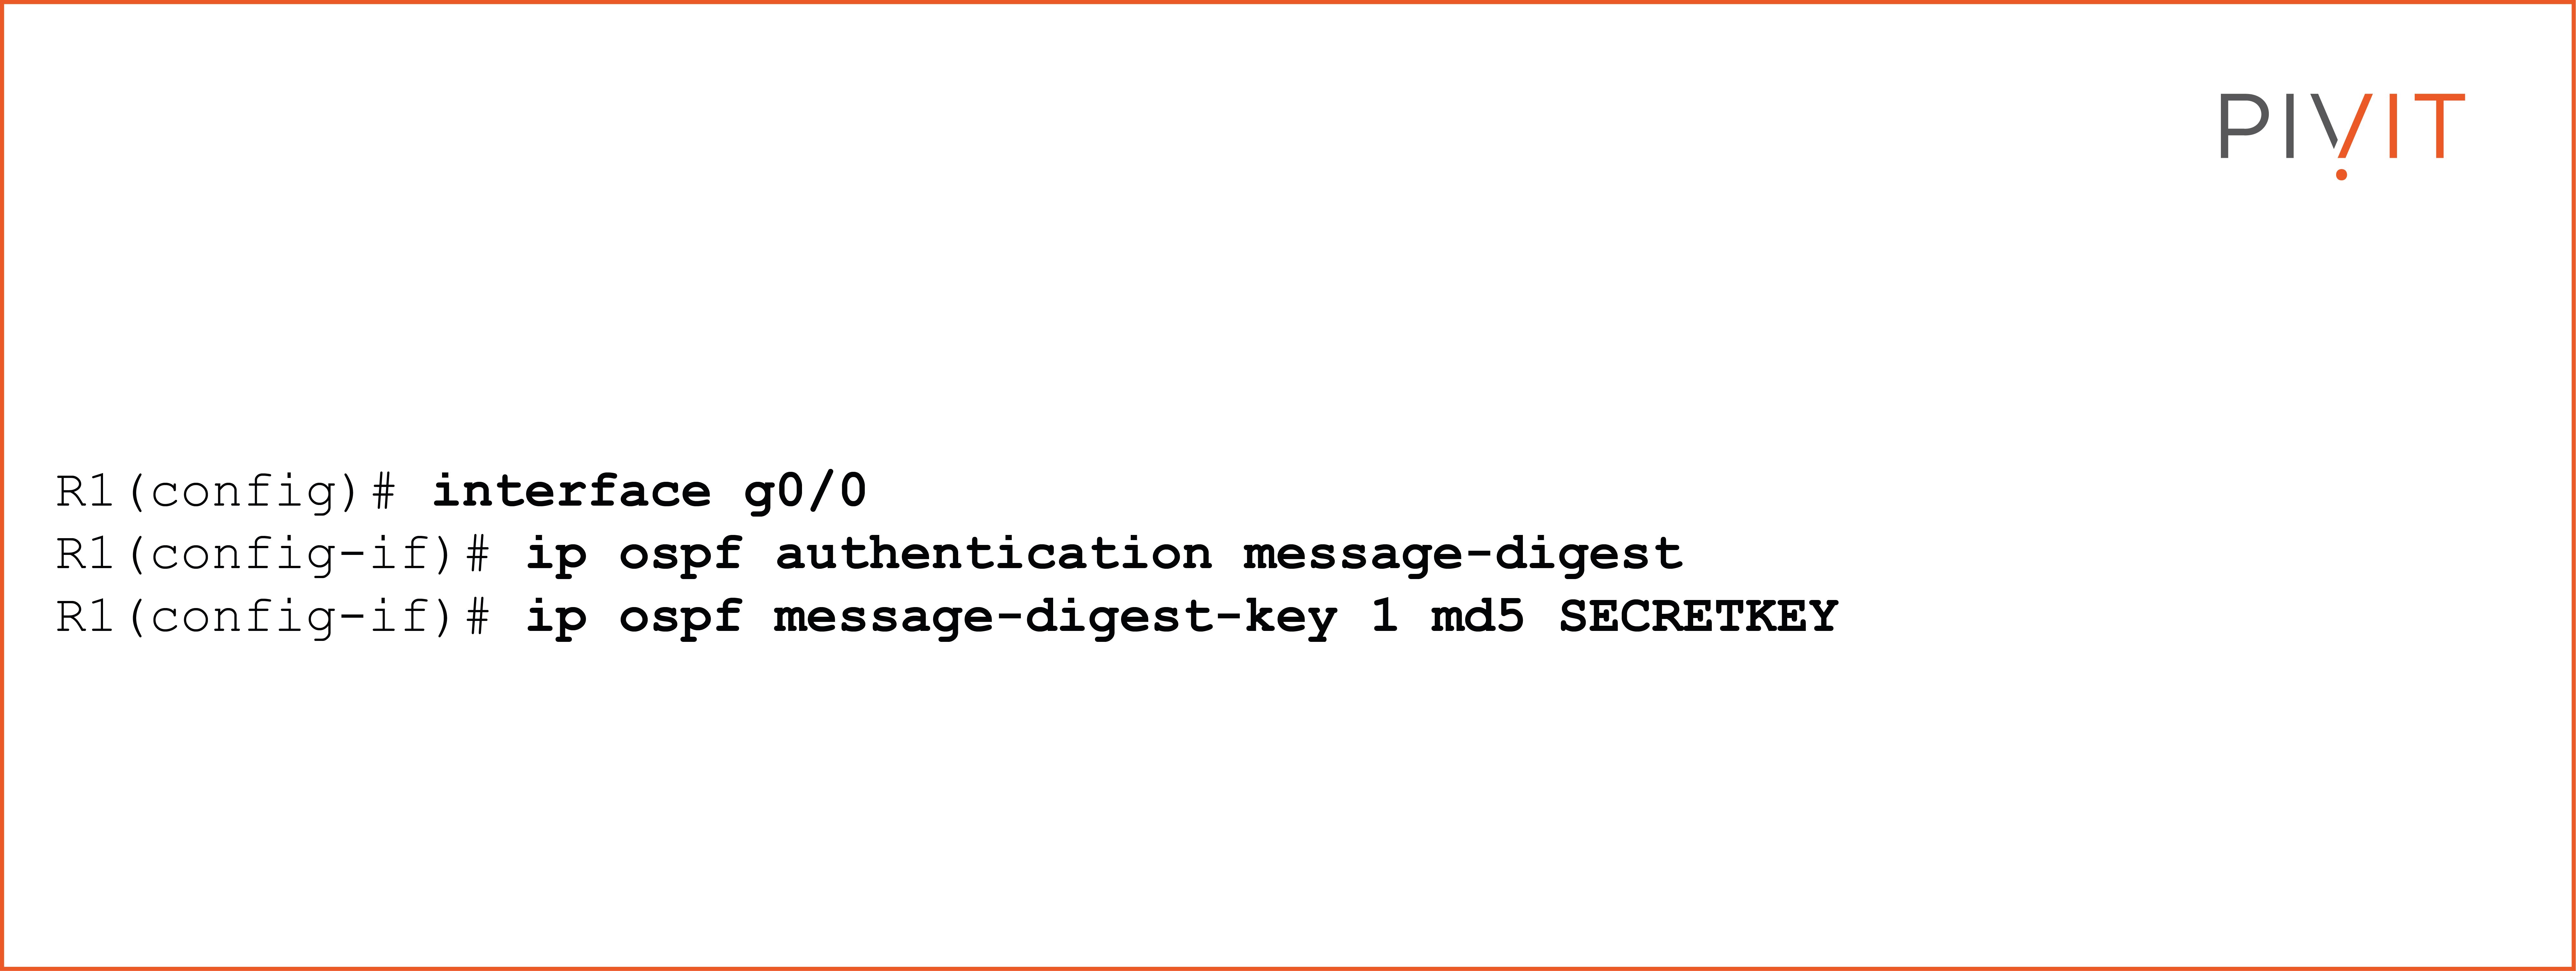
You can also use a key chain for OSPF authentication. Once the key chain is configured, you have to reference it in the desired interface configuration mode using the "ip ospf authentication key-chain OSPF-keys" command.
__________________
Whether trying to protect a small or large data center of varying complexity, a breach in your network can cause a catastrophe. At PivIT, our certified engineers are ready to perform a site survey and provide you with the best firewall for your network, using a mixture of new and legacy units. Let our professionals take care of your network security needs with our EXTEND service.
__________________
BGP Authentication
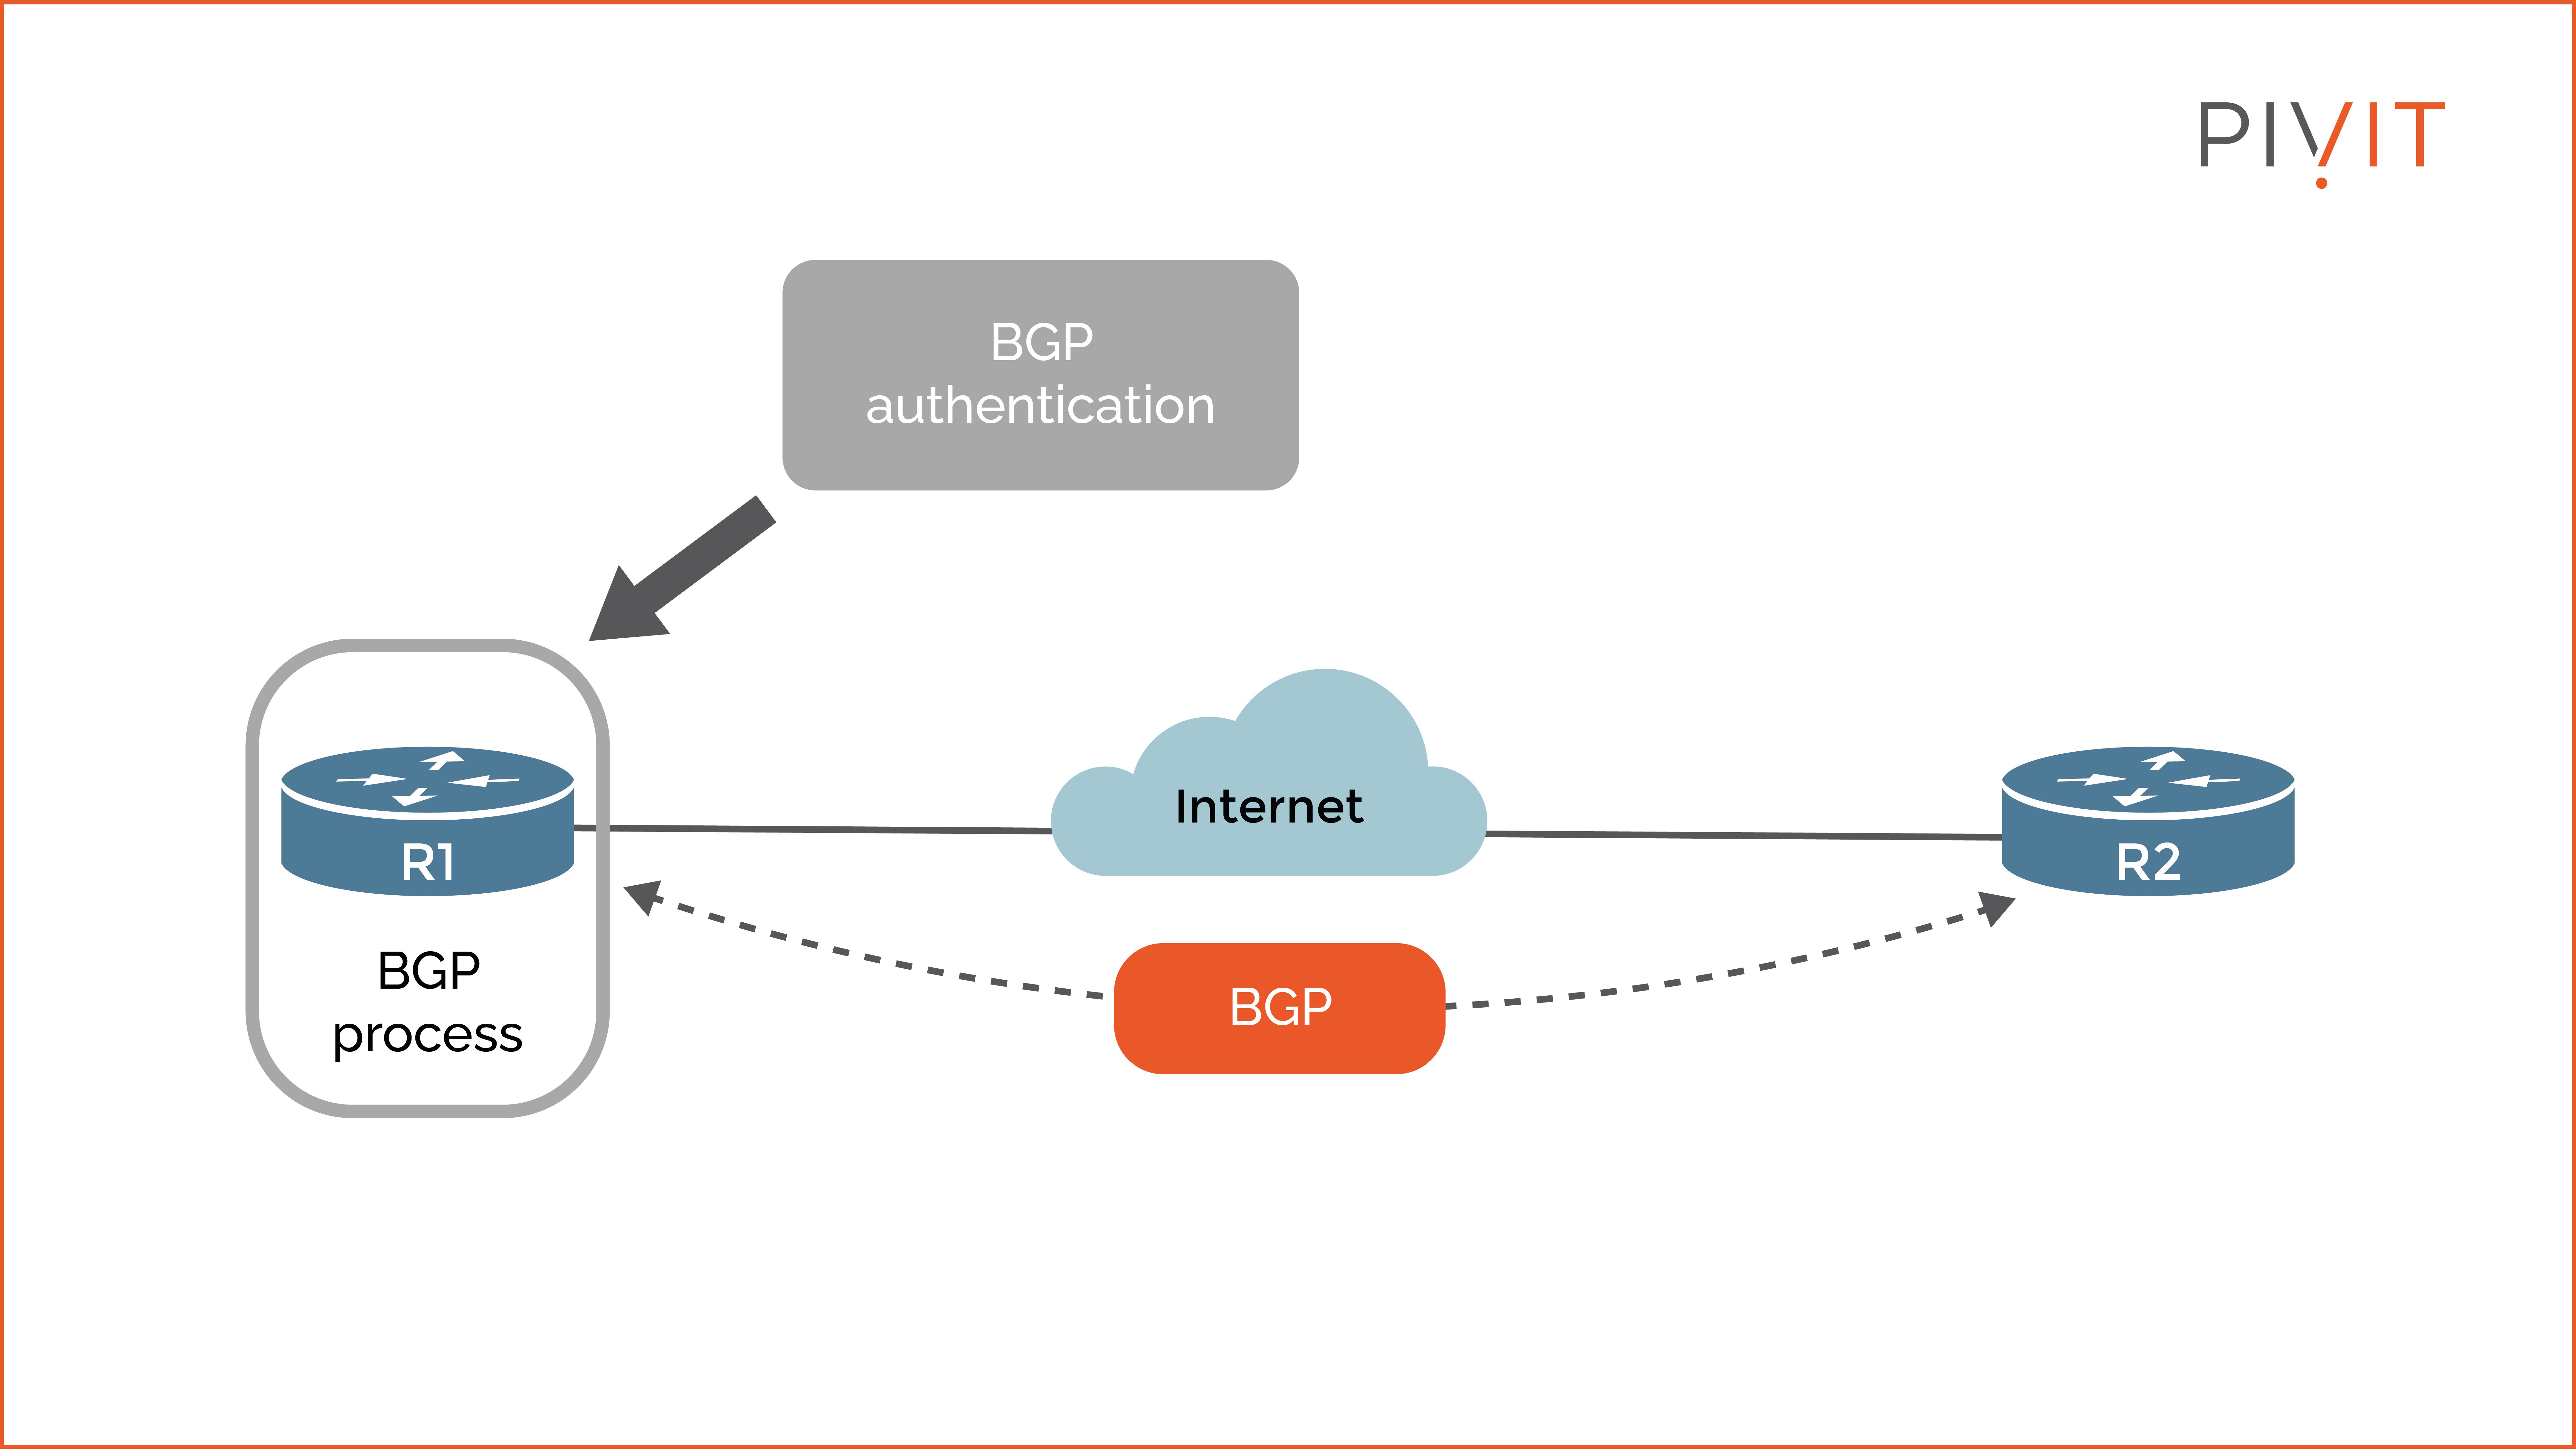
Like EIGRP and OSPF authentication, BGP-enabled routers can authenticate the source of each routing update packet they receive. But, unlike EIGRP and OSPF, BGP supports only MD5 authentication.
This means that the same key (password) must be configured on both BGP peers so that the BGP adjacency can successfully form. Once the relationship is on, each router will generate and check the MD5 hash (also known as digest or fingerprint) of every segment sent on the TCP connection.
Configuring BGP Authentication
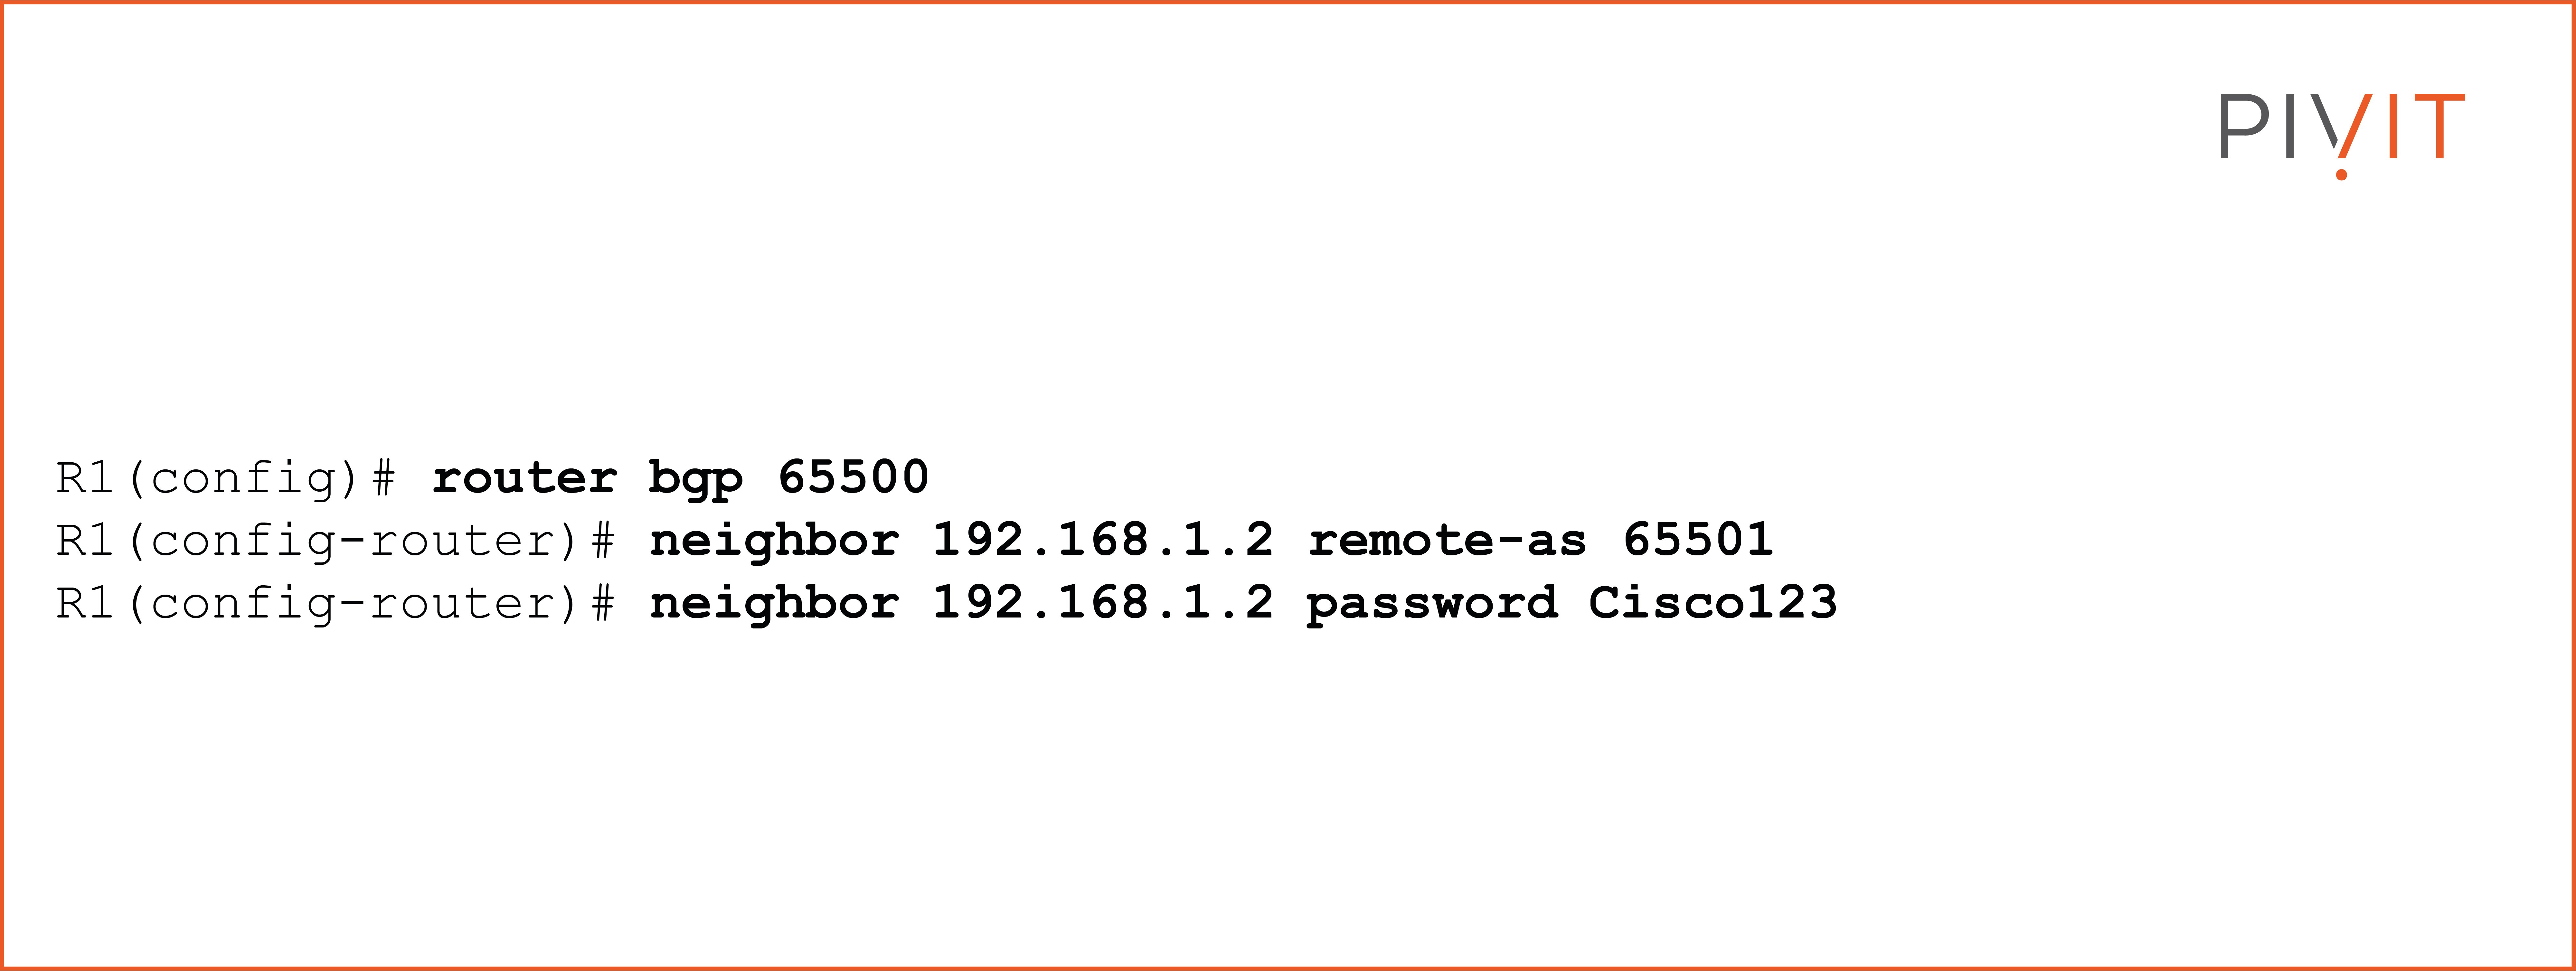
To enable MD5 authentication on a TCP connection between two BGP peers, all you have to configure is a password that will be used for a specific neighbor. This command is entered in the BGP configuration mode.
As you can see in the example below, inside the BGP configuration mode for Autonomous System (AS) 65000, you have to specify the IP address of R1's BGP neighbor to form an adjacency with the BGP peer on the other side. Also, you need to define a password (in this case, "Cisco123") required for MD5 authentication.
View the commands below.
Authenticate and Protect Your Network Today!
Although authentication is an optional feature when implementing routing protocols and not essential for normal routing operations, it always helps to be extra cautious to protect against various attacks. These attacks could include route injection attacks, man-in-the-middle attacks, or denial of service, which can wreak havoc on your enterprise network.
Protect your network even further with a next-generation firewall. PivIT has the router and firewall hardware for any network needs. Send us a request or connect with our Team in real-time using our chat feature.

