-1.png)
OSPF can be implemented by using two different approaches, single-area or multi-area deployment. In a single-area design, all routers are part of the same area and are an appropriate option for small networks. Let’s not forget that in such a scenario many link-state advertisements (LSAs) will be flooded throughout the area and processed by each router.
Even though the advantage of that results in each router accumulating the same knowledge about the topology, the disadvantage outweighs it, causing larger routing tables built on each router.
On the other side, for enterprise networks, a multi-area design is a better option. By using this approach, the network is segmented into smaller domains (areas), each one working independently from the others.
This is accomplished by configuring summarization of routes between the areas on the area border routers (ABR). This results in smaller routing tables by limiting the propagation of LSAs throughout the areas.
In this article, we are going to focus on multi-area OSPF configuration and some additional features that can help in the optimization process of OSPF as well as routing in general.
To brush up on the basics and single area OSPF configurations, go here.
Want to compare interior routing protocols? Read our in-depth comparison here.
OSPF Multi-Area Configuration
Configuring OSPF in multi-area designed networks is not that different than in a single-area design. The difference is that instead of using neighbor adjacencies between the routers in the backbone area only, there is now an OSPF relationship between routers in other areas as well.
On top of that, the ABRs have neighbor adjacencies to routers in multiple areas because they are part of two or more areas (no more than 3 is recommended).
Let PivIT handle the OSPF configuration on your network with EXTEND, which serves as a seamless and confidential extension of your IT teams. Consider us your boots on the ground working to cost-effectively extend your reach and complete your projects.

The image below shows a multi-area OSPF topology with three areas, namely, Area 0 or the backbone area, and then the additional Area 1 and Area 2. We will focus only on the configuration of routers R1 (internal router in Area 1), R2 (ABR), and R3 (backbone router) because the rest of the routers will be configured in the same way.
As for the verification part, we will use other routers as well, to get a better understanding of the benefits of OSPF and its additional features.
.png?width=1920&name=1%20(15).png)
For more details on the basics of OSPF and configuring it in a single-area on a Cisco router, see Part 1 of this two-part series.
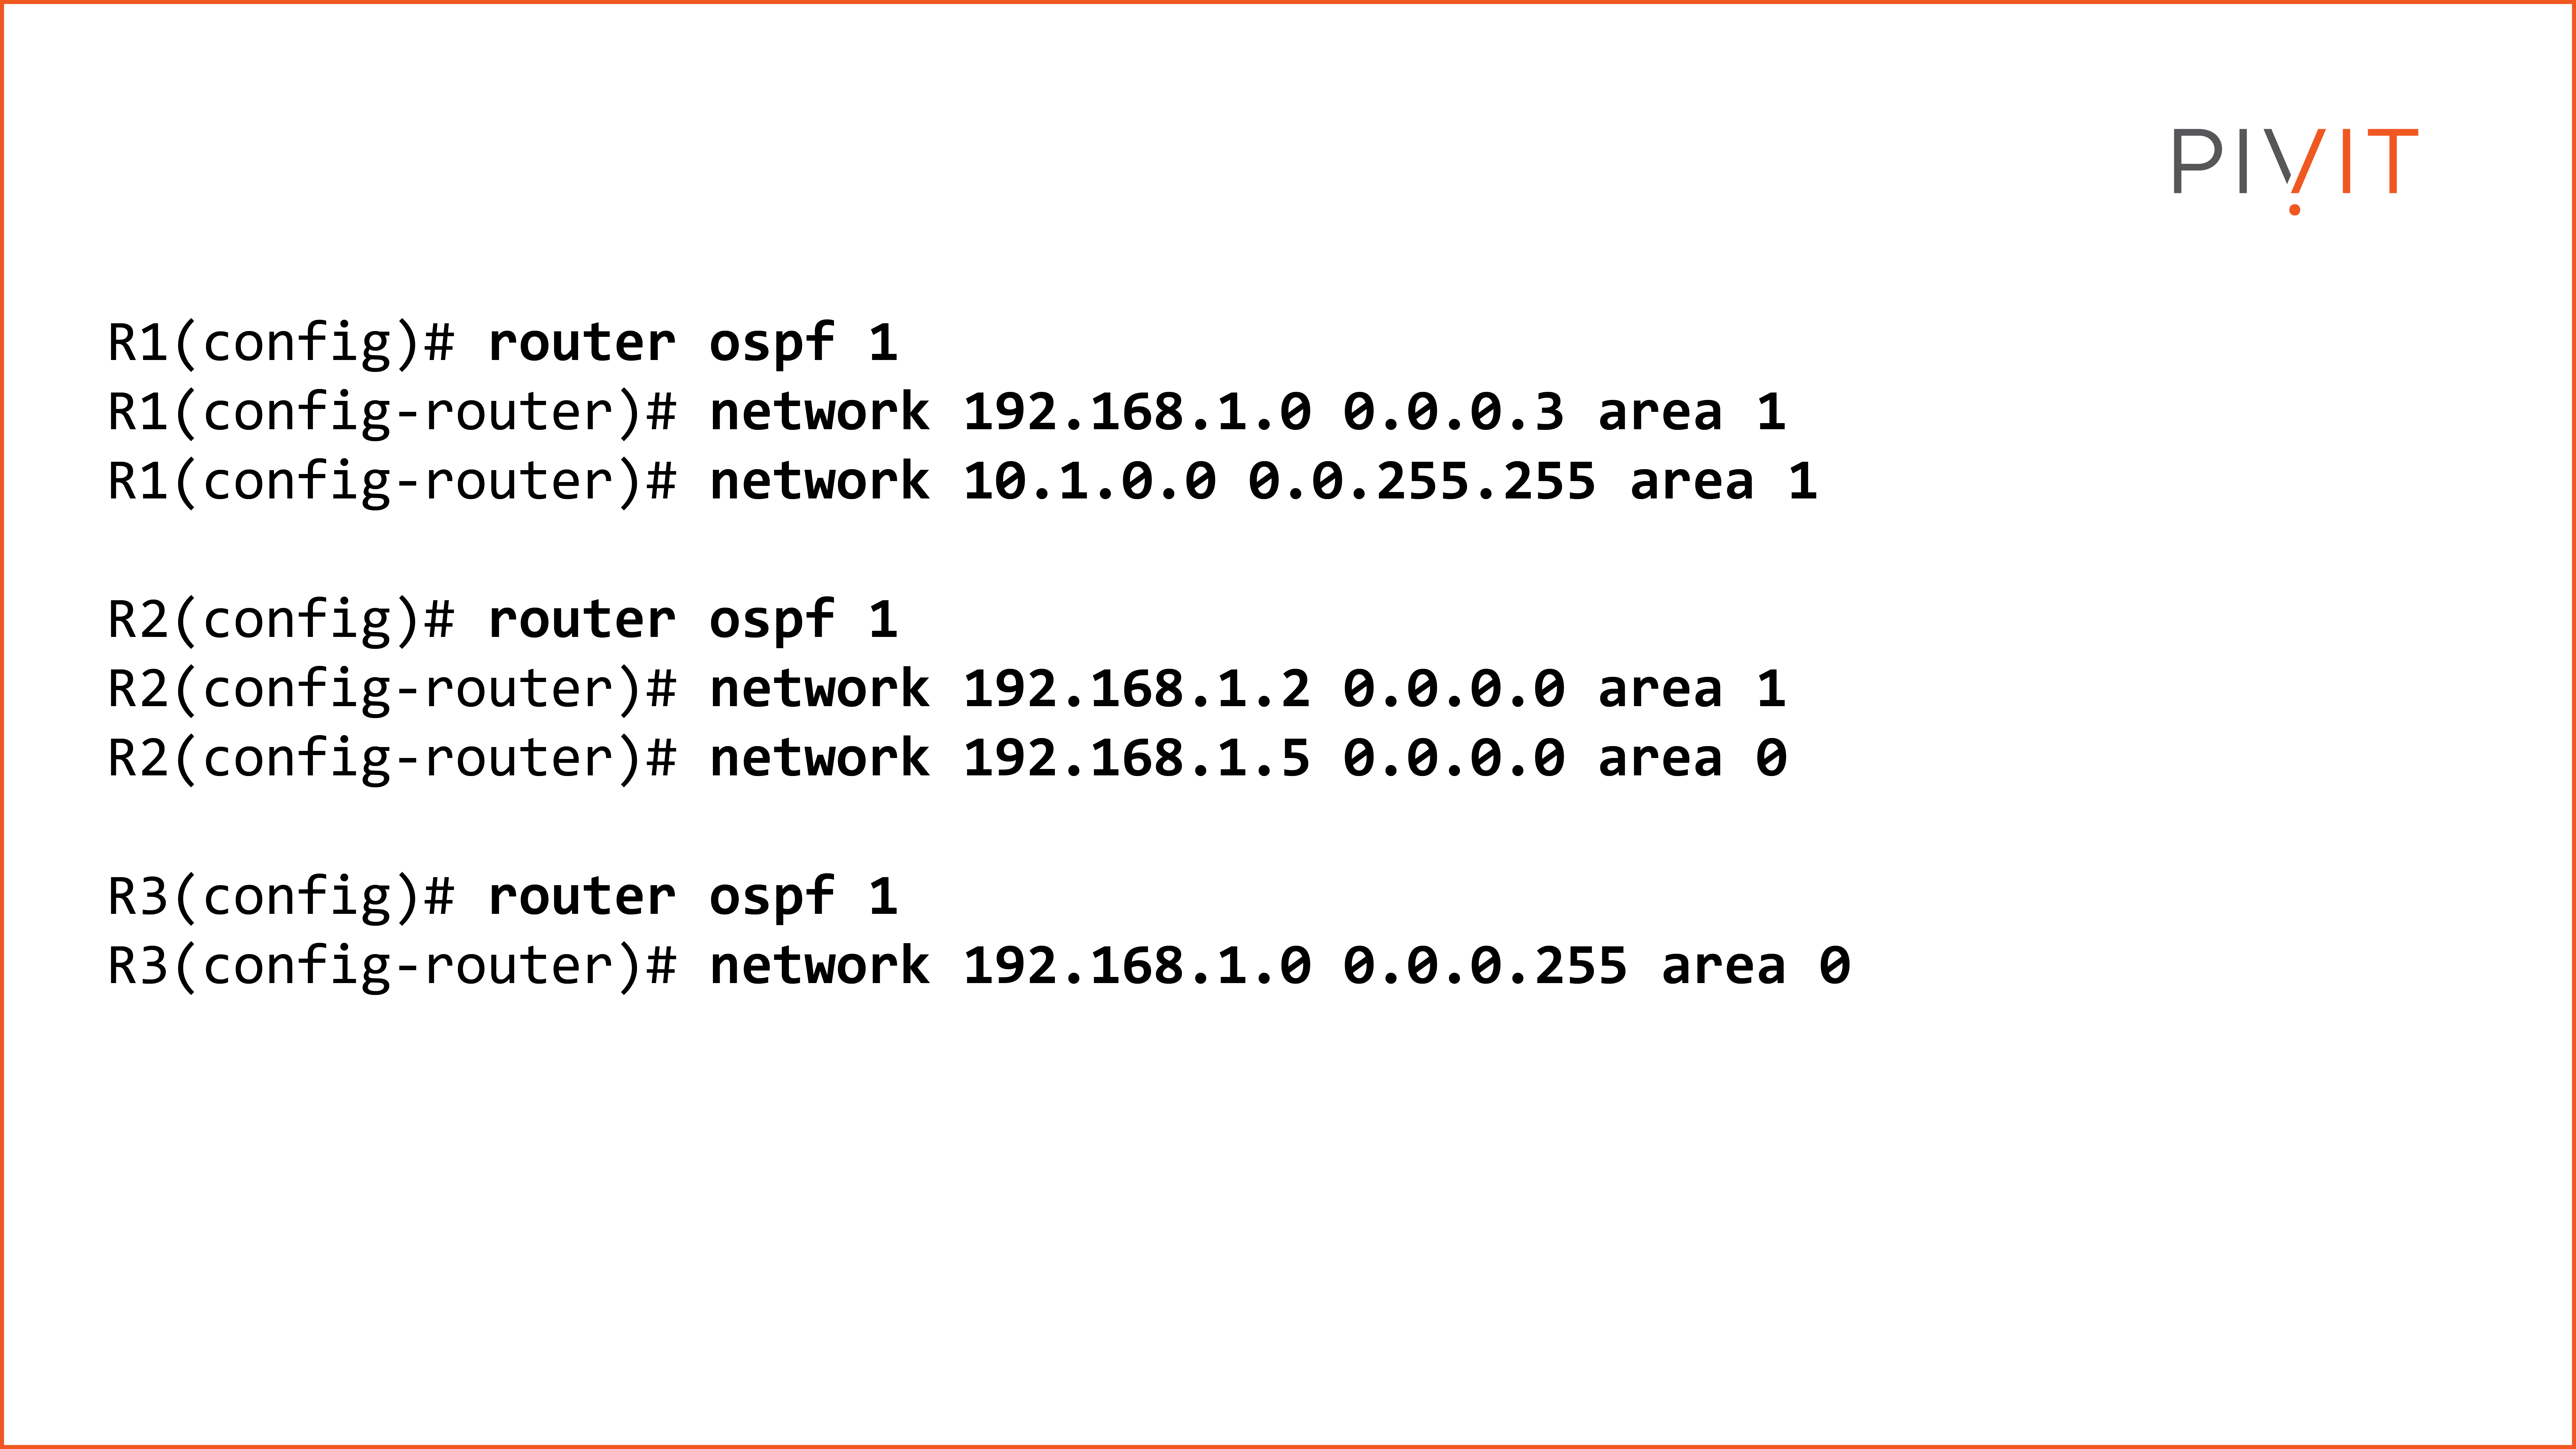
The routers need to be configured for OSPF for the corresponding areas in which they belong. Depending on the network command, OSPF can be enabled on a single interface, multiple interfaces at the same time, or all interfaces.
Once correctly configured, verification is required so we will have confirmation that OSPF is properly operating and routers are learning networks from the other areas.
Since Area 1 contains many networks, all those should be learned by R5 (part of Area 2). For that reason, we will focus on R5 by verifying the routing table if those networks are learned, along with the networks used on the point-to-point links between the routers in the backbone area and Area 1.

If you are having trouble with the OSPF configuration, send PivIT a request or connect with our Team in real-time using our chat feature. Are you looking to configure more routers with OSPF? Click below to see how we can meet your sourcing needs!

Additional OSPF Options
Now that we know how the configuration of OSPF in multi-area design works, we can continue with some additional tuning options to optimize the overall behavior and save on some resources.
OSPF Route Summarization
By default, there is no route summarization performed on the routers when OSPF is enabled. For that reason, two major problems arise: large routing tables and frequent LSA flooding throughout the areas in the Autonomous System (AS).
As a result, each router knows every single network available. However, when something changes, such as a link failure or the network going down, it affects all the other routers in the AS, resulting in recalculations and making appropriate updates without any real benefit.
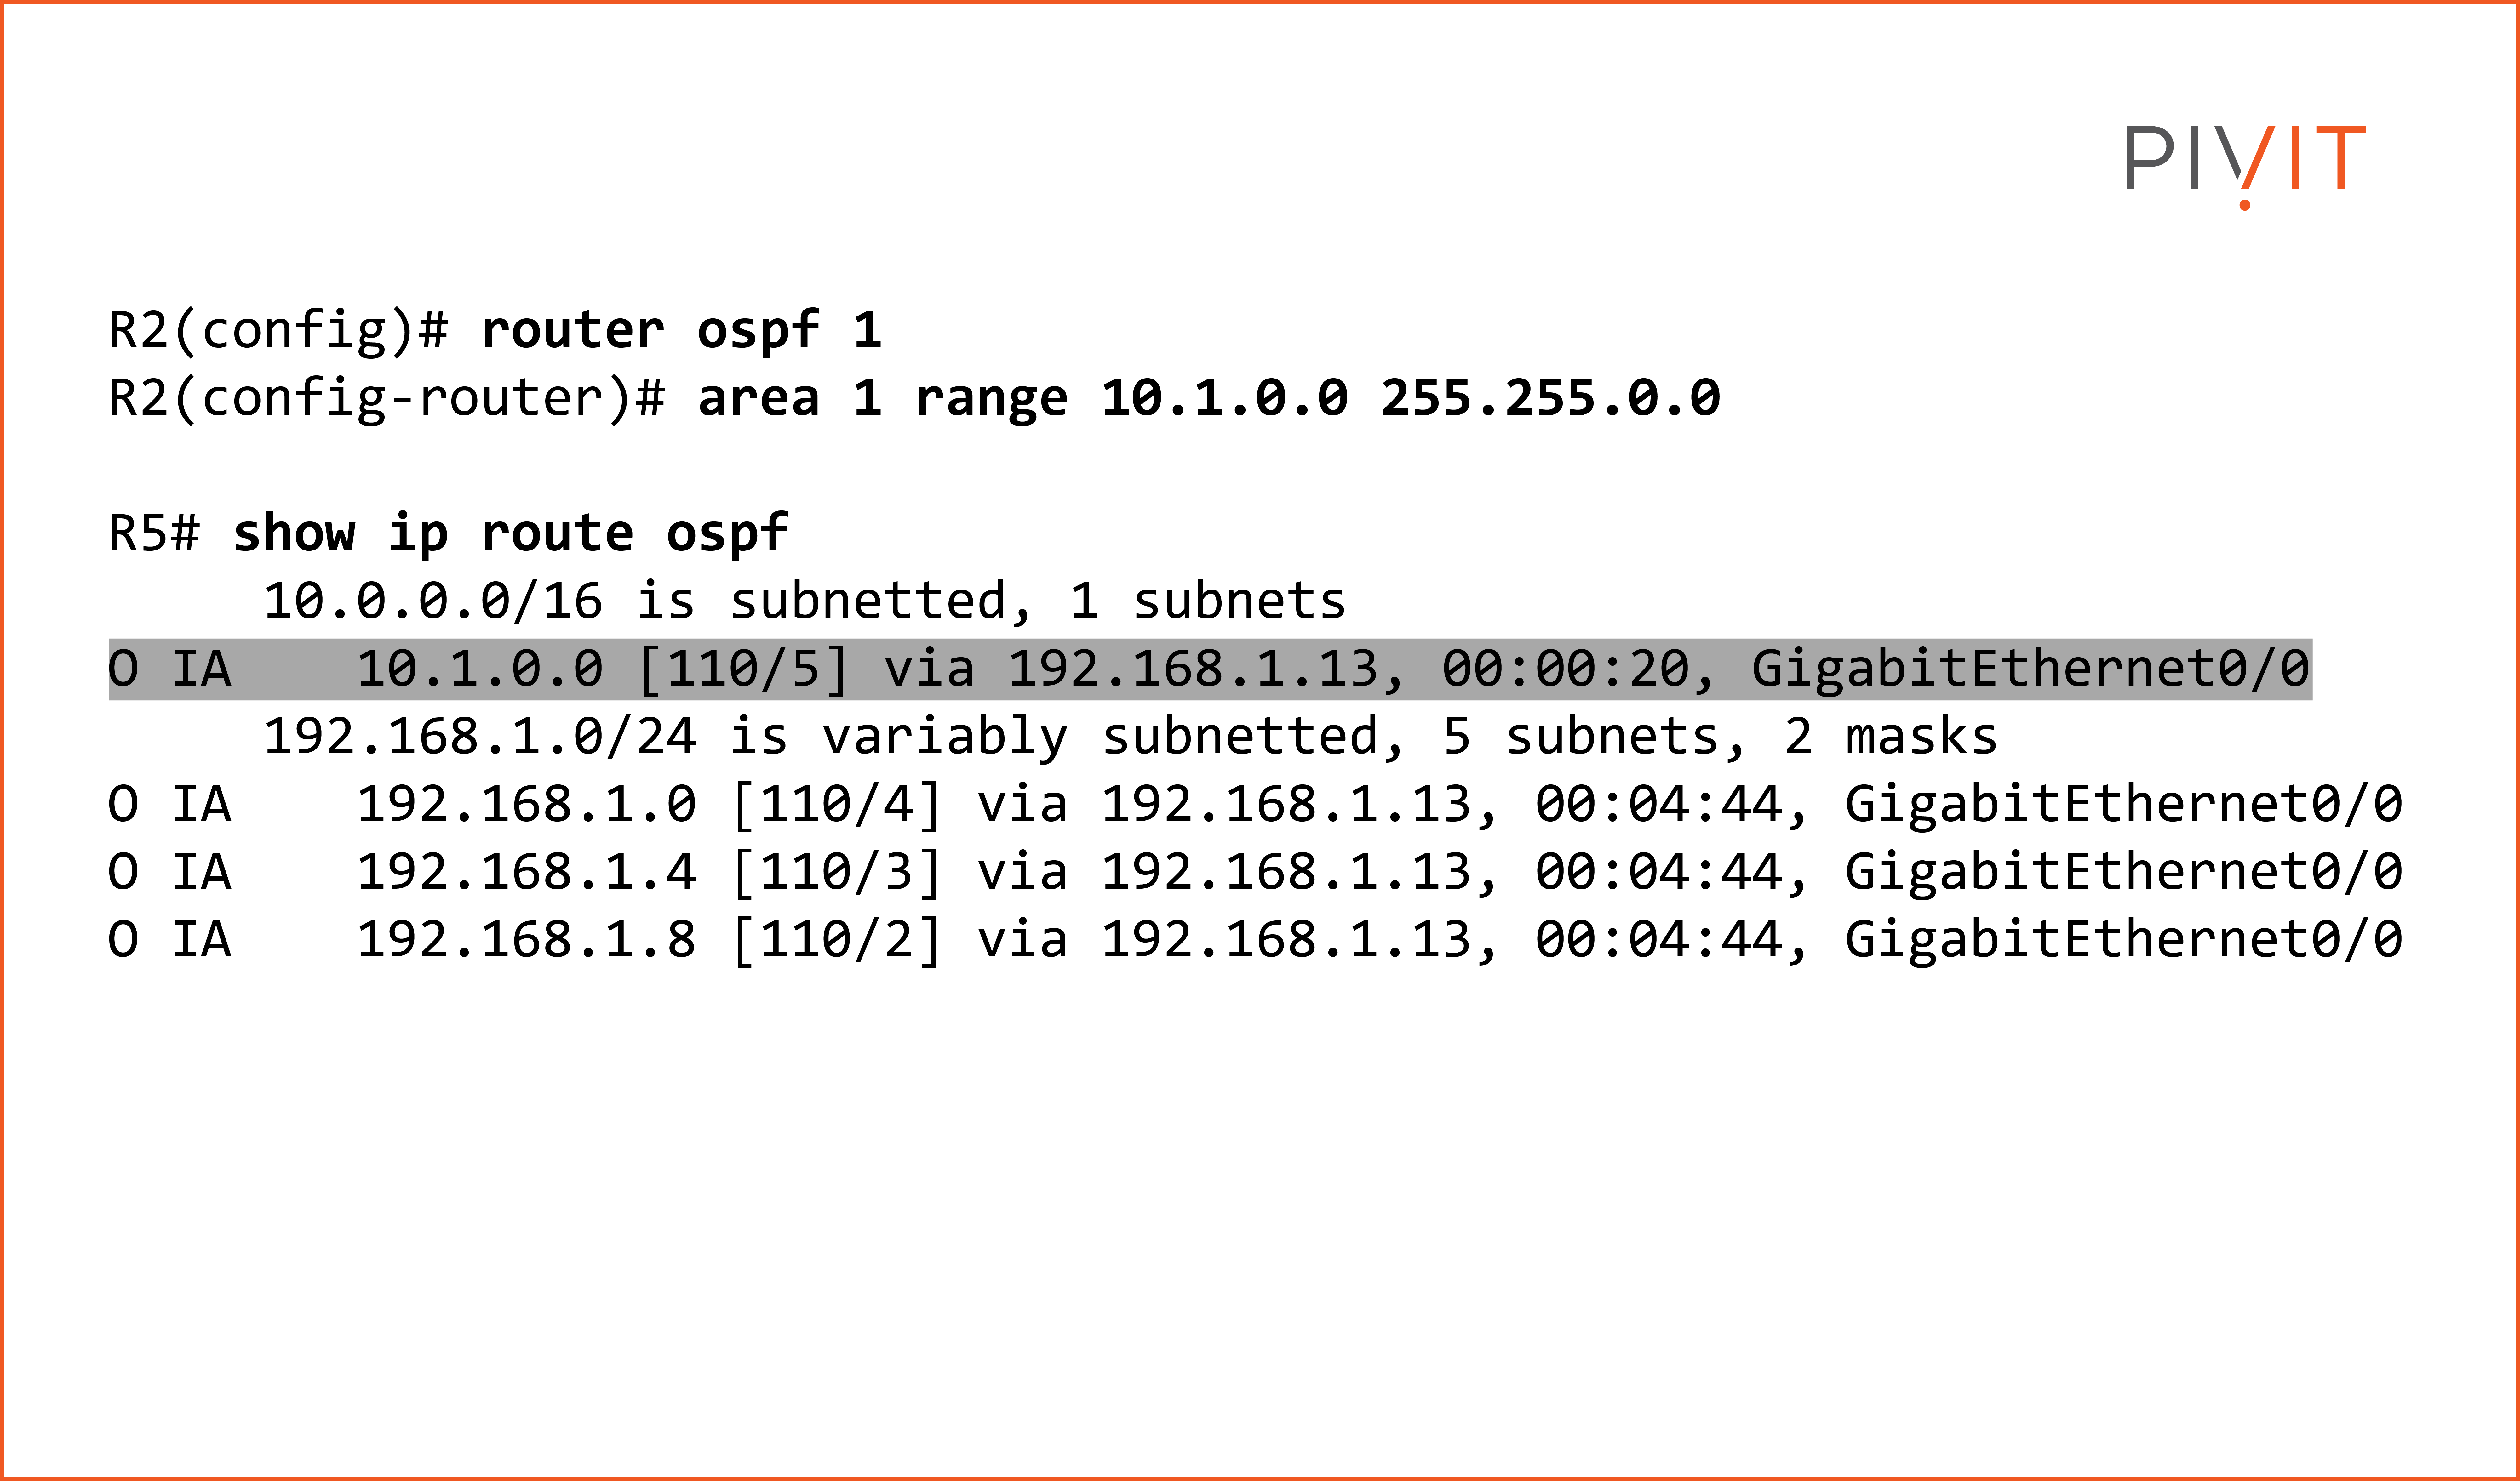
The solution is route summarization which summarizes network updates when they are exchanged between the areas. This is implemented on the ABRs, and instead of sending updates for each network, only one or more summary routes that include all separate routes will be sent to the other areas.
Thus, when something happens to some of the networks in the originating area, it will not reflect on the routers in the other areas using only the summary route containing those networks. Keep in mind that route summarization requires a good addressing plan because summarization of networks works only if they have something in common (e.g., the first two octets).
In the topology image, most of the networks are available in Area 1, so implementing route summarization on the ABR R2 will reduce the routing table size of the other routers from other areas. As a result, R5 in Area 2 should not see the internal networks of Area 1 anymore, but only a summary route.
Default Route in OSPF
Every single router needs a default route so when a route to the destination network is not available in the routing table, the packet can be is sent to the gateway of last resort and not get dropped.
One way of using default routes is to configure them on each router manually, which can be quite difficult in large enterprises. The other way is to exchange a default route dynamically between the routers through the OSPF protocol.
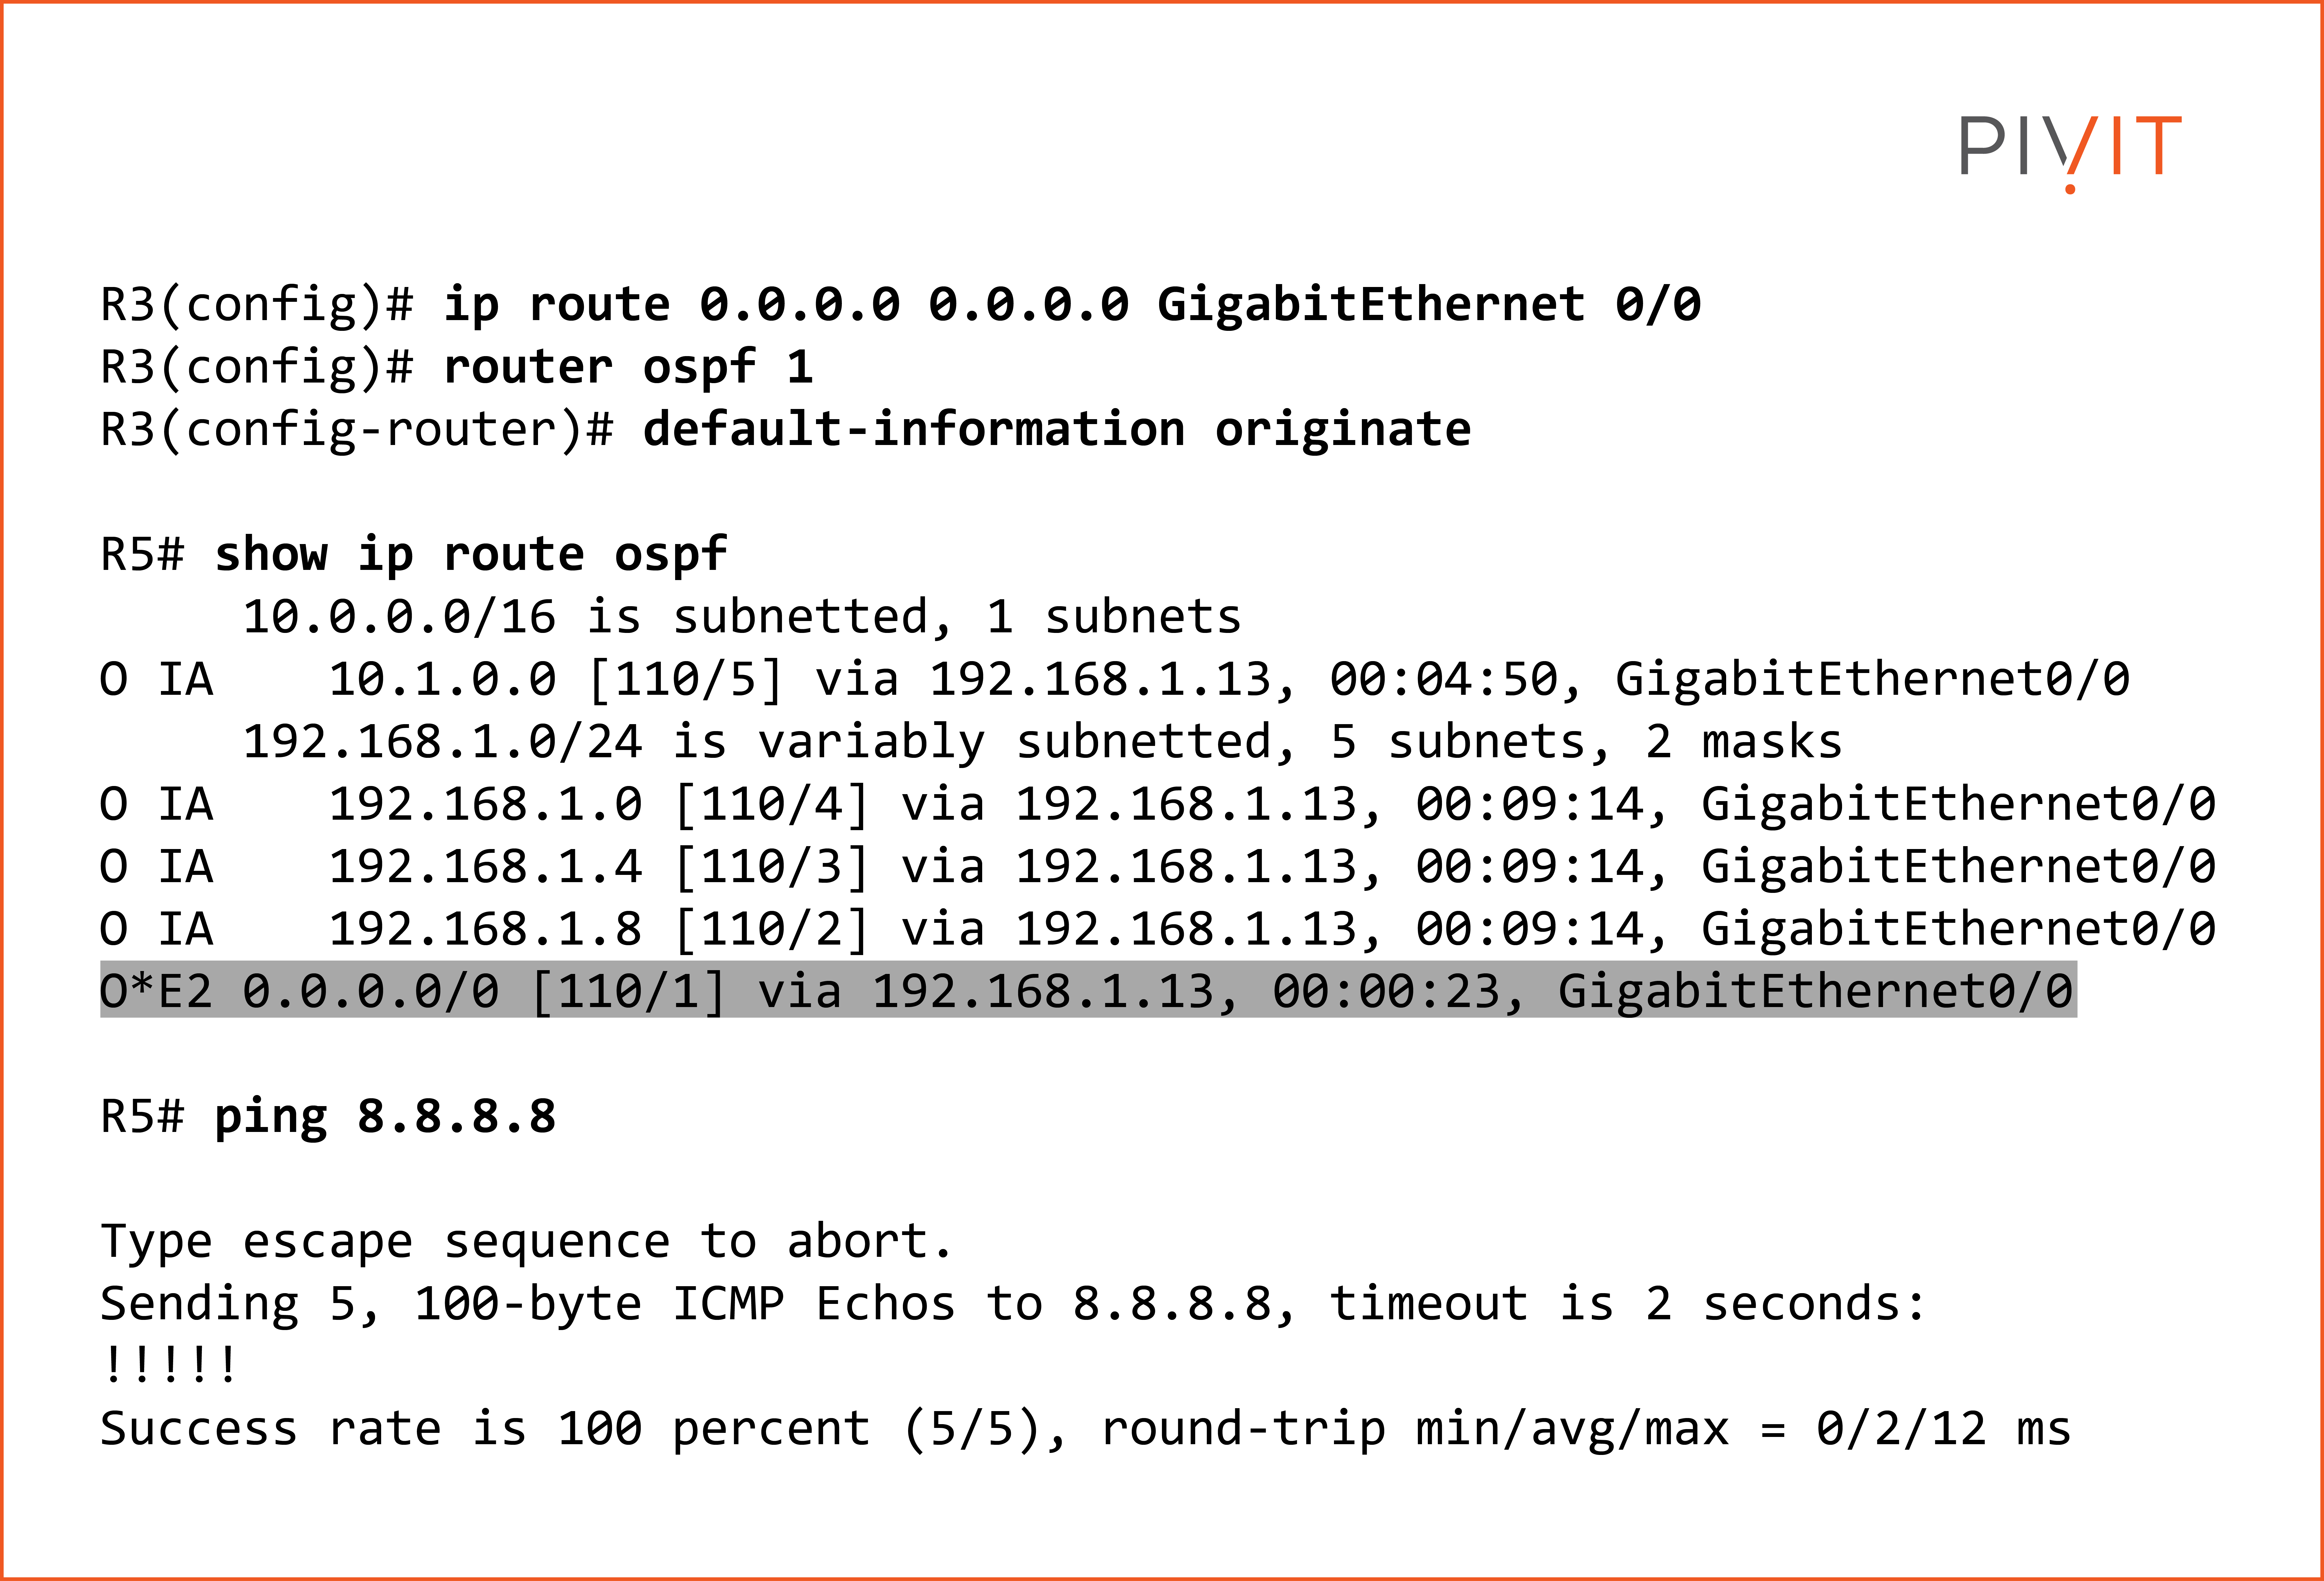
In the topology, R3 is the router that connects to the external AS which can be a partner network or the Internet, so the default route must be available on this router before it starts sharing itself with the rest of the routers in the OSPF domain.
To verify that other routers learn the default route through OSPF, we can check the routing table on R5 and perform a ping to 8.8.8.8 to confirm that it works.
OSPF Special Area Types
The OSPF protocol supports several area types and according to the requirements and the goal, one or another might be a better fit. By default, when configuring areas in the OSPF domain all those are of type normal.
However, additional area types can be used, such as stub area, totally stubby area, not-so-stubby area (NSSA), and totally not-so-stubby area. Even though the names sound funny and strange, these are the real names, and each area type performs differently.
The main idea behind the area types is to filter out the amount of information learned and stored on the routers. Filtering some of the LSAs exchanged results in reducing the size of the link-state database (LSDB) of the routers inside the area, as well as the memory required.
For example, instead of one router knowing every single network in the topology, changing the area type will result in learning only networks from other areas, but not external to the OSPF domain, or just a default route to reach any network outside the local area, including the external domain.
To see the benefits of the area types, we will configure Area 2 as a totally stubby area. This will filter out everything on R5 except the default route (and the local networks from Area 2), that will be used to reach any other network in the OSPF domain or the external domain. Therefore, both routers R4 and R5 should be configured properly, defining Area 2 as a totally stubby area.
OSPF Configuration Summary
To summarize, the OSPF protocol has been on the market for a very long time and is the most used protocol in the networks today. Besides its simplicity, it offers many additional tuning features that can optimize the performance as well as the overall routing process.
Additionally, authentication can be used as a protection from undesired OSPF links between the routers. For more information about OSPF authentication and why it is so important, look at our article entitled An Engineer's Guide to Configuring OSPF Authentication.