Virtual Private Network (VPN) technology is the most cost-effective and flexible solution that provides secure traffic transfer over untrusted networks such as the internet. About 31% of internet users have used a VPN service, which is growing yearly. Regardless of the VPN service/type, VPN implementation consists of several negotiation steps.
Although IPsec and TLS protocols can be used for securing communications, IPsec is typically deployed in site-to-site VPN implementations. The VPN negotiation process is performed in two main steps.
In the Internet Key Exchange (IKE) Phase 1, a secure tunnel is created, over which IKE Phase 2 establishes the security parameters for protecting the real data exchanged between remote sites.

In this article, we will provide the following:
- A detailed overview of the site-to-site tunnel negotiation process,
- the steps involved in each IKE phase,
- the supported security options, and
- a 5-step site-to-site VPN configuration on Cisco ASA routers.
You can check out some of our related articles:
- What Is a GRE Tunnel and How Do You Configure One?
- Your Best Security System: Cisco ASA vs. Fortinet FortiGate
Site-to-Site Tunnel Negotiation Process Overview
The VPN negotiation process is performed in two phases, and each phase is responsible for creating a different tunnel. However, in the end, the goal of the VPN negotiation process is to establish a tunnel within a tunnel that provides a secure way of exchanging data between remote sites.
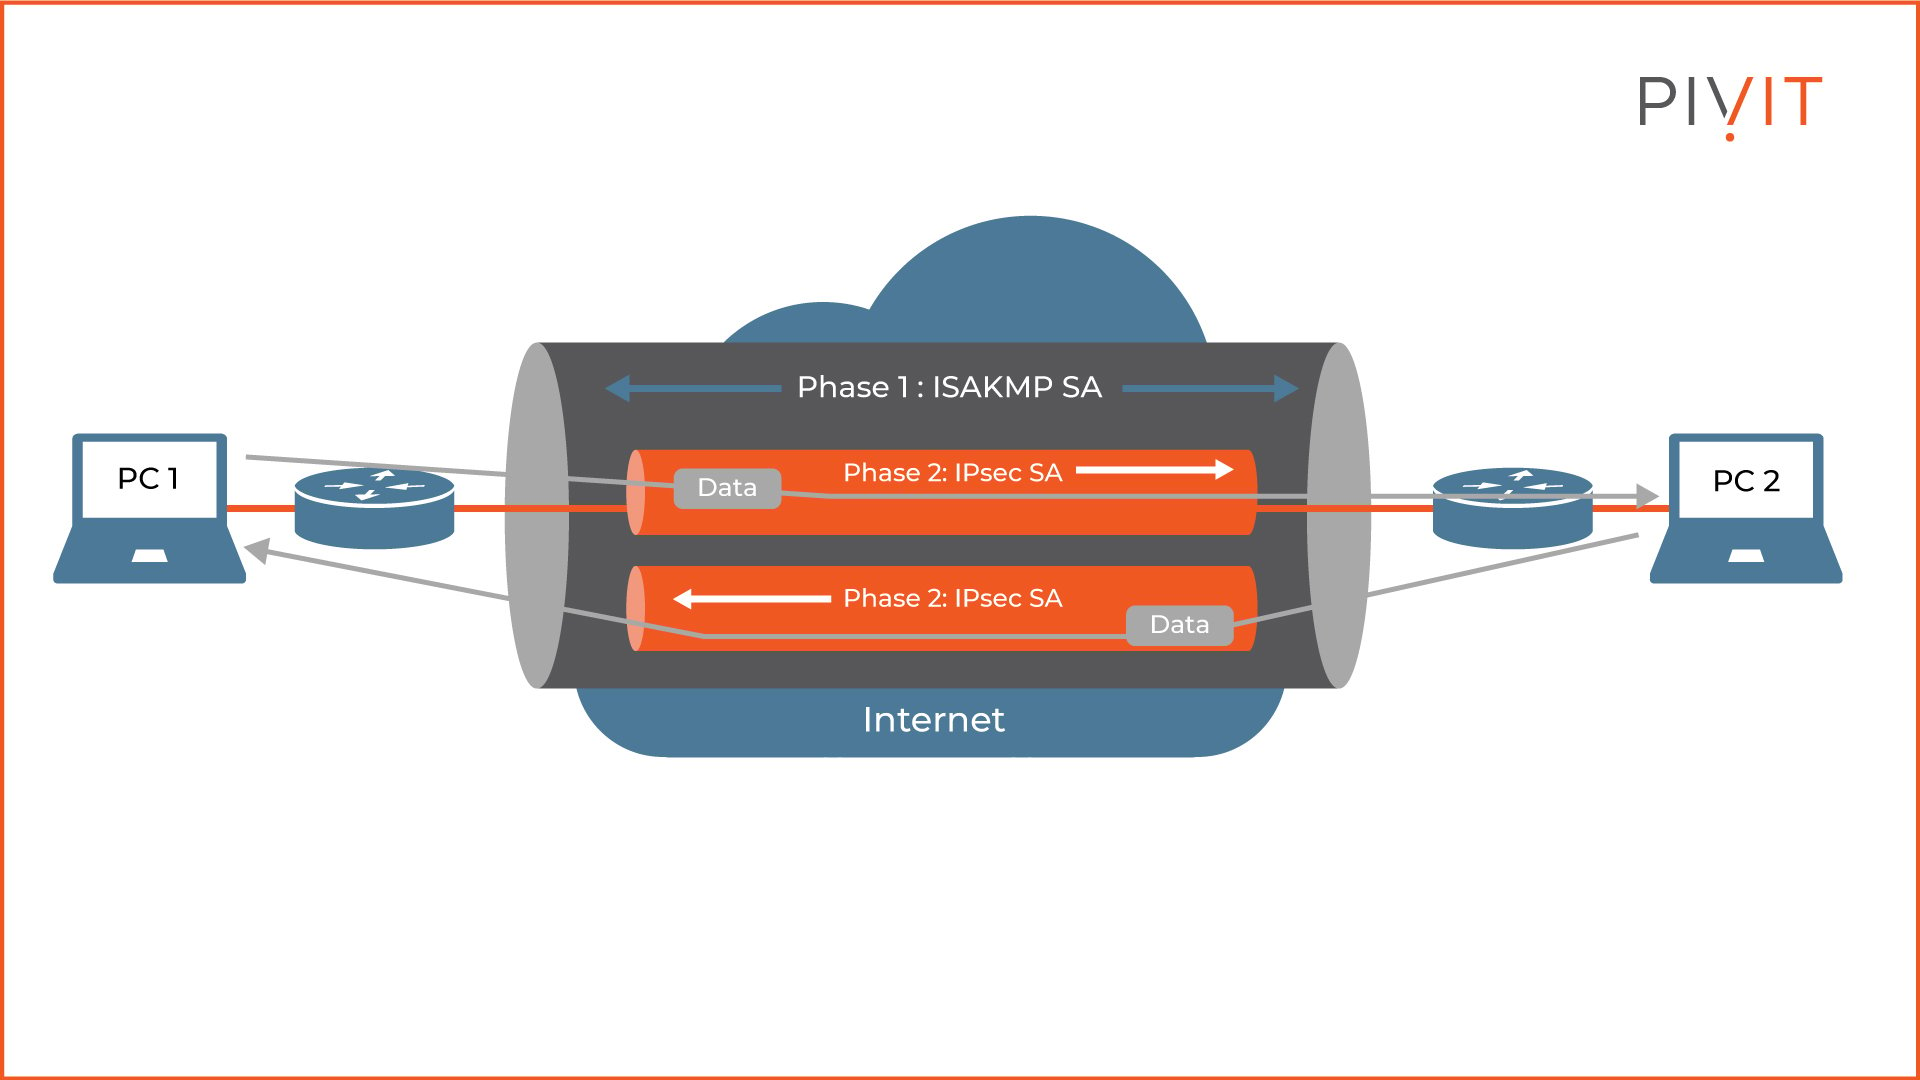
As shown in the image, the ISAKMP Security Association (SA) created in Phase 1 defines the outer bidirectional tunnel responsible for protecting the negotiation process of the IPsec SAs in Phase 2.
These unidirectional IPsec SAs represent the inner tunnels, and their responsibility is to protect the user data. When the existing IPsec SAs expire, they are replaced with new IPsec SAs negotiated using the ISAKMP SA.
__________________
Options That You Can Choose From
PivIT offers a unique and wide selection of hardware and financing options. We also offer OEM options that give you the flexibility you need to develop your network.

__________________
5-Step Site-to-Site Configuration Process
The site-to-site VPN implementation process on a Cisco router contains five steps. Each step must be correctly configured to establish a VPN tunnel between remote routers. The steps are as follows:
- Initially, you must ensure that any access control lists (ACLs) applied on the router are compatible with IPsec traffic, or in other words, they permit IPsec traffic.
- Configure ISAKMP policies with parameters that will be used to establish the outer tunnel in Phase 1.
- Configure IPsec transform sets to define how the traffic data will be protected when exchanged in IPsec SAs.
- Create a crypto ACL to define which traffic (aka “interesting traffic”) should be protected and sent through the VPN tunnels built in Phase 2.
- Create a crypto map to bind all previously configured parameters and apply it to the outgoing VPN interface on the router.
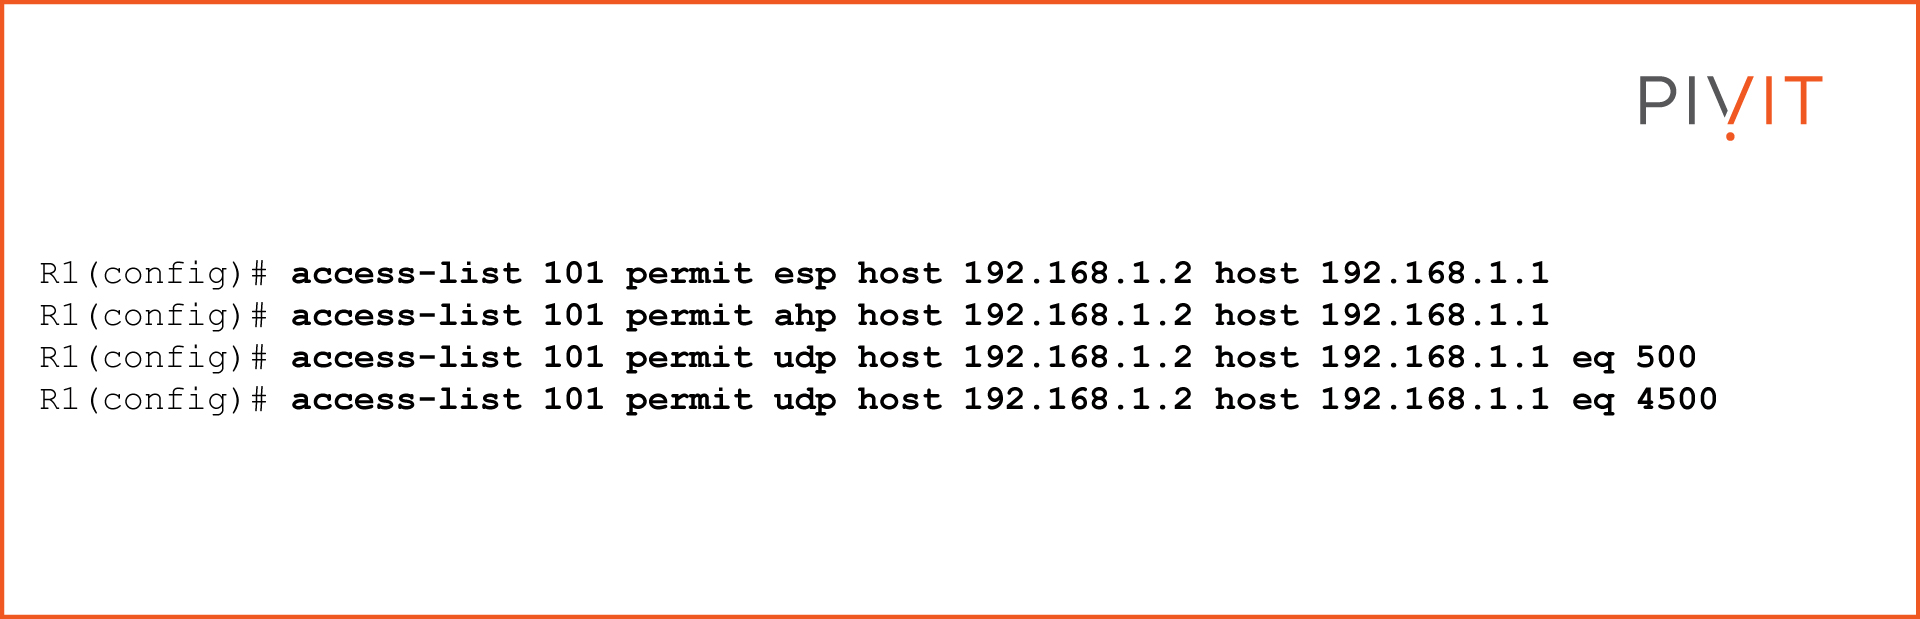
Step 1: Permitting IPsec in the ACLs
The first step in a VPN configuration is to ensure that any ACLs applied on the routers or firewalls in the network do not block the IPsec traffic. Usually, perimeter devices have restrictive policies that allow only specific traffic and deny everything else.
Since the VPN traffic is not an exception to this rule, the best approach is to add new entries in the existing ACLs so that they permit the necessary VPN protocols:
- Encapsulating Security Payload (ESP) - protocol 50
- Authentication header (AH) – protocol 51
- ISAKMP – UDP port 500
- Non500-ISAKMP – UDP port 4500
%20are%20allowed%20to%20flow%20between%20routers%20R1%20and%20R2.jpg?width=1920&height=1080&name=VPN%20protocols%20(IKE%2c%20ESP%2c%20AH)%20are%20allowed%20to%20flow%20between%20routers%20R1%20and%20R2.jpg)
As shown in the image, VPN protocols must be allowed in the communications between the routers. Let’s assume that an ACL 101 on R1 is applied on interface GigabitEthernet0/1 in the inbound direction. To allow ESP, AH, and IKE traffic, you need to add the following ACL entries to the existing ACL:
Step 2: Configuring ISAKMP Policies
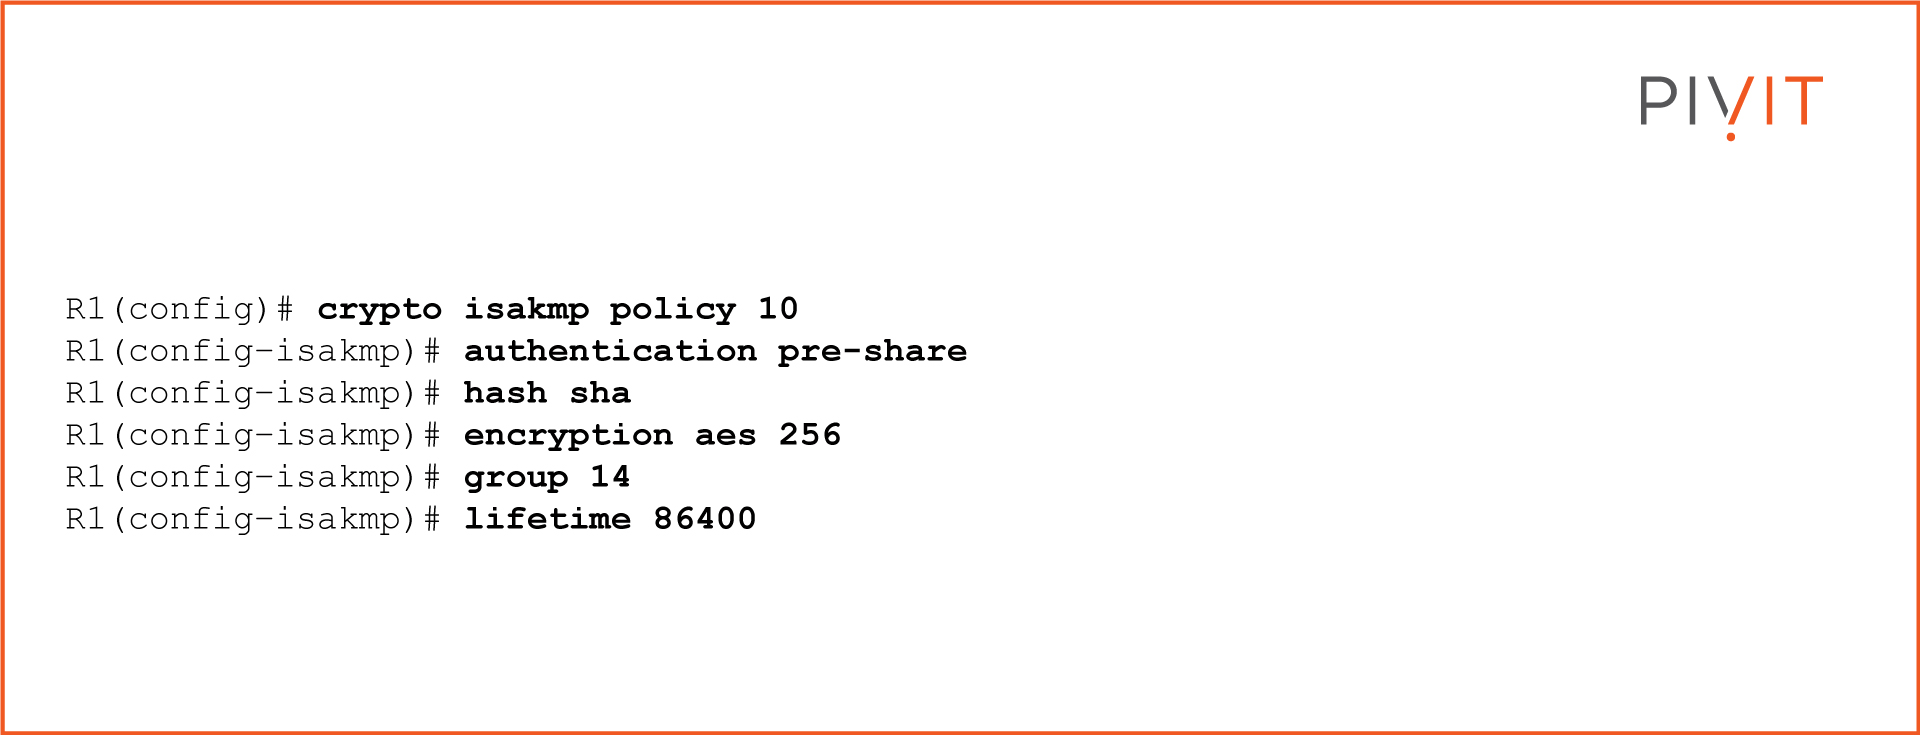
To successfully create a secure tunnel in IKE Phase 1, both routers must agree on common parameters used during the VPN establishment process. These parameters are defined inside an ISAKMP policy. Policies can include different ISAKMP parameters for encryption, hashing, authentication, Diffie-Hellman group, and lifetime.
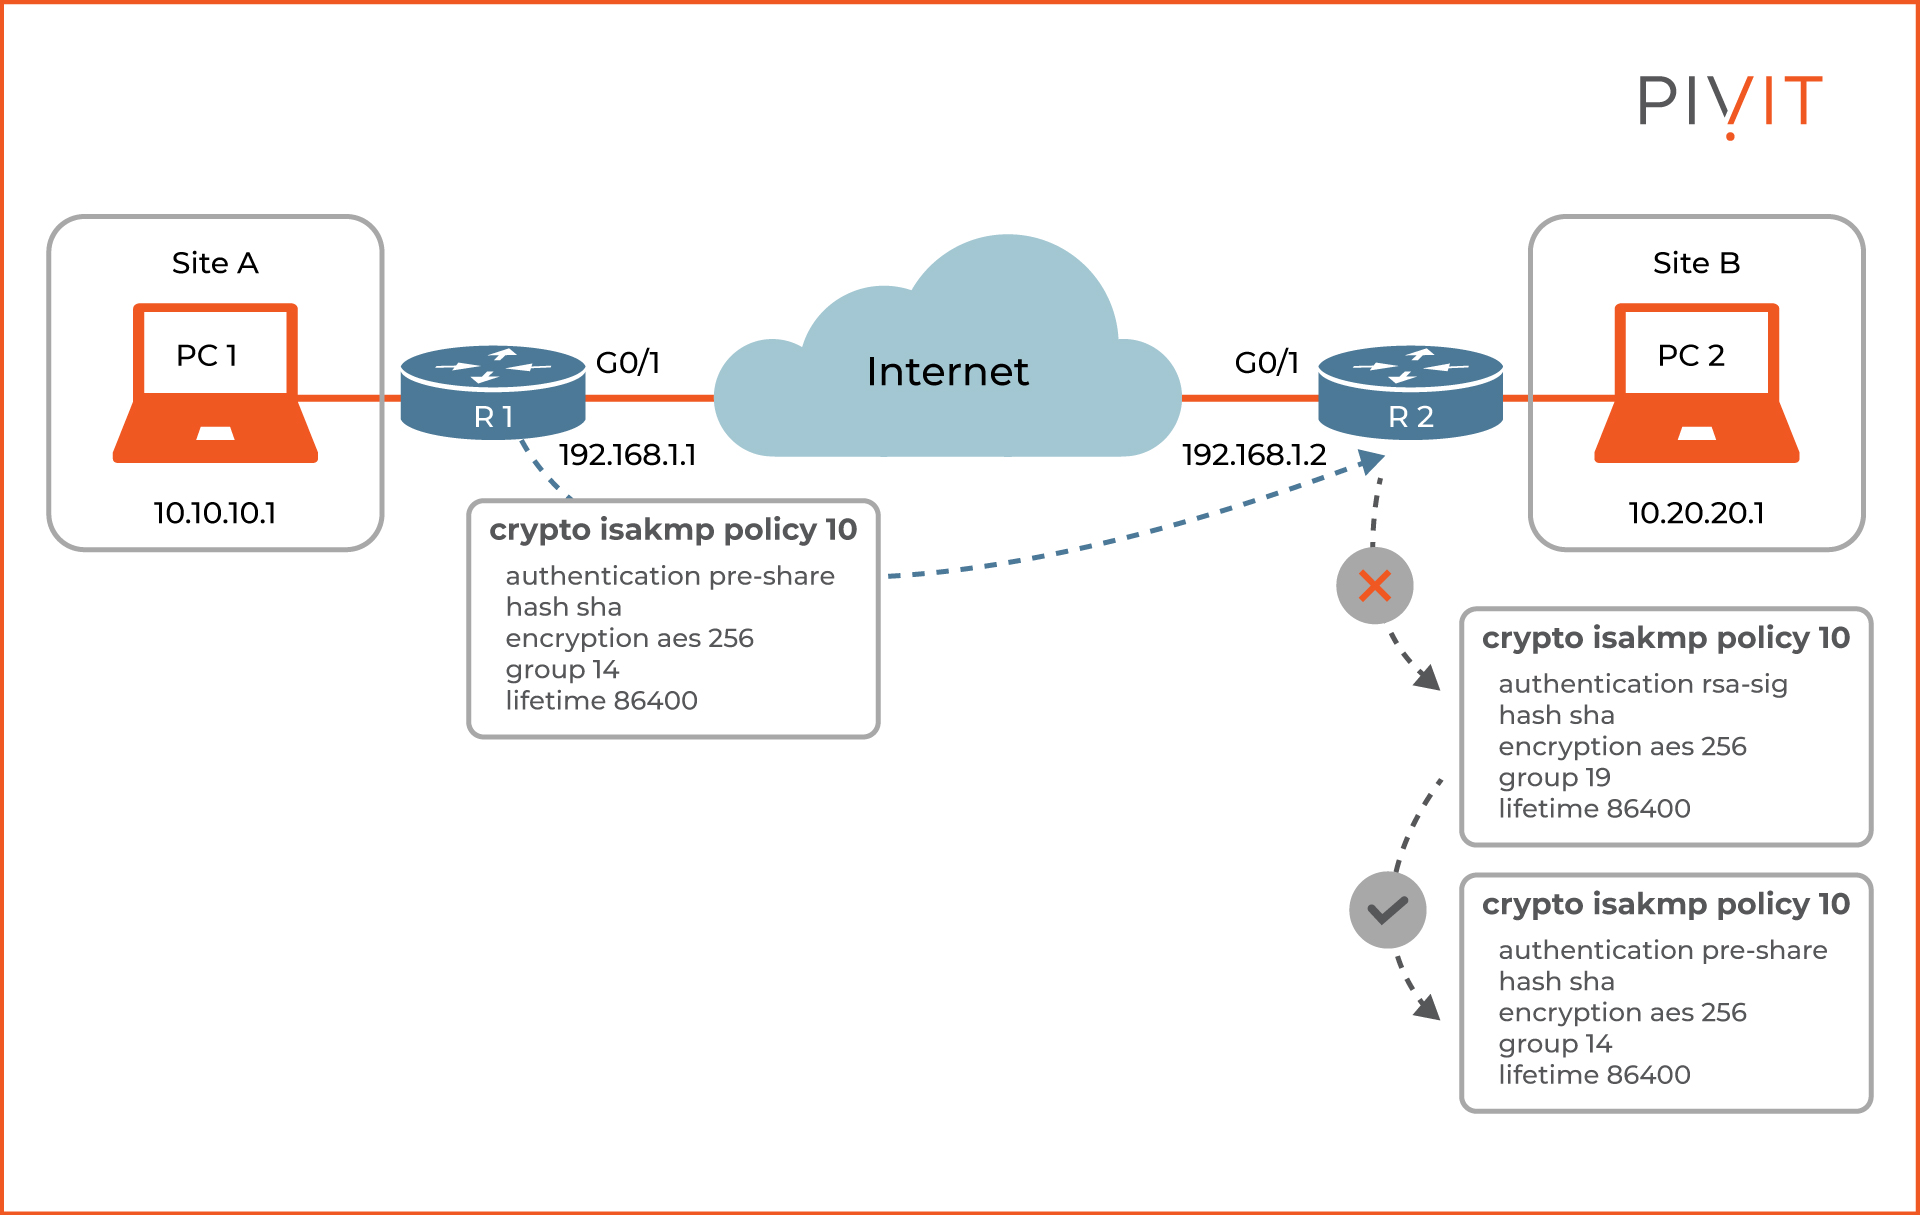
When the ISAKMP negotiation begins in IKE Phase 1, ISAKMP looks for a policy that is the same on both routers. As you can see in the image above, the router (R1) that initiates the ISAKMP negotiation process sends all its policy proposals (in our example, there is only one) sets to the remote router. The router then tries to find a match with one of its locally available policies.
If a match is found, ISAKMP completes IKE Phase 1 negotiation, and the process continues to Phase 2, where the IPsec SAs are created. However, if no match is found, ISAKMP refuses the negotiation, and IPsec cannot establish.
The commands to configure ISAKMP policy 10 with corresponding parameters on R1 are:
Step 3: Configuring Transform Sets
During the IPsec SAs negotiation process in IKE Phase 2, the routers must agree on common security parameters that will be used to protect the real data. These parameters are defined inside a transform set. Different transform sets can include different IPsec parameters for payload authentication, payload encryption, and IPsec mode (tunnel or transport).
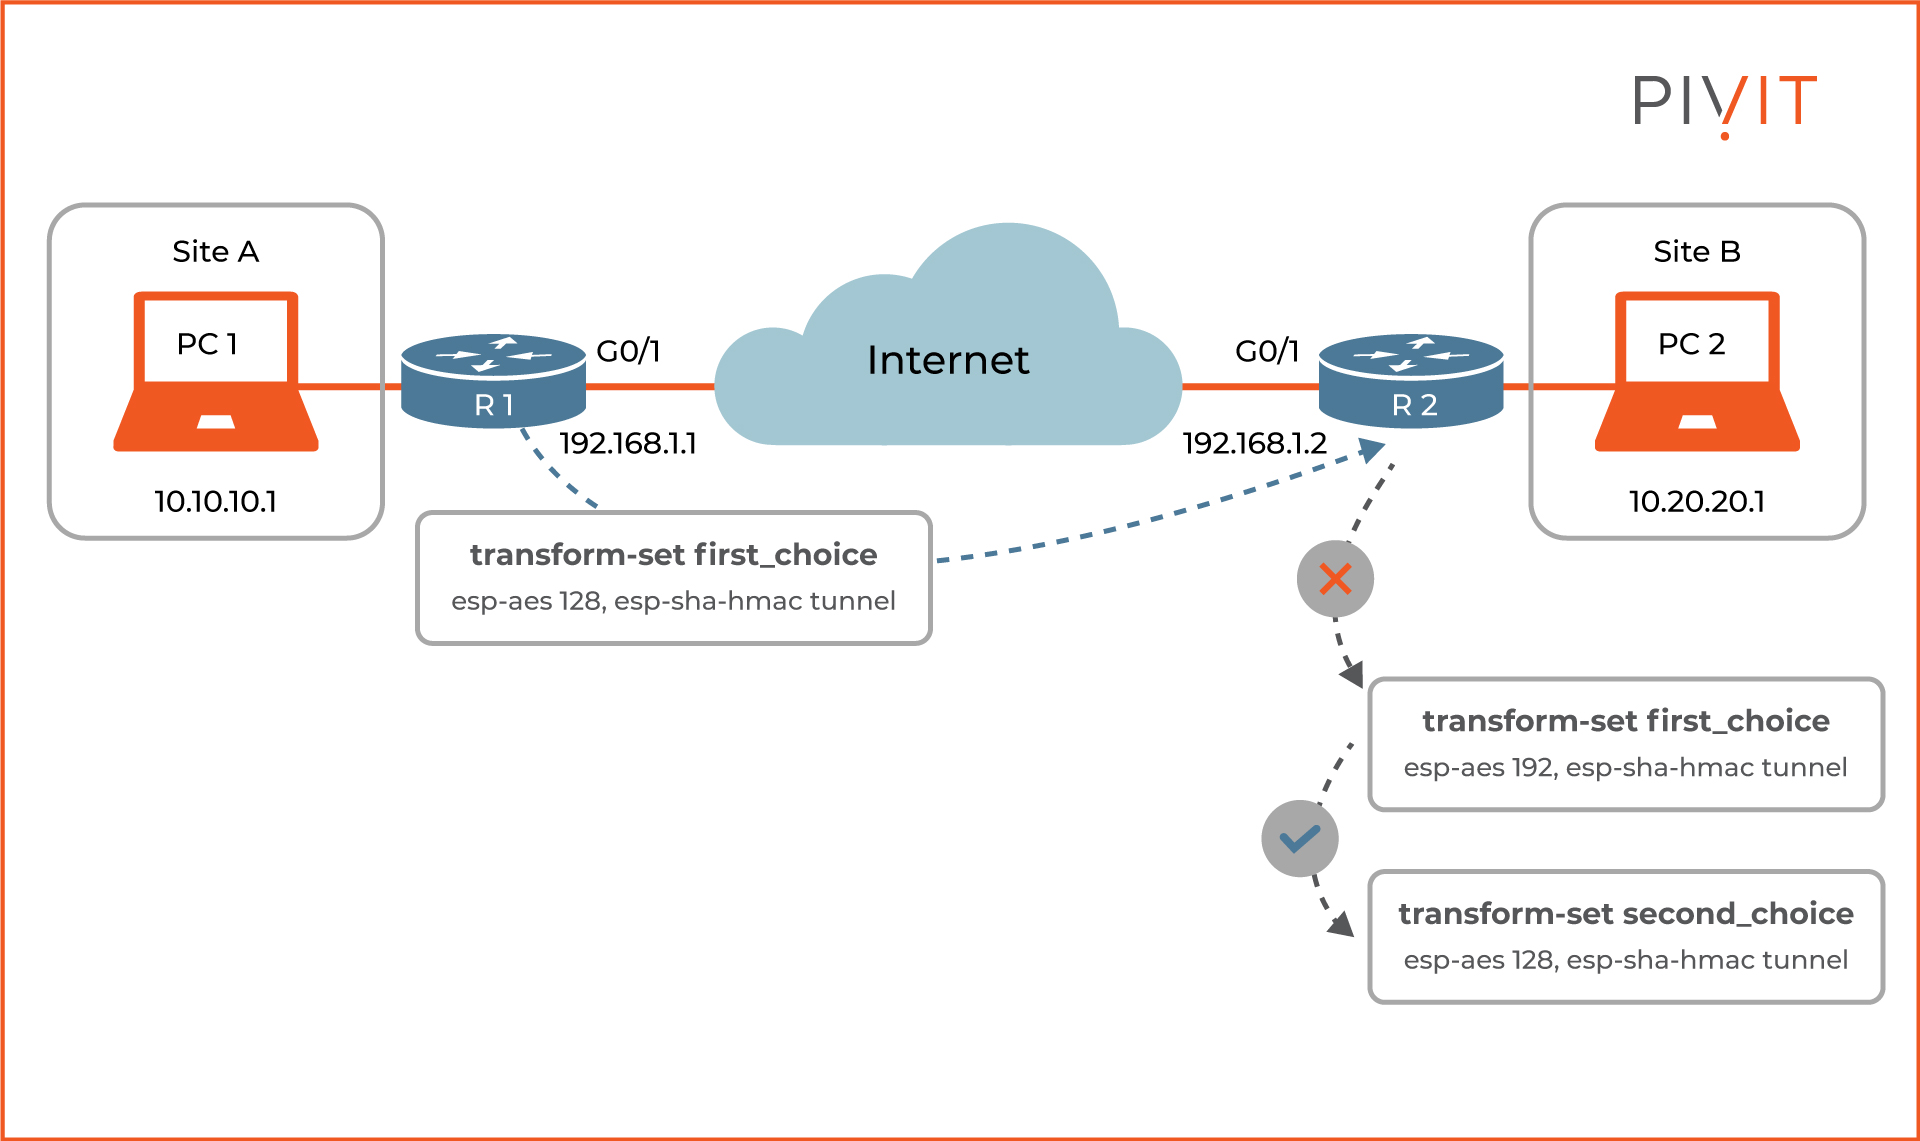
As shown in the image above, R1 initiates the negotiation and sends all its configured transform (in our example, there is only one) sets to R2. Then, R2 compares the transform set against its first transform set. If there is a match, R2 agrees to this transform set. Otherwise, the comparison continues against its second transform set, and the process continues until a match is found.
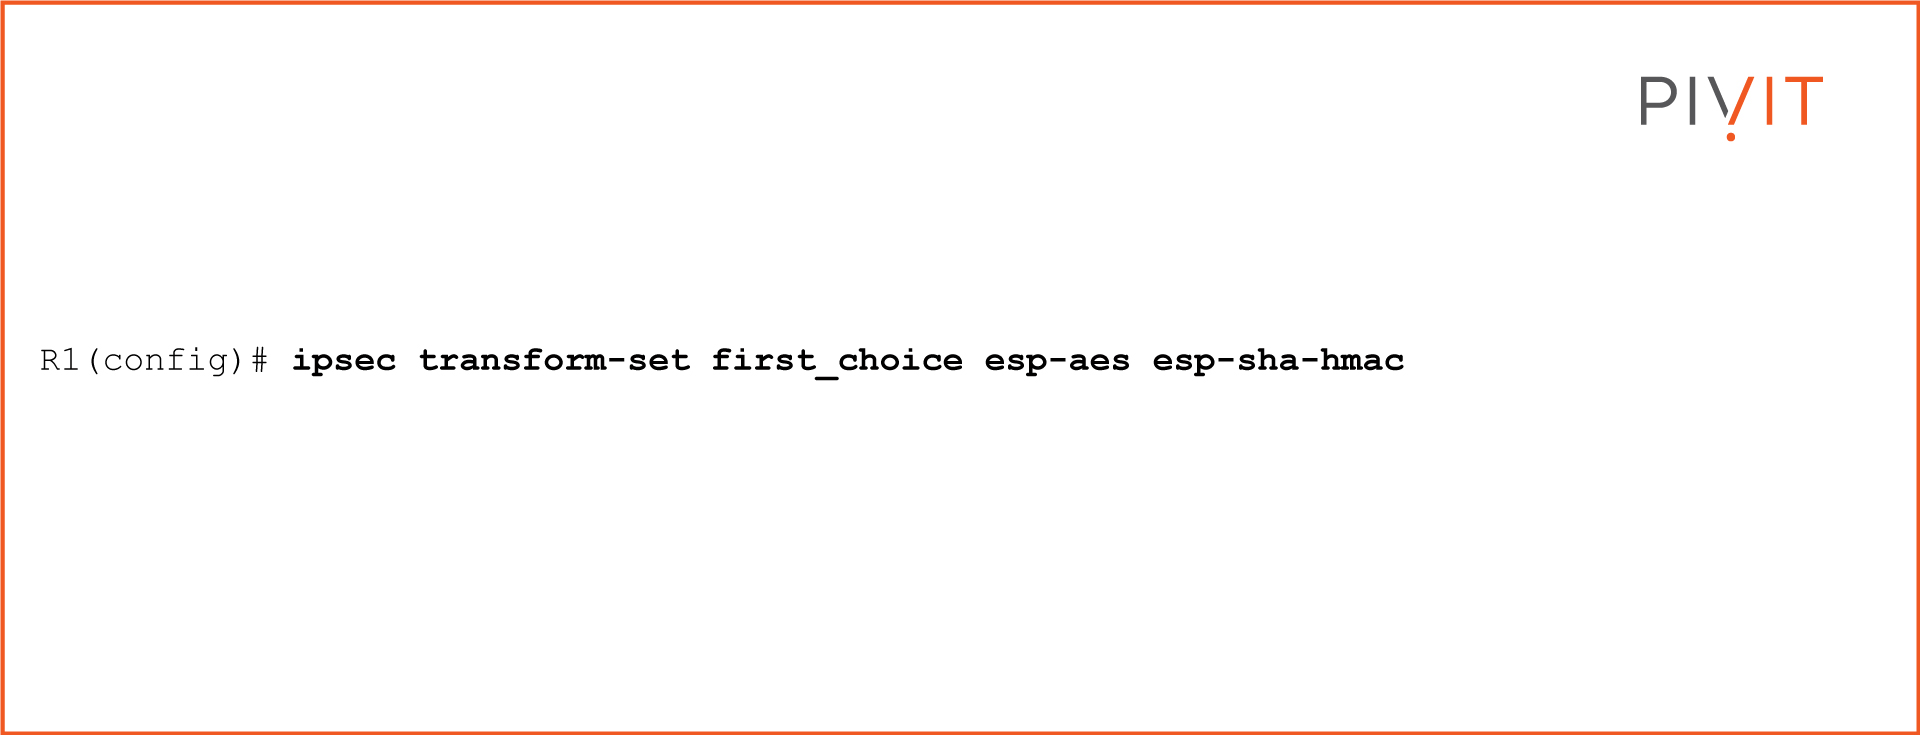
The command to configure the transform set “first_choice” on R1 is:
Step 4: Configuring Crypto ACLs
Crypto ACLs define interesting traffic in the VPN configuration. Therefore, traffic permitted by a crypto ACL gets protected by the VPN and sent through the appropriate IPsec tunnels. On the other hand, traffic that is not permitted by any crypto ACL is not protected by IPsec and is sent in cleartext outside the VPN tunnels.
Keep in mind that the same crypto ACL is used for outbound and inbound traffic. For outbound traffic, the ACL defines which data should be sent through the VPN tunnels. In contrast, inbound traffic defines the data that should have been protected with IPsec by the VPN peer when received. As a result, all packets matched against the ACL entries but arrived unprotected are discarded in the end.
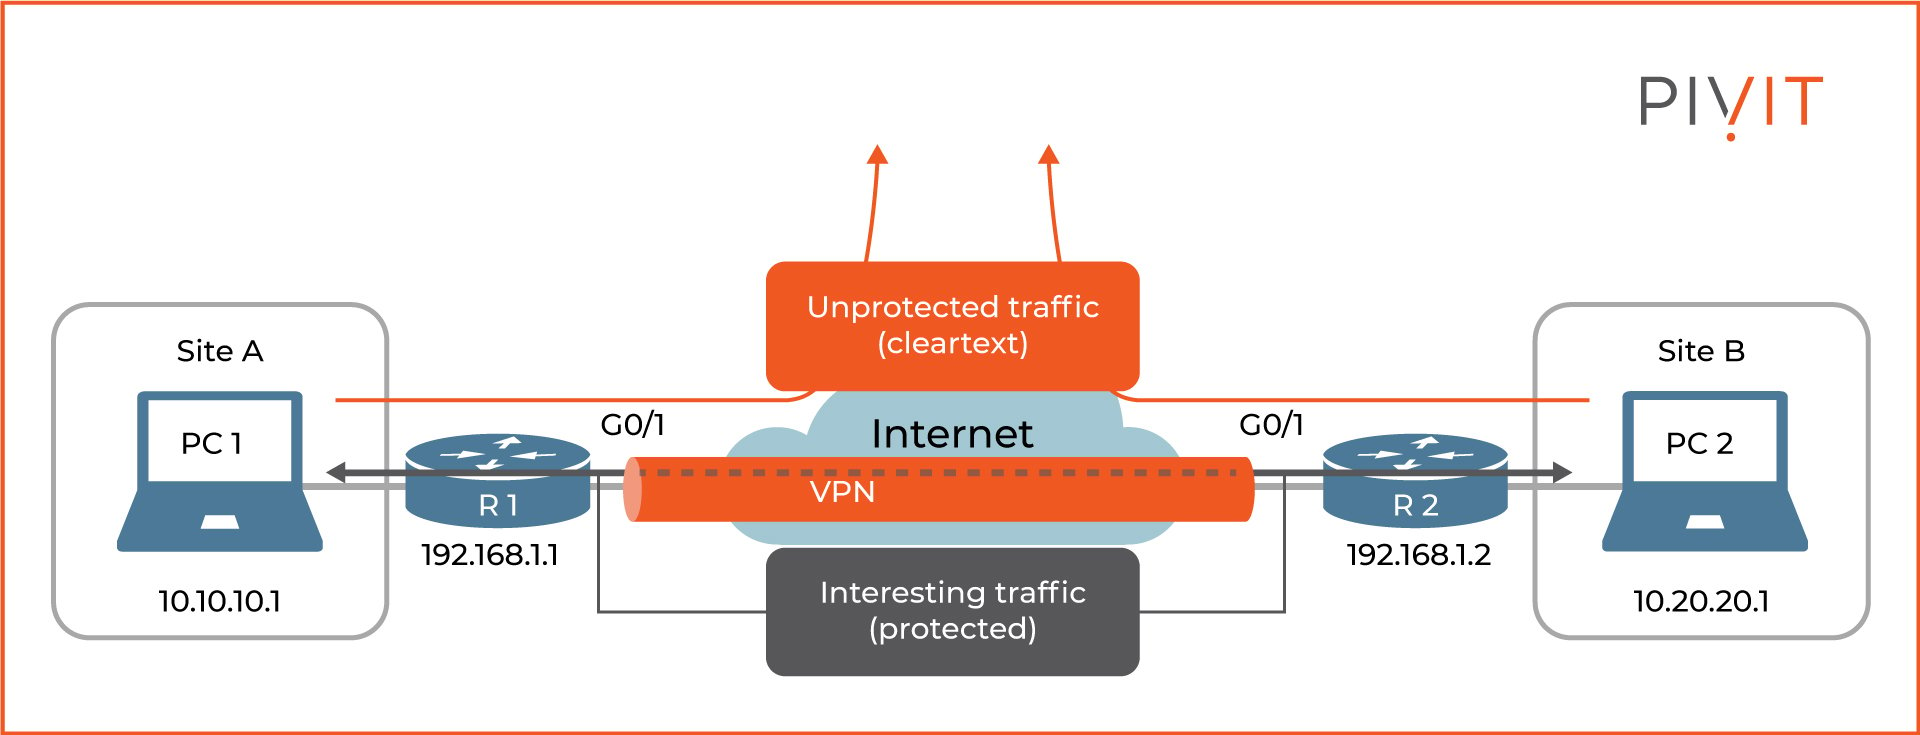
The image above shows that the data exchanged between sites A and B should be protected. Therefore, a crypto ACL must be configured on each router that will define the interesting traffic.
The command to configure a crypto ACL on R1 to protect traffic going from network 10.10.10.0/24 (site A) to network 10.20.20.0/24 (site B):
%20to%20network%2010.20.20.024.jpg?width=1920&height=735&name=command%20to%20configure%20a%20crypto%20ACL%20on%20R1%20to%20protect%20traffic%20going%20from%20network%2010.10.10.024%20(site%20A)%20to%20network%2010.20.20.024.jpg)
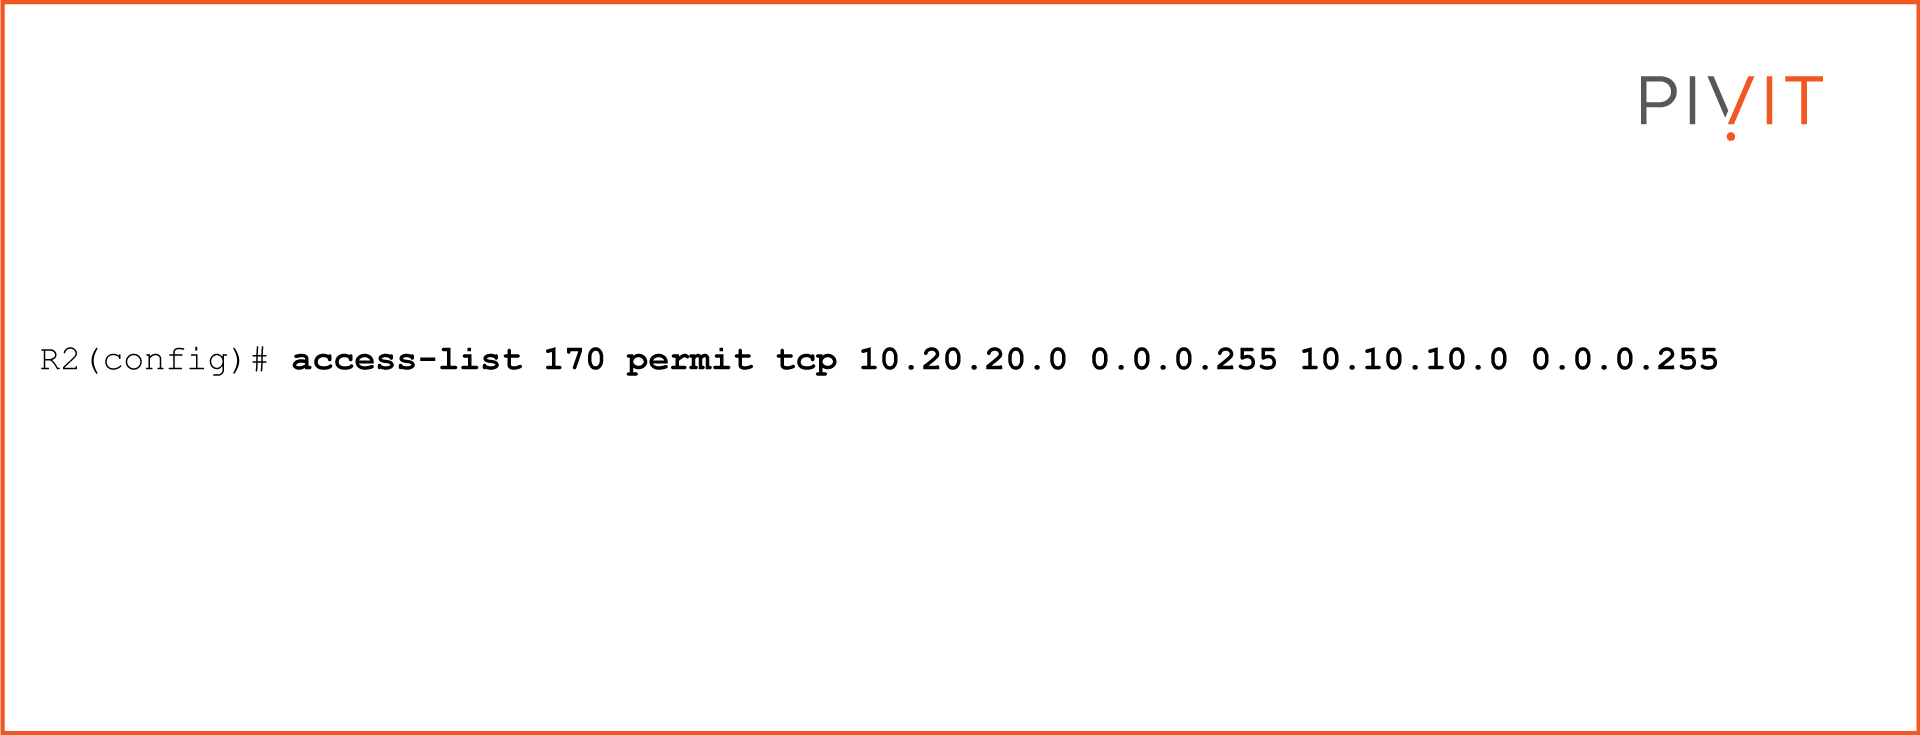
Keep in mind that the crypto ACL on R2 will be a mirrored image of the ACL on R1:
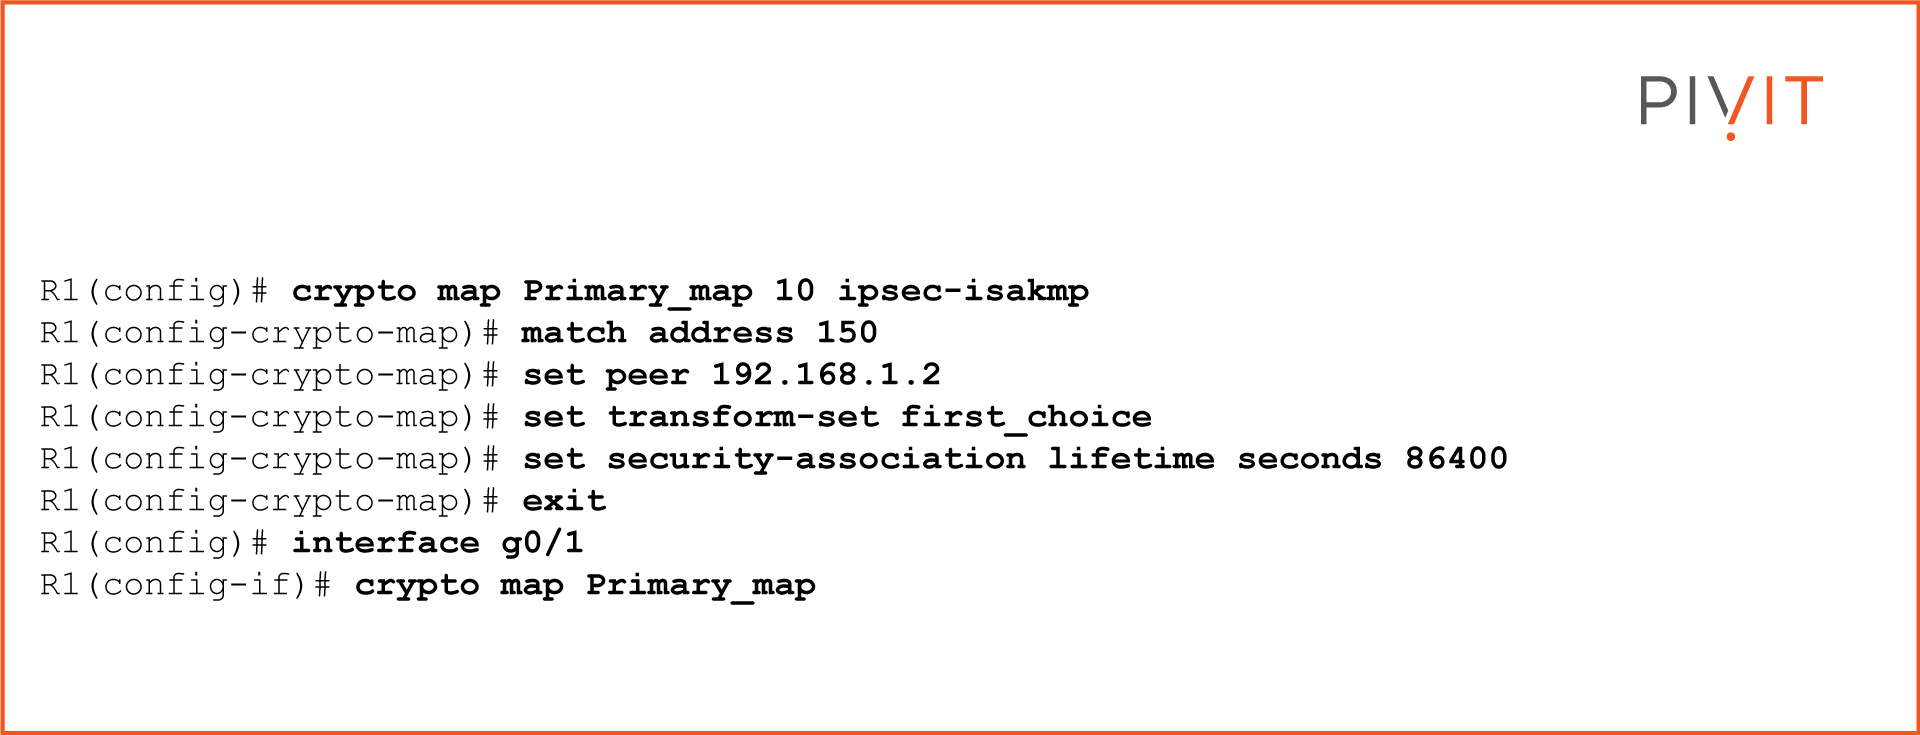
Step 5: Configuring a Crypto Map
After all VPN parameters are configured, they need to be bound together in the form of a crypto map that activates after it is applied to the exit VPN interface on the router. This will specify the traffic that needs to be protected, how it will be protected, and where it will be sent.
The commands to configure the crypto map on R1 and apply it on interface G0/1 are:
Do Your Site-to-Site Negotiation Process Like a Pro
As the article highlighted, the site-to-site VPN negotiation process is a complex process that consists of 5 configuration steps. Once familiar with the VPN commands, you can easily implement a VPN between two routers. Although a lot of additional tuning can be applied regarding the security algorithms used in the configuration, using the default parameters should provide adequate data protection.
If you need a helping hand to configure your network, consider PivIT's EXTEND SmartHands offering to gain access to engineers around the globe to locally access your infrastructure without ever leaving your desk. But don't take our word for it, here's what one of our clients had to say:
"Great response time by the PivIT team, they came through in a pinch and we really appreciate it." - Jarrod S. (Director of Infrastructure)
