%20Simple_%20yet%20essential%20filtering%20feature%20Tech%20Corner%20Featured%20Images%20(2).png)
In enterprise environments, controlling communications between different segments within a network is crucial for providing sufficient policy-based access and protecting the network from unauthorized use. For example, you may want certain users to have different levels of access to the network depending on their role (i.e., administrator or guest).
Many different security solutions can be implemented to achieve such goals. However, the Access Control List (ACL) is probably the simplest yet most used filtering mechanism supported on most network devices, such as switches, routers, and firewalls.
This article provides an overview of ACLs, their benefits, the configuration options you can choose from, and an example of how to implement an ACL.
View some of our other popular articles:
- A Complete Guide To Improving Redundancy with EtherChannel Technology
- Cisco Catalyst 8000 Series Edge Platforms vs Juniper SSR 100 Series
- A Must-Have Troubleshooting Guide: Aruba AP 305 Login Issues
Why Should You Use an ACL?
When the ACL was developed, the primary purpose of it was to filter out data traffic exchanged between different VLANs, subnets, or locations in an enterprise network. However, with the advent of technological improvements, ACL is not only used as a simple filtering tool but also plays an essential part in more advanced filtering security features.
Keep in mind that besides the main purpose of filtering traffic, the ACLs also have other purposes, such as specifying interesting traffic for a VPN, controlling route advertisements, or limiting debug output, among many other services.
Access Control List Overview
An ACL is a fundamental tool that filters out incoming and outgoing traffic on a device interface based on the Layer 3 and Layer 4 header information inside the packets.
A sequential list of rules (also known as access control statements or entries) defines a 'permit' or 'deny' action upon which the packets' processing is based. Once configured, these statements operate in sequential logical order from top to bottom.
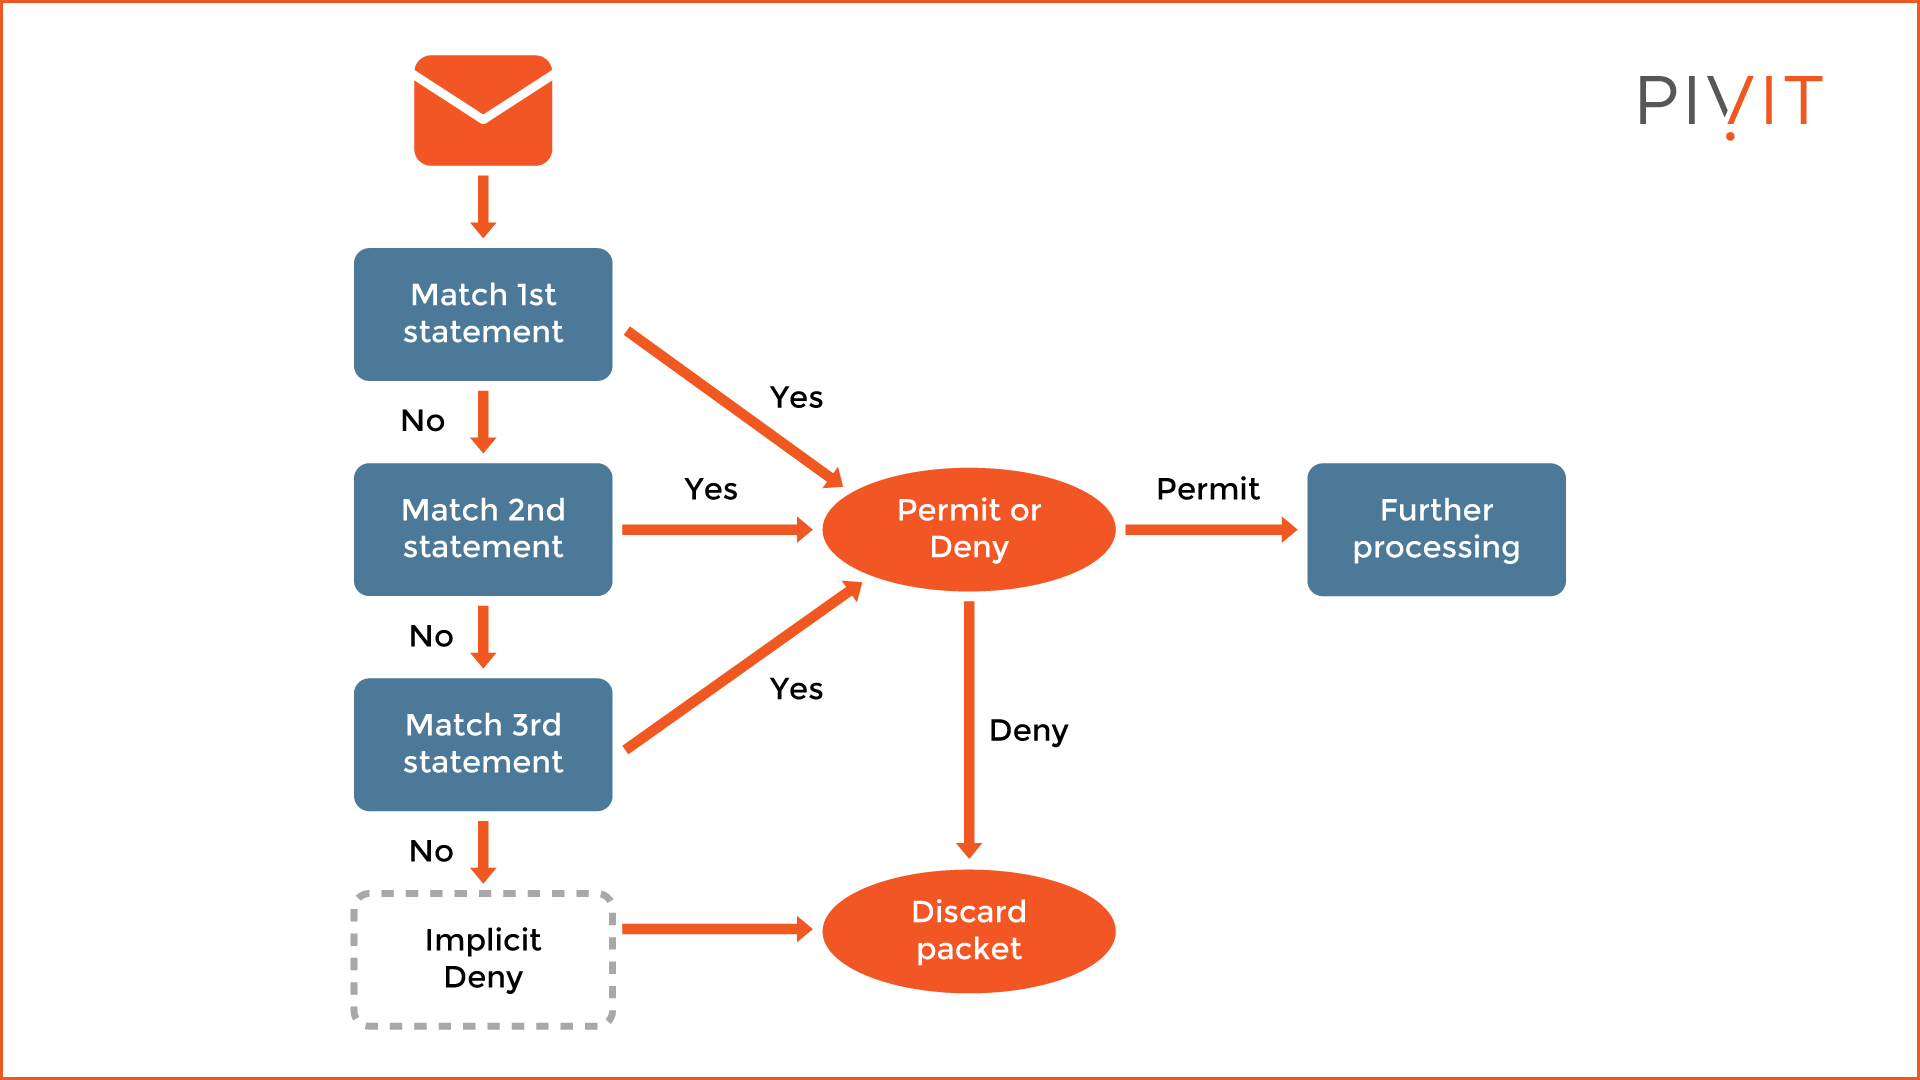
From the image above, the packet received on the interface is examined against the ACL applied, starting with the first entry at the top of the ACL. Regardless of the conditions, only two actions are available: ' permit' or 'deny.' When a match occurs, the configured action is applied, and the ACL processing stops there.
Otherwise, the process continues to the next ACL entry in the list until a match is found. In a case where there is no match against the configured entries, the packet always gets dropped. The reason is that the IOS always places the implicit deny entry as the last entry in the ACL by default.
Configuring the correct entries does not mean that the ACL will operate as expected. If the order in which the entries are placed inside the ACL is wrong, you might get different results.
Therefore, you should always place the more specific entries at the top of the ACLs while more general entries at the bottom. When this is not followed, a more general entry might be matched first, even though a more specific and appropriate entry might exist below the matched one but will never be reached.
Hardware Options For You
We make it easy for you to find the routers or switches you need to configure ACLs. Click below for hardware options or reach out to us and share the project you are currently working on.

Types of ACL
You can configure two ACL types on Cisco routers and switches: standard ACL and extended ACL. Even though they operate in the same way and provide identical services, there is a difference in the criterion used in the conditions inside the ACL statements. Therefore, based on the requirements, you will configure and apply one or the other.
Standard ACL
Standard ACL is the simper ACL type and uses just the source IP address of the Layer 3 header inside the packets as a matching criterion. In other words, this ACL type does not consider the protocol or ports used, as well as the destination IP address of the packet. When you configure one, you must specify the source IP address and nothing else.
Because of this approach, the correct placement of the ACL is crucial for proper data filtering. Otherwise, undesired results might be experienced. The best practice is to place a standard ACL as close to the destination of the data traffic as possible.
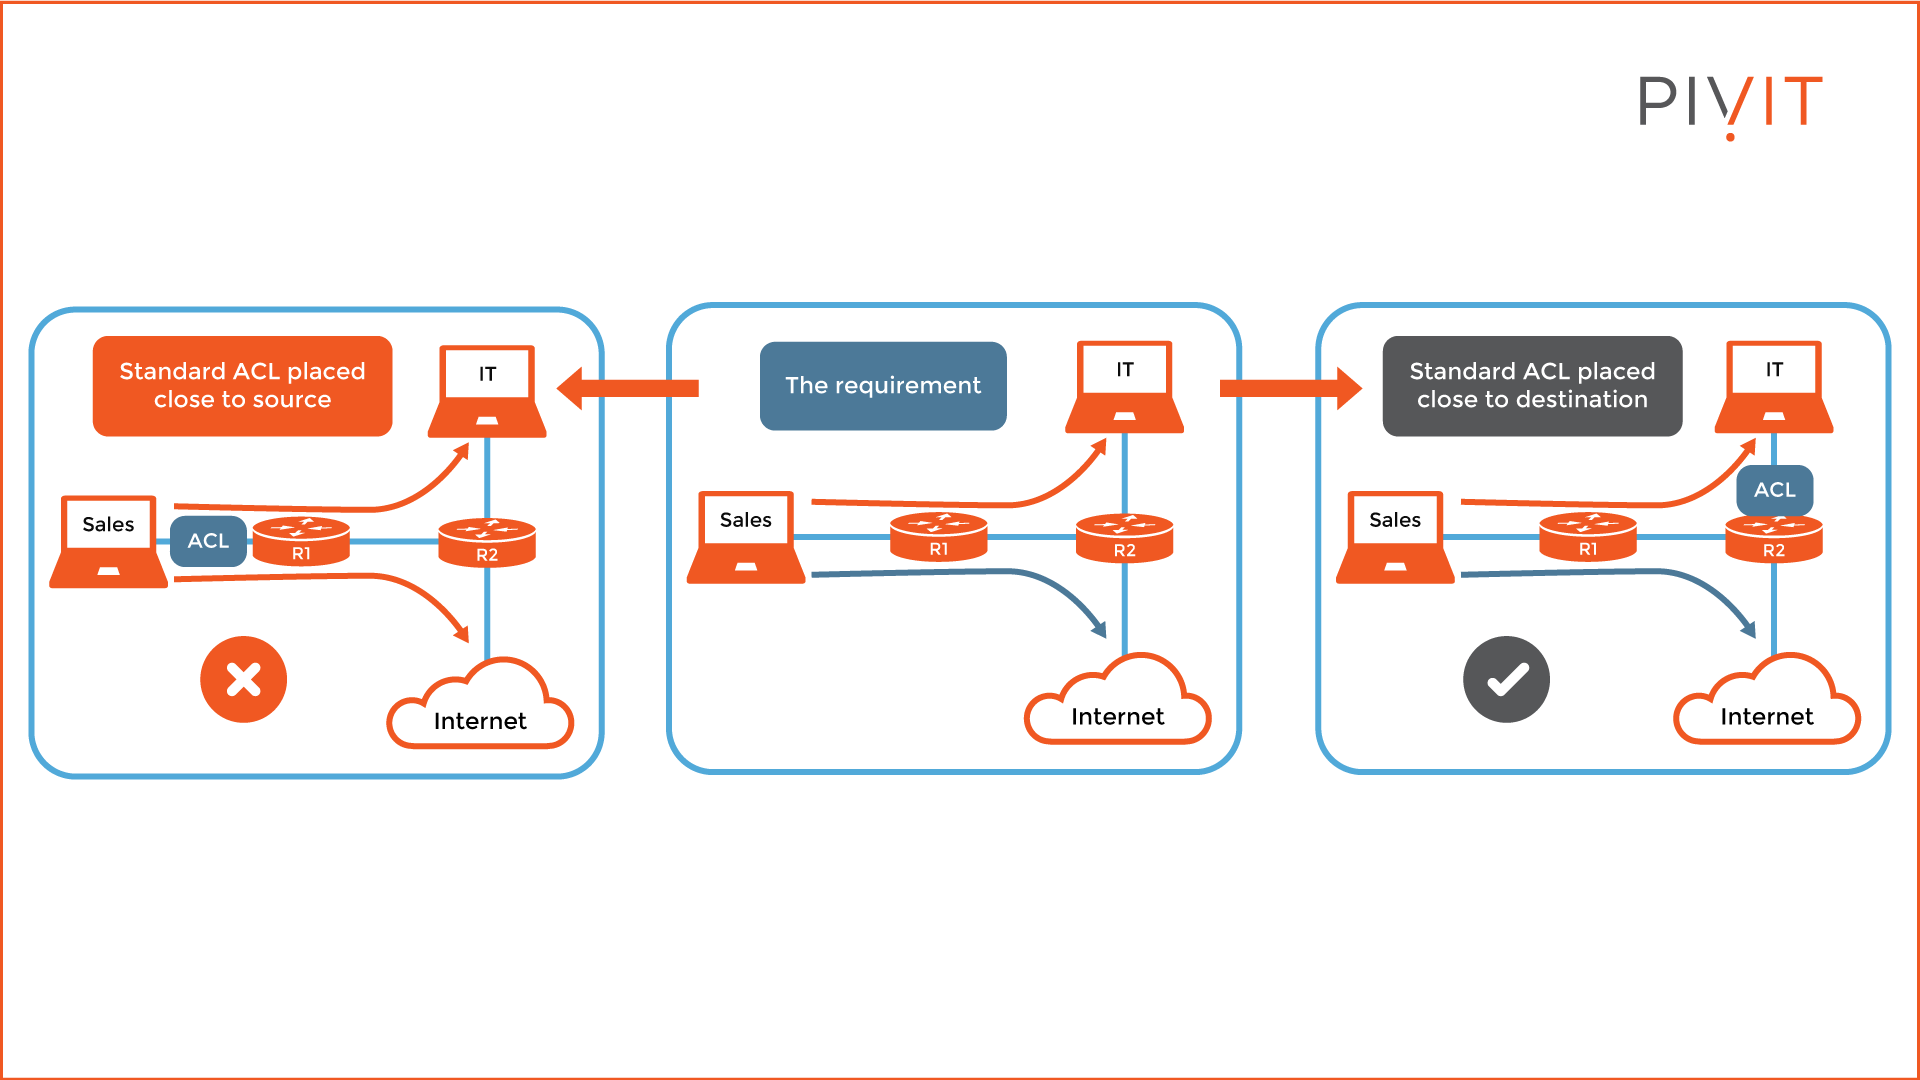
Take a look at the image above. The users from Sales should have access to the internet, but not to IT. If the ACL is placed on R1 (filtering traffic coming in), then Sales will not be able to access IT or the internet. The reason is simple: the processing is based only on the source IP, and there are no other criteria.
Therefore, the best place for applying the ACL is R2 (filtering outbound traffic), which is closest to the destination. Now, Sales cannot communicate with IT, but internet access is allowed.
Extended ACL
Extended ACL not only uses the source IP address from the packets as a matching criterion but also a few additional parameters. Therefore, when you create an extended ACL, you can also define the destination IP address, protocol, and source and destination ports (optional).
Because this approach allows several parameters to be included instead of just one, traffic can be processed more precisely, leading to better optimization. The best practice is to place an extended ACL as close to the source of the data traffic as possible.

Take a look at the image above. If you apply the ACL on R2, the requirement will be satisfied. However, when the packets are denied, this happens on R2 instead of earlier on R1. This configuration leads to extra resource consumption on R1, so it is best to configure and apply the ACL on R1 instead of R2. This way, when packets should be denied (from Sales to IT), it will happen at the very beginning of the path.
Methods for Creating ACLs
When creating ACLs, either standard or extended, two options can be used to identify them: numbers or names. For numbered ACLs, there is a predefined range of numbers for each type, and they are:
- Standard ACL: 1-99 and 1300-1999
- Extended ACL: 100-199 and 2000-2699
Based on the number used, the IOS allows only the corresponding conditions to be configured for that specific type of ACL.
Conversely, when using a name for identifying an ACL, the type of the ACL must also be included in the configuration because the name does not provide information about the type. Note that using named ACLs instead of numbered ACLs is recommended as it allows for easier management.
Configuration Example
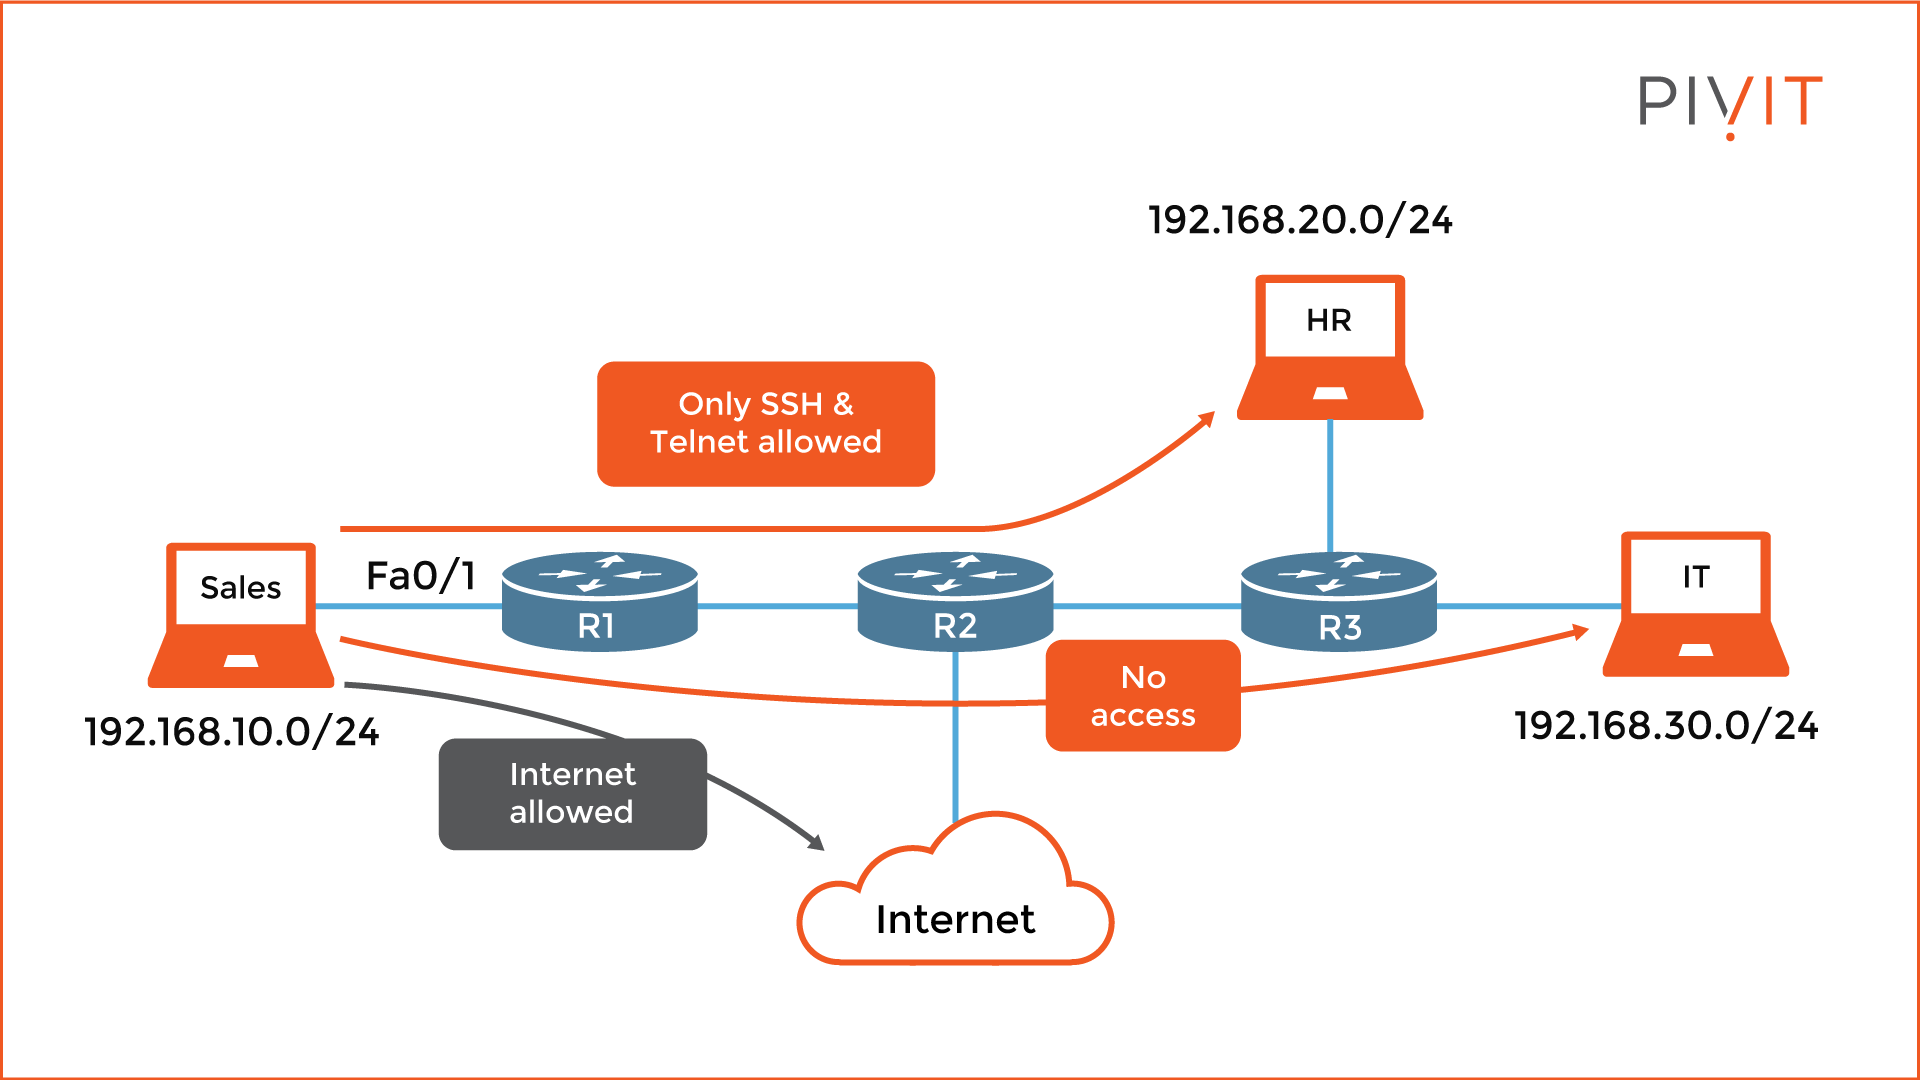
Let's look at the example below to understand better how ACLs work. The requirement is that Sales should not have any access to the IT department, have limited access (SSH and Telnet) to the HR department, and full access to the internet.
If you run into any issues when configuring an ACL or simply need an extra set of hands to help in the configuration, we have a team ready to step in to configure your network through our SmartHands offering.

Creating the ACL
Since we have several requests based on source and destination IP addresses, as well as applications, a better approach would be to use an extended ACL instead of a standard. This way, we can translate all requests into ACL entries and define them as close as possible to the source (R1), so only allowed packets will be permitted and all others denied.
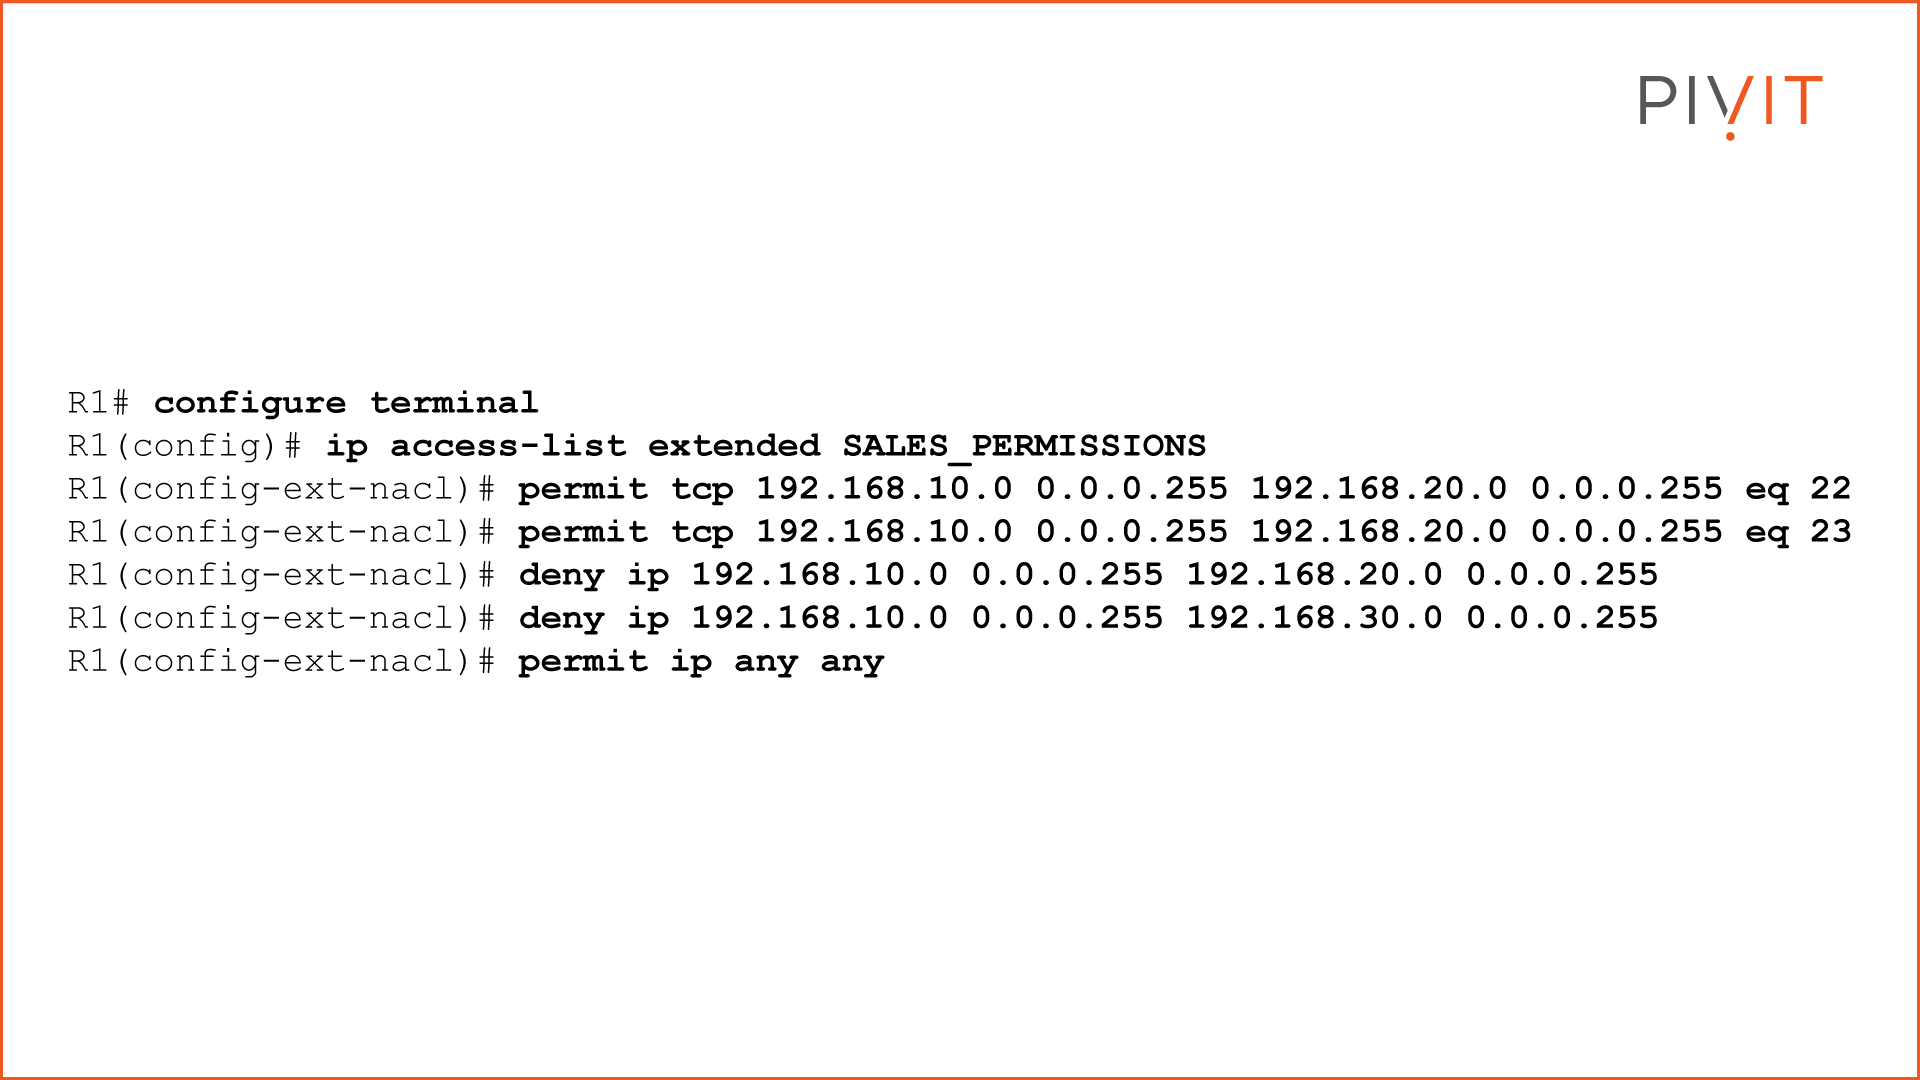
As you can see from the commands above, first, you need to create the ACL. Once you define the type and the name inside the ACL mode, you enter the ACL statements. The first three statements allow SSH and Telnet from Sales to HR and deny everything else. The fourth one denies any access from Sales to IT, while the last entry permits everything else, including access to the internet.
Note that you do not use a subnet mask on Cisco routers and switches to identify the subnets or hosts inside the ACL statements, but a wildcard mask. However, on Cisco firewalls, a subnet mask is used.
Applying the ACL
Creating an ACL without applying it will not do anything. Therefore, we will apply the ACL on interface Fa0/1 in the inbound direction by using the commands below.
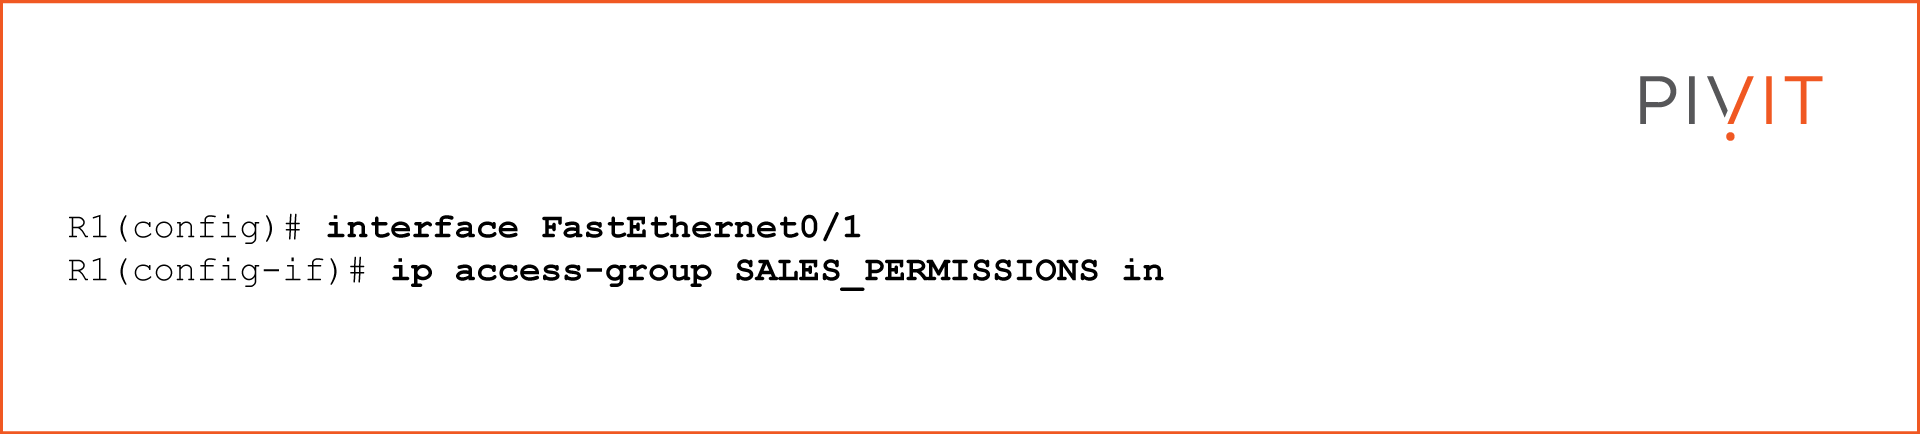
In the end, it does not matter whether you configure a standard or extended ACL, but whether the ACL will contain accurate statements based on your requirements and the correct order in which they will be placed inside the ACL. Last but not least, you should apply the ACL on the desired interface in the appropriate direction so that the ACL will be used immediately.
OneHub - Enterprise IT Asset Management
Ditch the bloated spreadsheet and make your life easier with OneHub, our free-to-use asset management software. Import from all your vendors, track your assets and contracts and view your data on a mobile-friendly version of the software.
Additionally, get live TAC agents (available 24/7/365) - your own virtual engineering team! Contact PivIT to discuss OneHub in more detail or to set up your account.
