Configure Network Security Using an ACL in SVI Environments
.png)
Network security is as important now than ever with data getting bigger and more precious. As network security helps businesses reduce the risk of data theft and disturbance in production network operations, it is key to understand your security environment. An access control list (ACL) provides the network security in your routing and switching environments through a rule or series of rules that can permit or deny data traffic from the network layer. Today, we will look at ACL concepts as well as troubleshooting common cases that you may see.
A quick note before we dive in. Where there are no specific prerequisites for applying ACL in the network, it should be done with professional network/security engineers. This feature is in Cisco IOS software releases 8.3 or later, and uses packet filtering. Packet filtering is a firewall technique used to control network access by monitoring outgoing and incoming packets while allowing them to pass or halt based on the source and destination Internet Protocol (IP) addresses, protocols, and ports. We can set the configuration (as you'll see below) to IP filter traffic in Cisco layer 3 switches, such as the Nexus switches, between two different SIV's/VLANs. Let's dive in!
Why ACL in Networks
The ACLs work by blocking specified traffic to enhance the performance of the network. A strong security is provided though blocking packets that are destined to sensitive areas in the network. Determination of the type of traffic to forward based on the protocols takes places to then deny certain users access to the internet while allowing others. Please note that we are not focusing on access list types today, but if you would like to access more information, click here to get in touch!
The example we will use today uses a PivIT environment with Nexus switches. We will show you a couple of rules to you can use, but you can add or remove rules from the default network ACL. When rules are added or removed they are automatically applied to the subnets that the ACL is associated with. Parts of a network ACL rule include:
- Rule Number
- Type
- Protocol
- Port Range
- Source
- Destination
- Allow/Deny
Access control lists are a principal element in securing your network, and understanding their function is essential to achieving their best effectiveness. Below are a few rules and configurations to help gain the knowledge and understanding around ACLs and basic rules to apply.
Before we get started with the specific configurations, ask yourself a couple of questions:
- Do I have the time to handle configurations?
- Do I have the bandwidth to configure my devices?
If you answered "No" to these questions, consider PivIT's SmartHands through EXTEND. Hire an engineer to take on these basic configurations and more. Click below to learn more about SmartHands.
Step-by-Step Configurations
We have created one VLAN (154) in both Nexus switches. In the diagram below, you can also check the recommended way to configure SVI in the Cisco 9500 series switches to get the maximum output. Note: The configurations below can only be done on Cisco Nexus Layer 3 switches.
Step 1. Create VLAN in both Nexus Core Switches
Core 1 Configurations:

Core 2 Configurations:

Step 2. Create SVI on both Nexus Core Switches
A Switched Virtual Interface (SVI) is a routed interface in IOS representing the IP addressing space for a particular VLAN connected to this interface. There is no physical interface for the VLAN, and the SVI provides the Layer 3 processing for packets from all switch ports associated with the VLAN.
With SVIs the switch will use a virtual Layer 3 interface to route traffic to another Layer 3 interface thus eliminating the need for a physical router. VLANs reduce the load on a network by dividing a LAN into smaller segments and keeping local traffic within a VLAN. However, because each VLAN has its own domain, a mechanism is needed for VLANs to pass data to other VLANs without passing the data through a router. We'll now show those configurations to create the SVI.
Core 1 Configurations:

Core 2 Configurations:

Step 3. Create Access List to Block All Traffic from VLAN 154
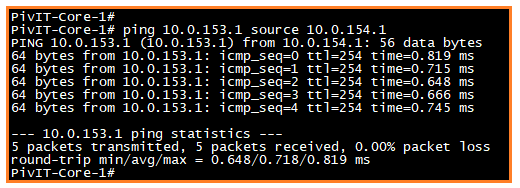
Before configuring the ACL rule, verify the inter VLAN communication between the two VLANs. Below is what the verification should look like.
Now we'll block the inter VLAN traffic between two VLANs through an ACL rule, but first we will create the access list.

Next, we need to apply this access list in VLAN 154 SVI. This makes it to where both VLANs cannot communicate with each other. If we do not apply the access list in SVI, the case will not work.

Step 4. ACL Cases
Scenario 1: No one can access VLAN 154 through 8080 port

Scenario 2: Block ICMP from VLAN 154

Scenario 3: Support 888 port for 10.0.121.15 IP address

Scenario 4: Show access list commands

About PivIT Global
PivIT Global provides the support you need through infrastructure, maintenance, and professional services. Contact us today to chat more about configuring an ACL in SVI environments or how we can support you through our third-party maintenance and professional services offerings.
