Your Ultimate NAT Configuration Guide for Cisco ASA
.jpg)
Network Address Translation (NAT) is an essential feature on Layer 3 devices for providing proper network communications inside the networks, as well as on the public internet.
It is a mechanism that provides address simplification and allows you to conserve the registered IPv4 addresses in all-sized networks and resolve overlapping addressing scenarios.
Network engineers use it to protect from cyberattacks, the costs of which are projected to reach USD 10.5 trillion annually by 2025.
Though you may see NAT most often implemented on routers, you can also configure it on Cisco ASA appliances.
However, the NAT configuration on a Cisco ASA dramatically differs from that on a Cisco router. Besides offering additional translation techniques, the configuration process also depends on network objects.
This article will provide the following:
- An inside and outside NAT overview.
- A look at the benefits and limitations of inside NAT.
- An overview of the Cisco ASA NAT concept.
- A configuration of the network object NAT.
- A look at how to configure manual NAT.
Not the article you were hoping to read? View some popular articles:
- What Is Public Key Infrastructure and How Important Is It?
- Fundamental Firewall Technology Principles: What Is a Firewall?
- Exploring Routing Functions and the Purpose of the Routing Table
Exploring Inside and Outside NAT
NAT technology was introduced primarily to overcome the address limitations of the IPv4 protocol that arrived with the expansion of the internet in the 90s.
It mitigates global IPv4 address exhaustion, maintains internal addressing of enterprise networks, and indirectly provides an additional layer of security by hiding devices' internal (private) IP addresses.
The main goal of NAT is to translate private IP addresses used by the hosts into public IP addresses when users communicate on the internet. The translations are performed on a NAT gateway such as a router, firewall, or other device supporting NAT. The NAT gateway always is placed at the edge of the network, which connects to the internet.
Based on the direction of the NAT translations, the NAT gateway can perform inside and outside NAT. A typical NAT translation usually involves only inside NAT.
This is when the NAT gateway translates the private (local) IP addresses of the hosts from the inside NAT domain into public (global) addresses when they communicate with devices in the outside NAT domain, such as devices on the internet.
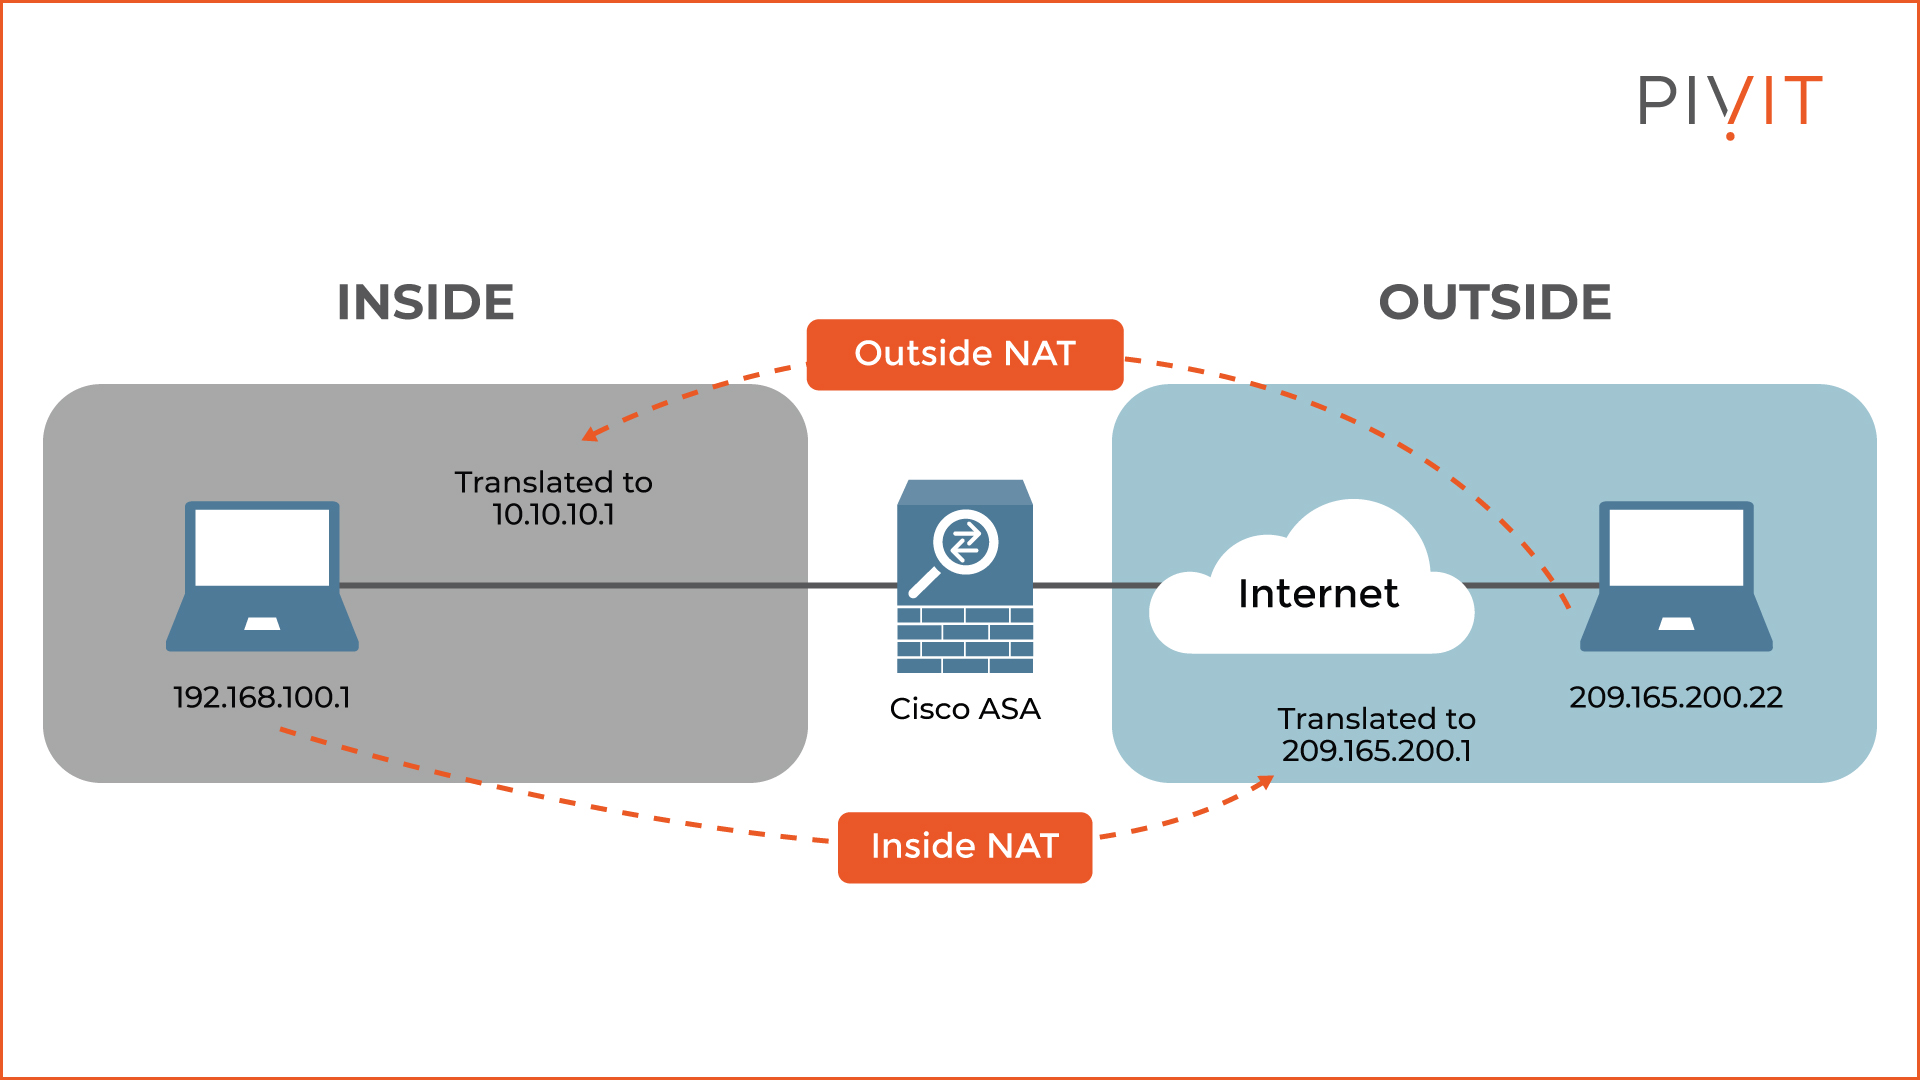
Optionally, the NAT gateway can also perform outside NAT.
By default, when external devices from the outside NAT domain communicate with internal hosts in the network, they are represented by their public IP addresses.
However, by implementing outside NAT, you can translate those public IP addresses into private ones so that the external hosts get represented with local addresses inside the network.
Outside NAT is advantageous when two networks with overlapping address space should merge (for example, when one company buys another) and only one side is using inside NAT.
In such a case, the overlapping addresses can be translated into new private IP addresses, so there won’t be any need for IP addressing.
Benefits and Limitations of Inside NAT
Like any other network technology, the inside NAT feature provides many general benefits to IP addressing and communications.
Besides conserving IPv4 address space, there is no need for IP readdressing when the organization changes the internet service provider. This not only lowers the total costs but also saves implementation time.
On top of that, it provides mutual connectivity between networks with overlapping addresses by using dual NAT.
However, the inside NAT feature is not perfect and has some limitations. Inside NAT can interfere with some encryption systems that attempt to ensure data integrity by encrypting whole packets, including IP addresses. Moreover, there are issues with embedded IP addresses.
Some systems hide the address information in the data portion of the packet, which causes trouble with the NAT translations.
Last but not least, inside NAT could create logging problems if the logging process happens after the NAT translation.
Learn more about the basics of NAT
Cisco ASA NAT Overview
The NAT configuration process on Cisco ASA differs from that on a Cisco router. When configuring NAT rules, it relies on using network objects and network object groups.
A simple network object can represent either a single host or a subnet. Once configured, the network objects identify the original IP addresses in the NAT configuration but can also represent the translated IP addresses.
This approach not just simplifies the NAT configuration in general — where instead of using IP addresses, you use named network objects — but also allows network objects to be reused as often as you need or even used for other features, such as in access control rules.
In the NAT configuration, you can use network object groups (multiple network objects grouped) to represent translated IP addresses.
The NAT configuration on a Cisco ASA can be done in two ways: auto NAT or network object NAT and manual or twice NAT. Typically NAT configuration includes auto NAT unless you need the extra features that manual NAT provides, such as configuring NAT based on specific policies.
The configuration process of the network object NAT is more straightforward, and the NAT rules are configured as a parameter for the network object. This approach allows you to define the NAT rules in the same place you define the network object itself, which significantly speeds up and simplifies the configuration process.
Because a single rule can only apply to either source or destination of a packet, you need two rules — one for the source IP address and one for the destination IP address.
In contrast, the manual NAT rule is not used as a parameter of the network object, but inside the NAT configuration, you apply network objects or network object groups representing the original and mapped IP addresses.
The benefit of manual NAT is that a single rule can translate both the source and the destination IP addresses. In addition, you can apply policy-based NAT, where the same IP address can be translated into different IP addresses based on the destination IP address of the packet.
__________________
Options That You Can Choose From
PivIT offers a unique and wide selection of hardware and financing options. We also offer OEM options that give you the flexibility you need to develop your network.
__________________
Sections of the ASA NAT Table
The Cisco ASA NAT table consists of NAT configuration entries that belong to one of the three sections.
These sections are always read from top to bottom, and once a translation match is found, the translation rule is used, and the process stops.
The three sections are used in the following order:
- Manual NAT: This is the first section inside the NAT table and is always used before the other two. The manual NAT section allows you to configure the parameters inside the NAT rules in a more precise way with more detail included. You can include translation on both the source and destination IP addresses. Usually, this is the section where you define more complex rules, such as translating an IP address based on the packet's destination IP address or the Cisco ASA's exit interface.
- Auto NAT: This is the second section used when there is no translation match in the manual NAT section. The auto NAT section is also referred to as network object NAT. The reason is the NAT translations, defined inside the network objects themselves. As a result, the NAT translation parameters are defined inside each network object configuration. Usually, auto NAT is used for static NAT translations, such as when local servers should be publicly available on the internet.
- Manual NAT after auto NAT: This is the third section in the NAT table. As the name suggests, this section is the same as the first one, with the only difference being used as the last one. Usually, in this section, you define more general translations than in the other sections, and it is used as a last resort in case there is no match between the previous two sections.
In the first and third sections, a translation is performed on a first-match basis, while in the second section, the static rules are checked first, and then the dynamic rules.
Keep in mind that the packet is not dropped when there is no match in either of the three sections, but without a translation, the packet is forwarded with its original IP address.
Configuring Auto NAT
Auto NAT, also known as network object NAT, is the most straightforward NAT configuration on the Cisco ASA appliance and is defined within the object itself.
Based on the requirements, you can define three different types of NAT:
- Static NAT: This is a one-to-one translation between two IP addresses, usually private and public. When configuring static NAT, permanent entries are added to the NAT table. These entries can be used in each direction, from inside to outside and vice versa, without hosts having to initiate a connection, assuming traffic is allowed by ACL rules.
- Dynamic NAT: This is also a one-to-one translation, but unlike static NAT, the translations are defined after hosts initiate connections. With dynamic NAT, the defined IP addresses in the NAT pool are reused by the internal hosts when initiating connections to the outside. During translations, the IP addresses are assigned in a first-come-first-served manner.
- Dynamic PAT: This is a many-to-one translation that allows one or more private IP addresses to be translated into one public IP address simultaneously. The critical element is the ports that separate the translations for each host from one another.
To configure Cisco ASA auto NAT, you must complete several steps in the Cisco ASDM management tool.
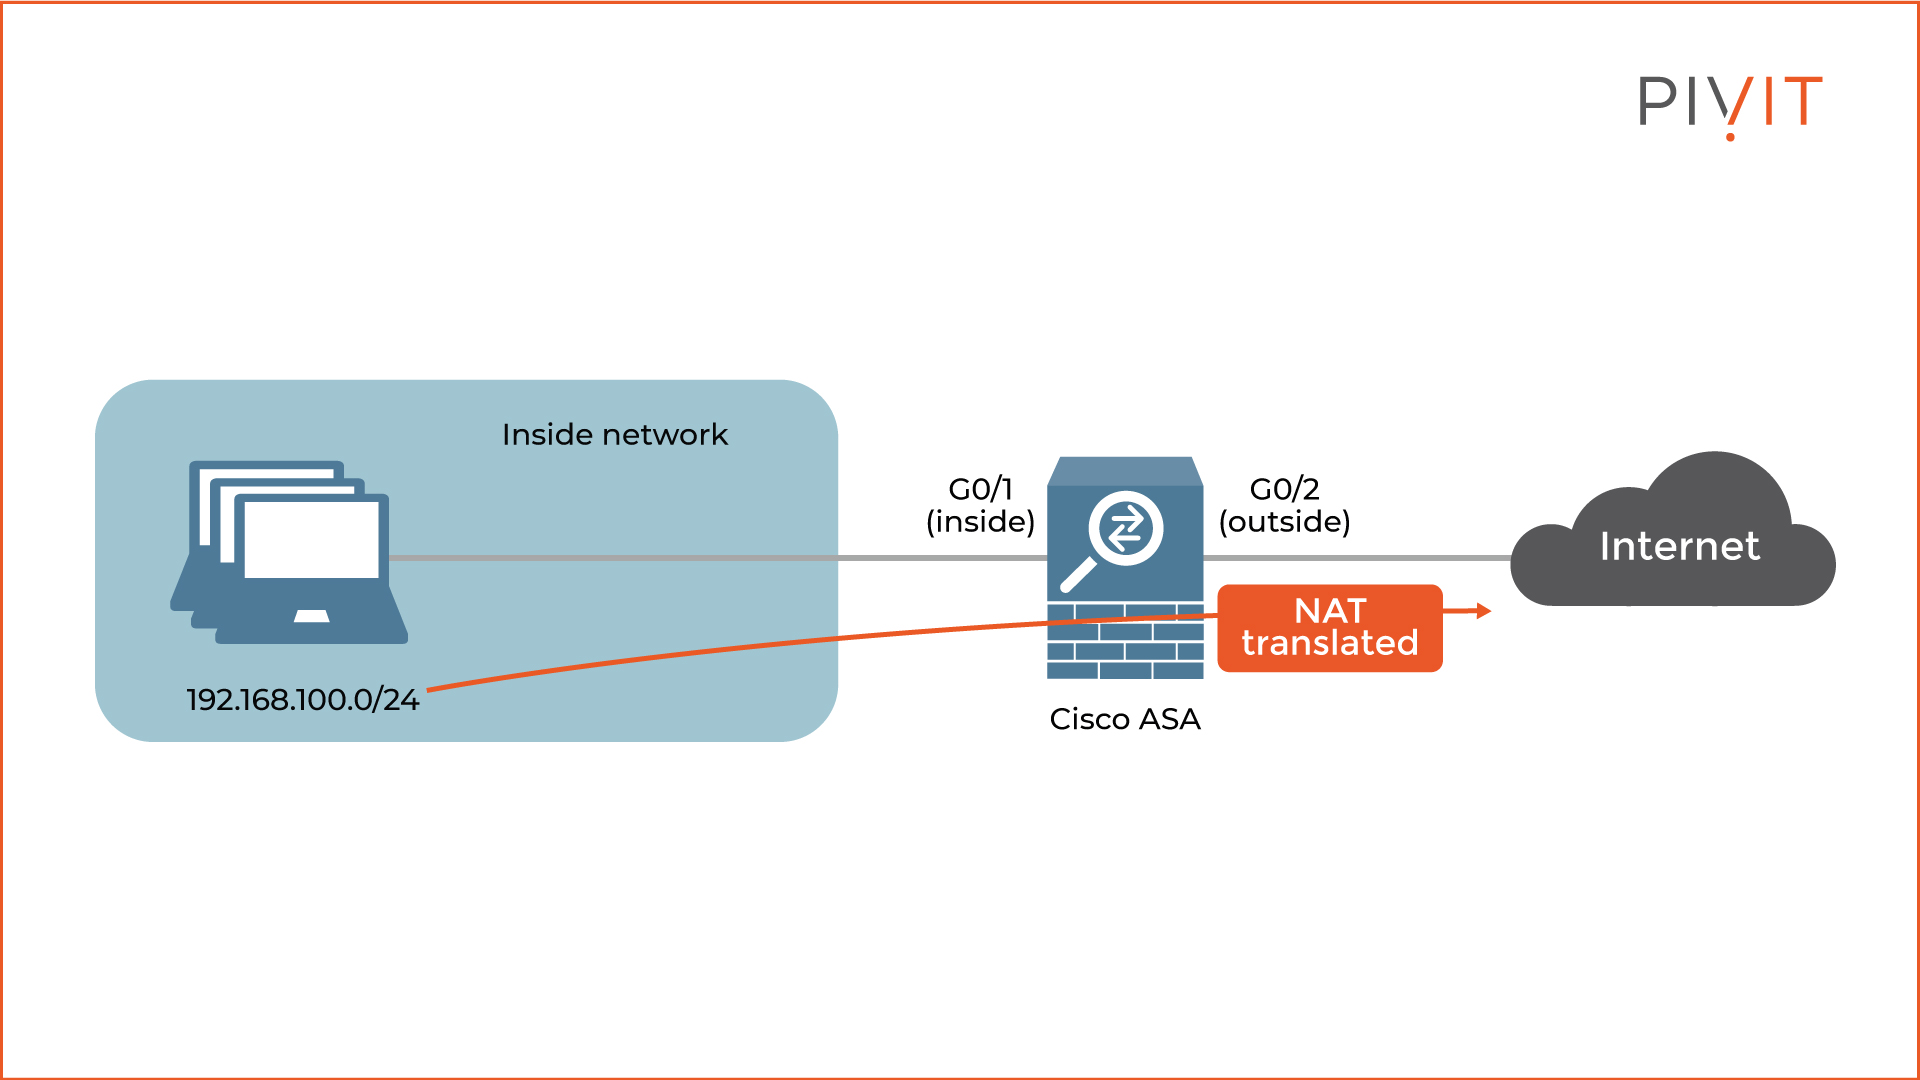
The configuration tasks will be based on the topology in the image below to get a better idea of the implementation process.
The goal is to translate all private IP addresses of the hosts in the inside network into one public IP address when communicating on the internet. This way, the costs of the NAT implementation would be the lowest since only a single public IP address will be used by all internal hosts.
Step 1:
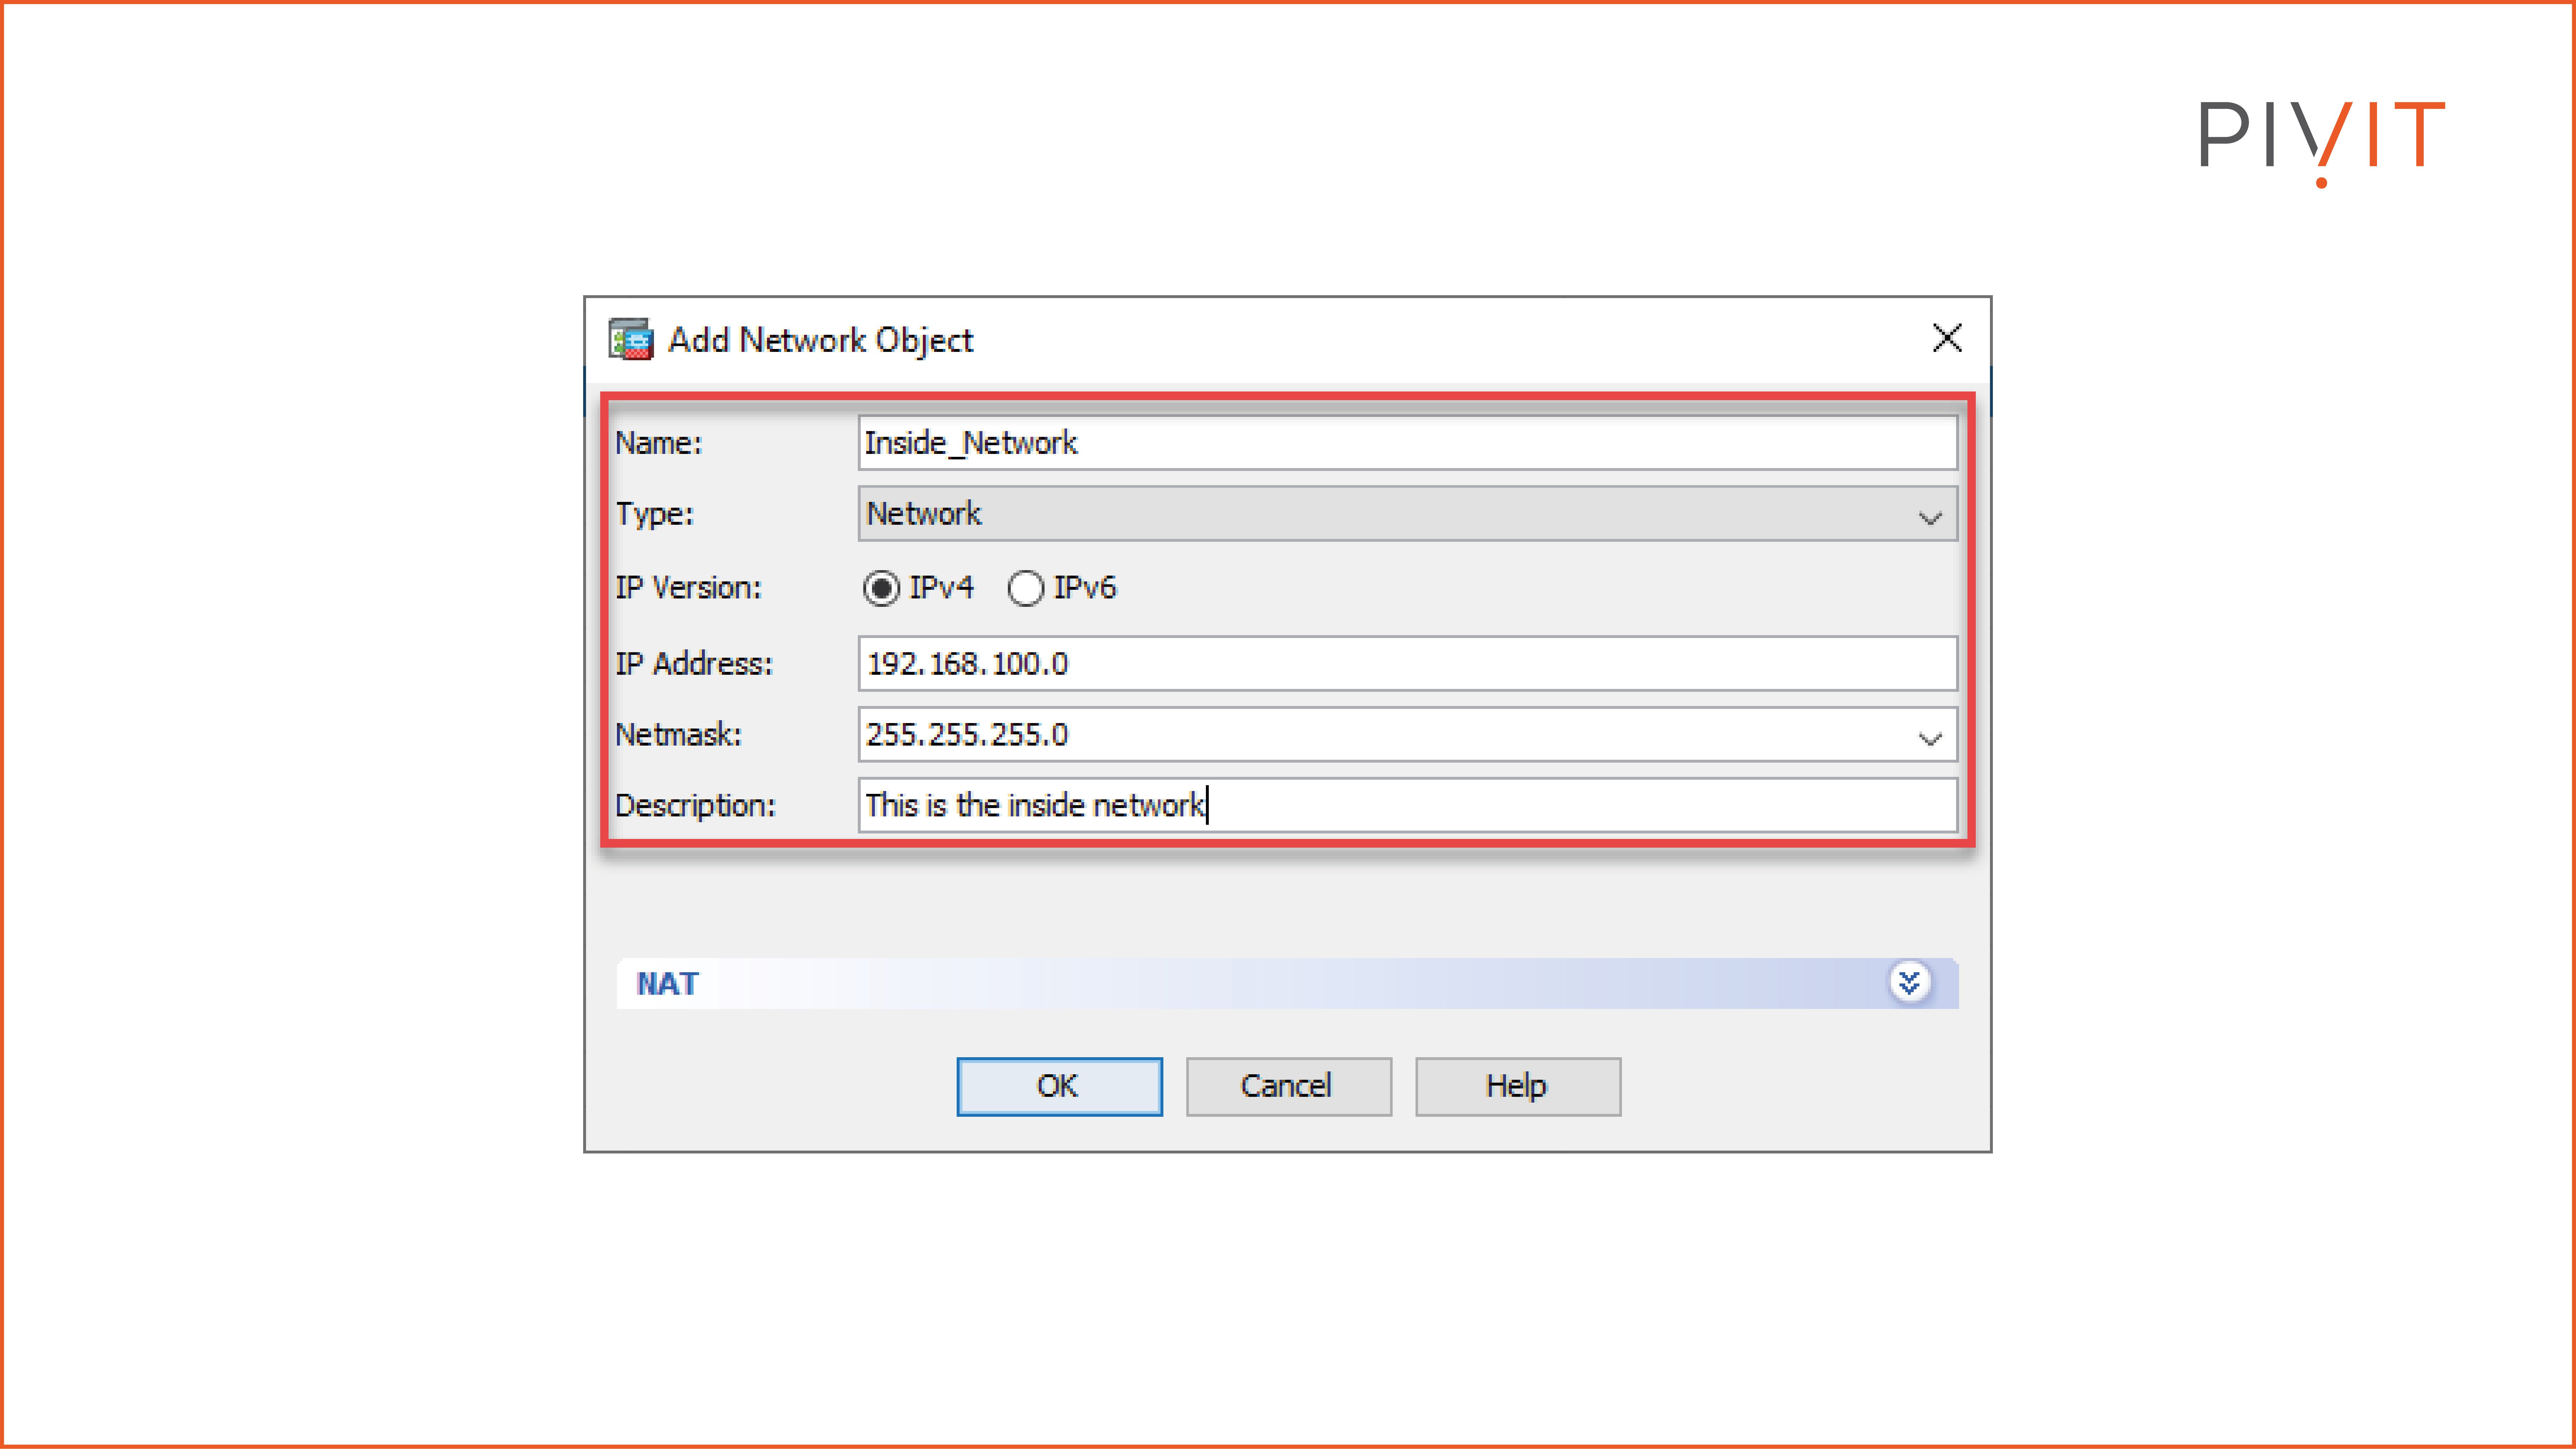
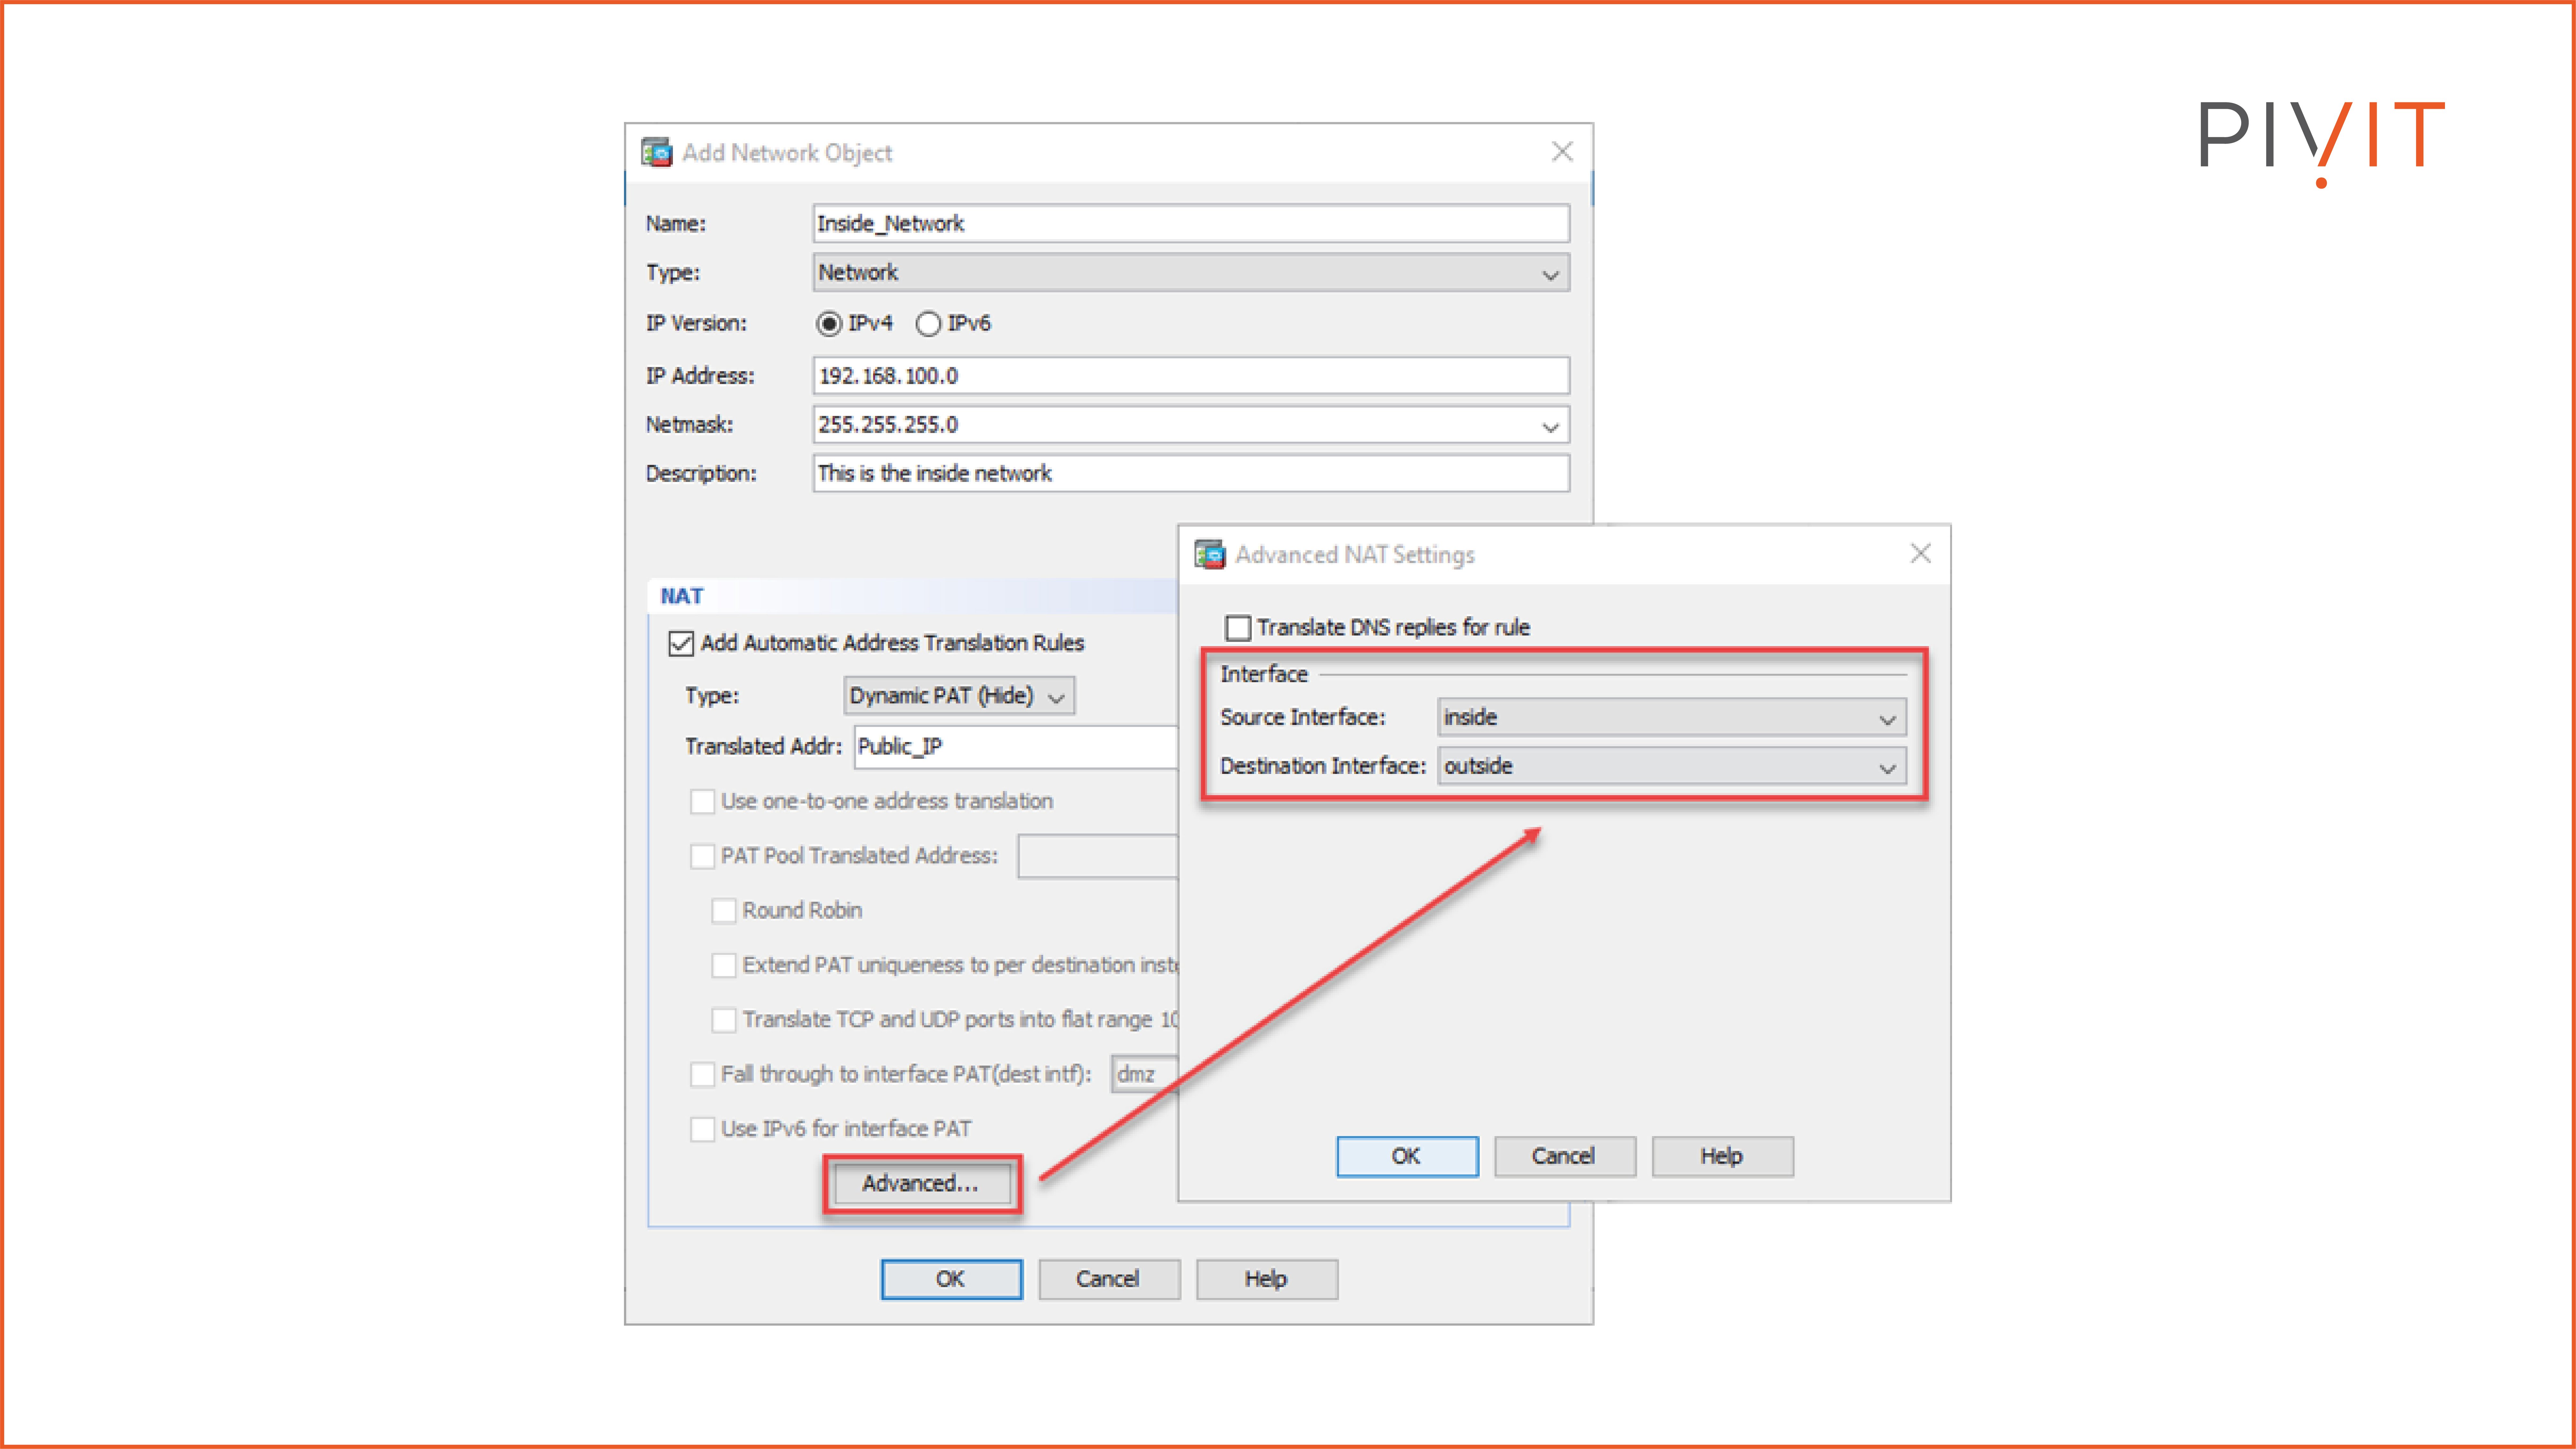
First, navigate to Configuration>Firewall>Objects>Network Objects/Groups in the Cisco ASDM. Then, create a network object (“Inside_Network” in our case) representing the inside network of 192.168.100.1/24.
Step 2:
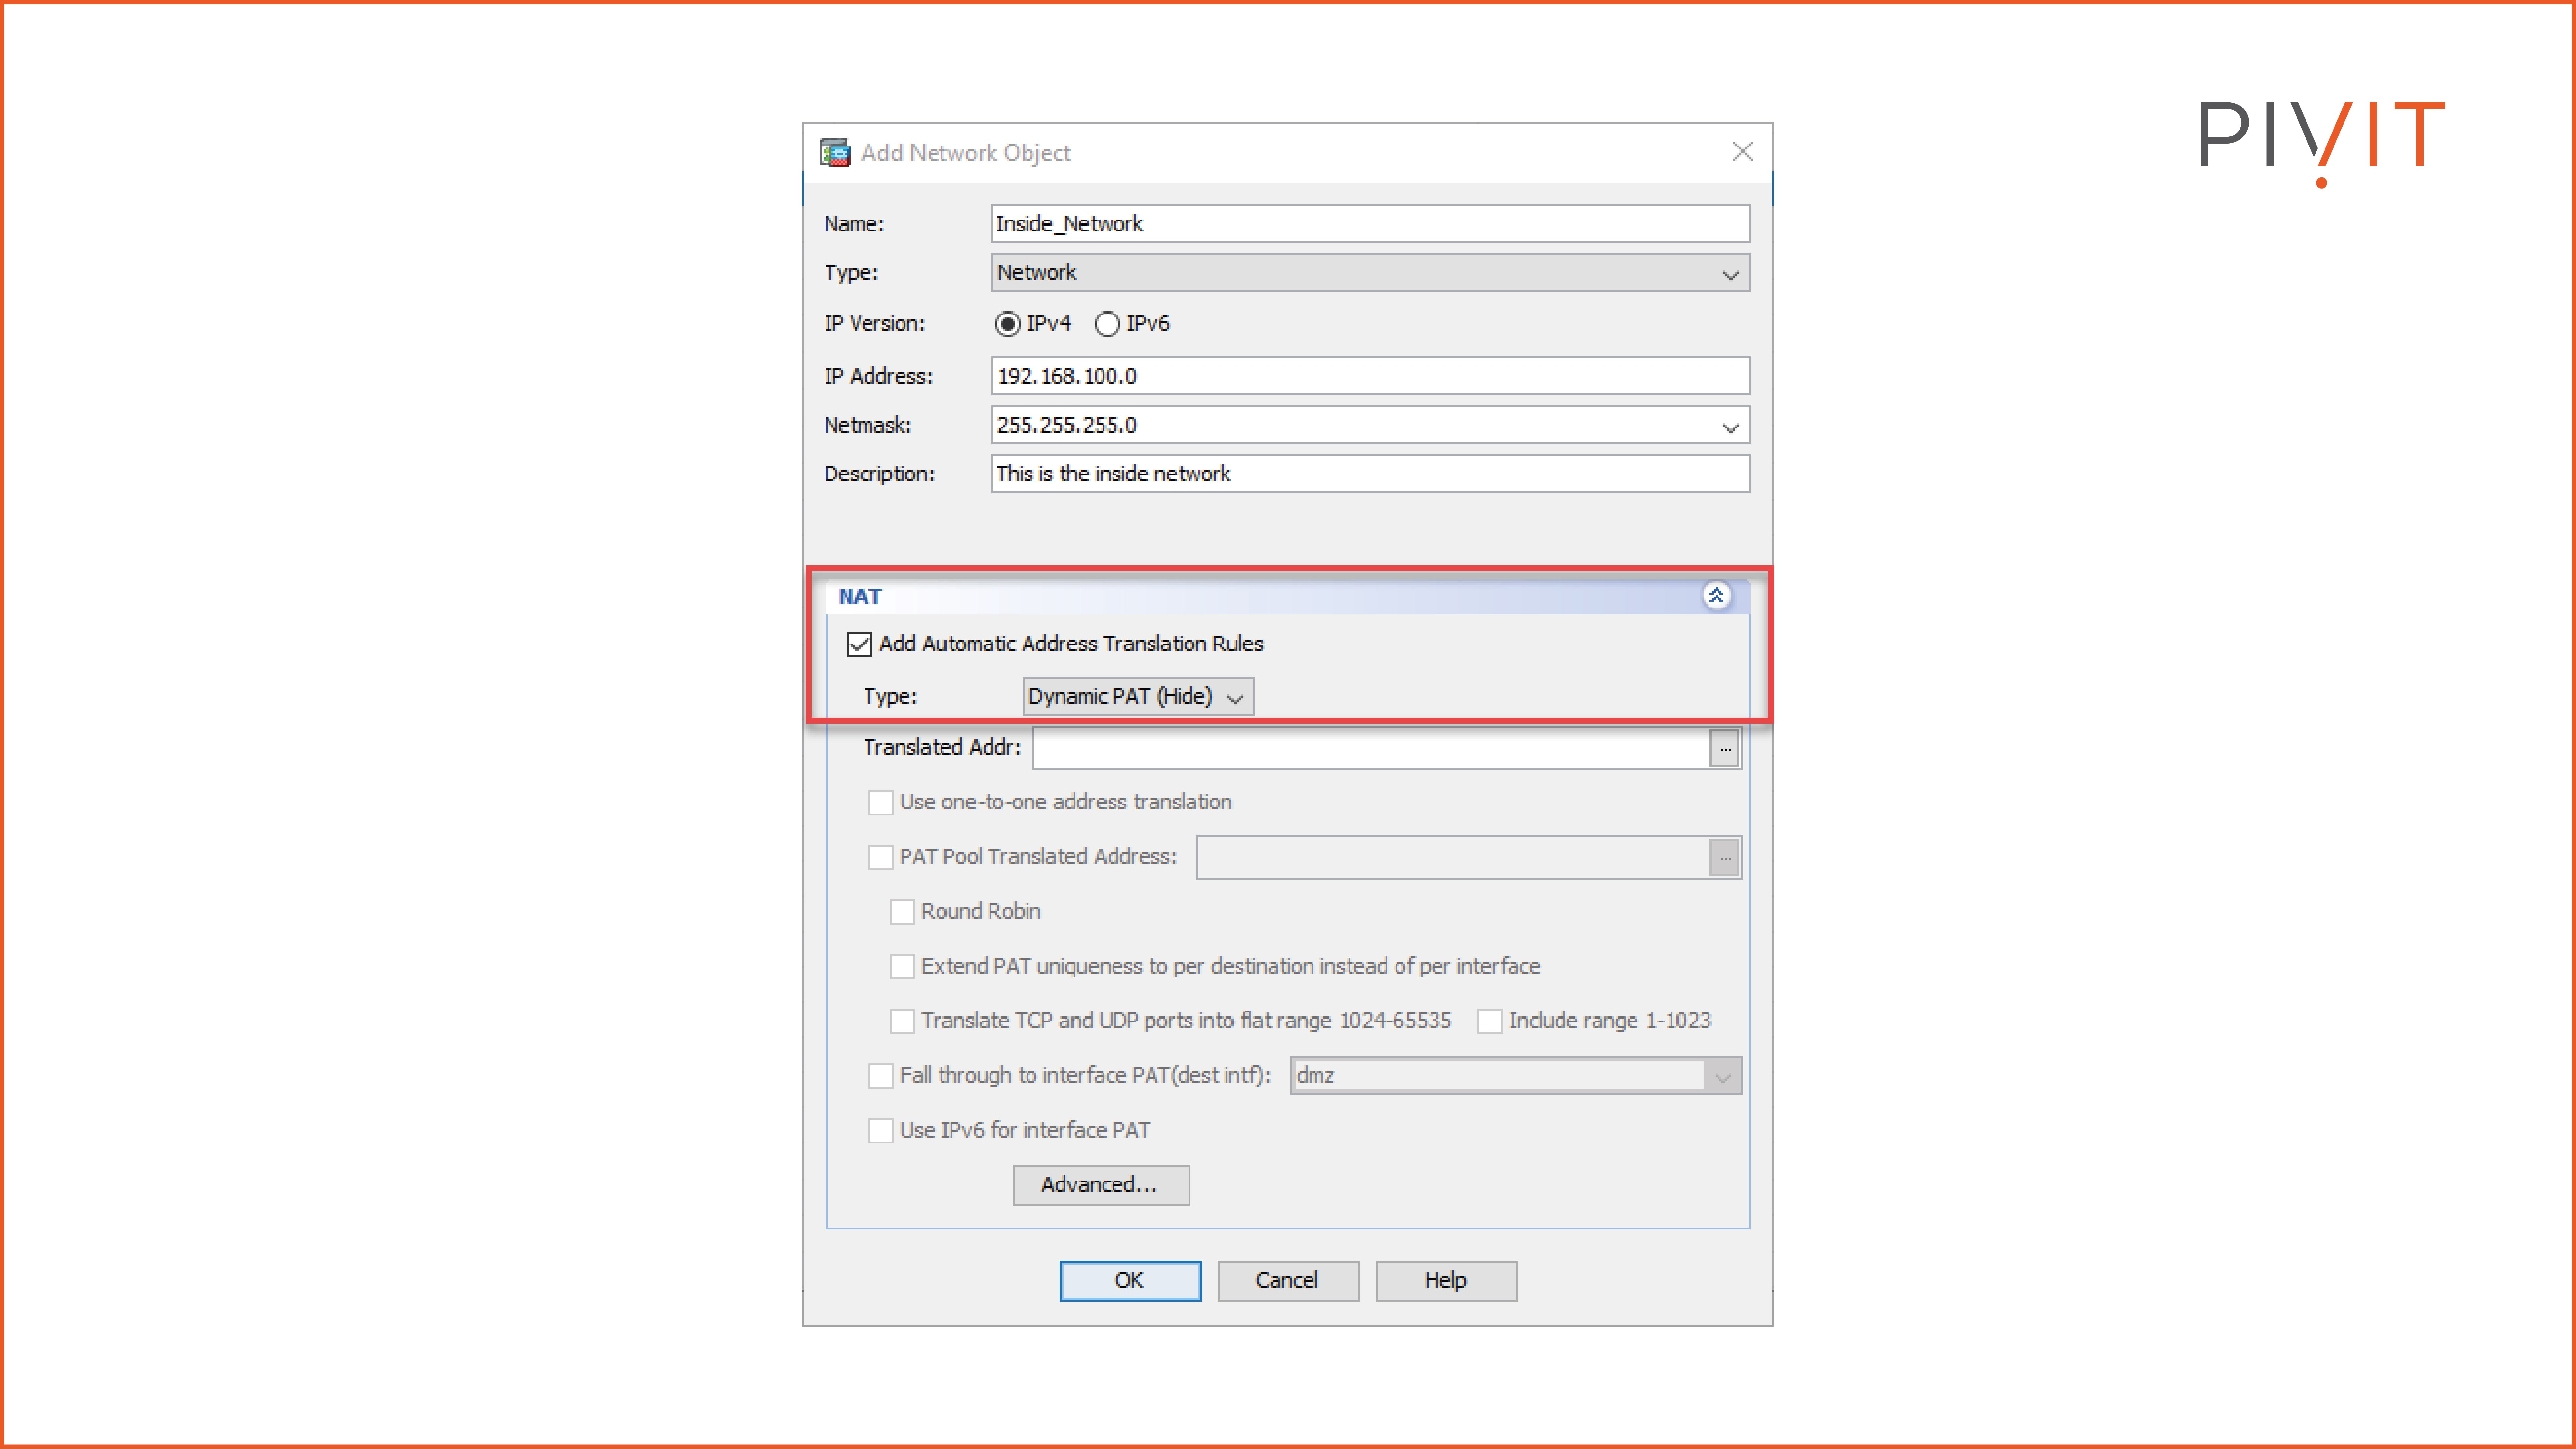
Specify the NAT type to Dynamic PAT.
Step 3:
Specify the translated IP address that, in our case, would be a public IP address represented by the network object named Public_IP.

Step 4:
Specify the traffic direction by defining the incoming and outgoing interface for the NAT translations.
In our case, G0/1 is named “inside” and used as an incoming interface, while G0/2 is named “outside” and used as an outgoing interface.
Configuring Manual NAT
Although auto NAT is sufficient for essential NAT translations in most situations, sometimes you just need more options than auto NAT provides.
When the requirements are more demanding and complex, you must include multiple parameters in the configuration so NAT translations are correctly performed.
Because manual NAT is the first section in the NAT table, it has the highest priority. On top of that, manual NAT allows both the source and destination IP addresses to be translated at once (twice NAT). Last but not least, it will enable you to implement policy-based NAT translations according to various requirements you may have.
The configuration tasks will be based on the topology in the image below to get a better idea of the manual NAT implementation process. The goal in the scenario is to provide communication between companies A and B, although they have overlapping IP address space.
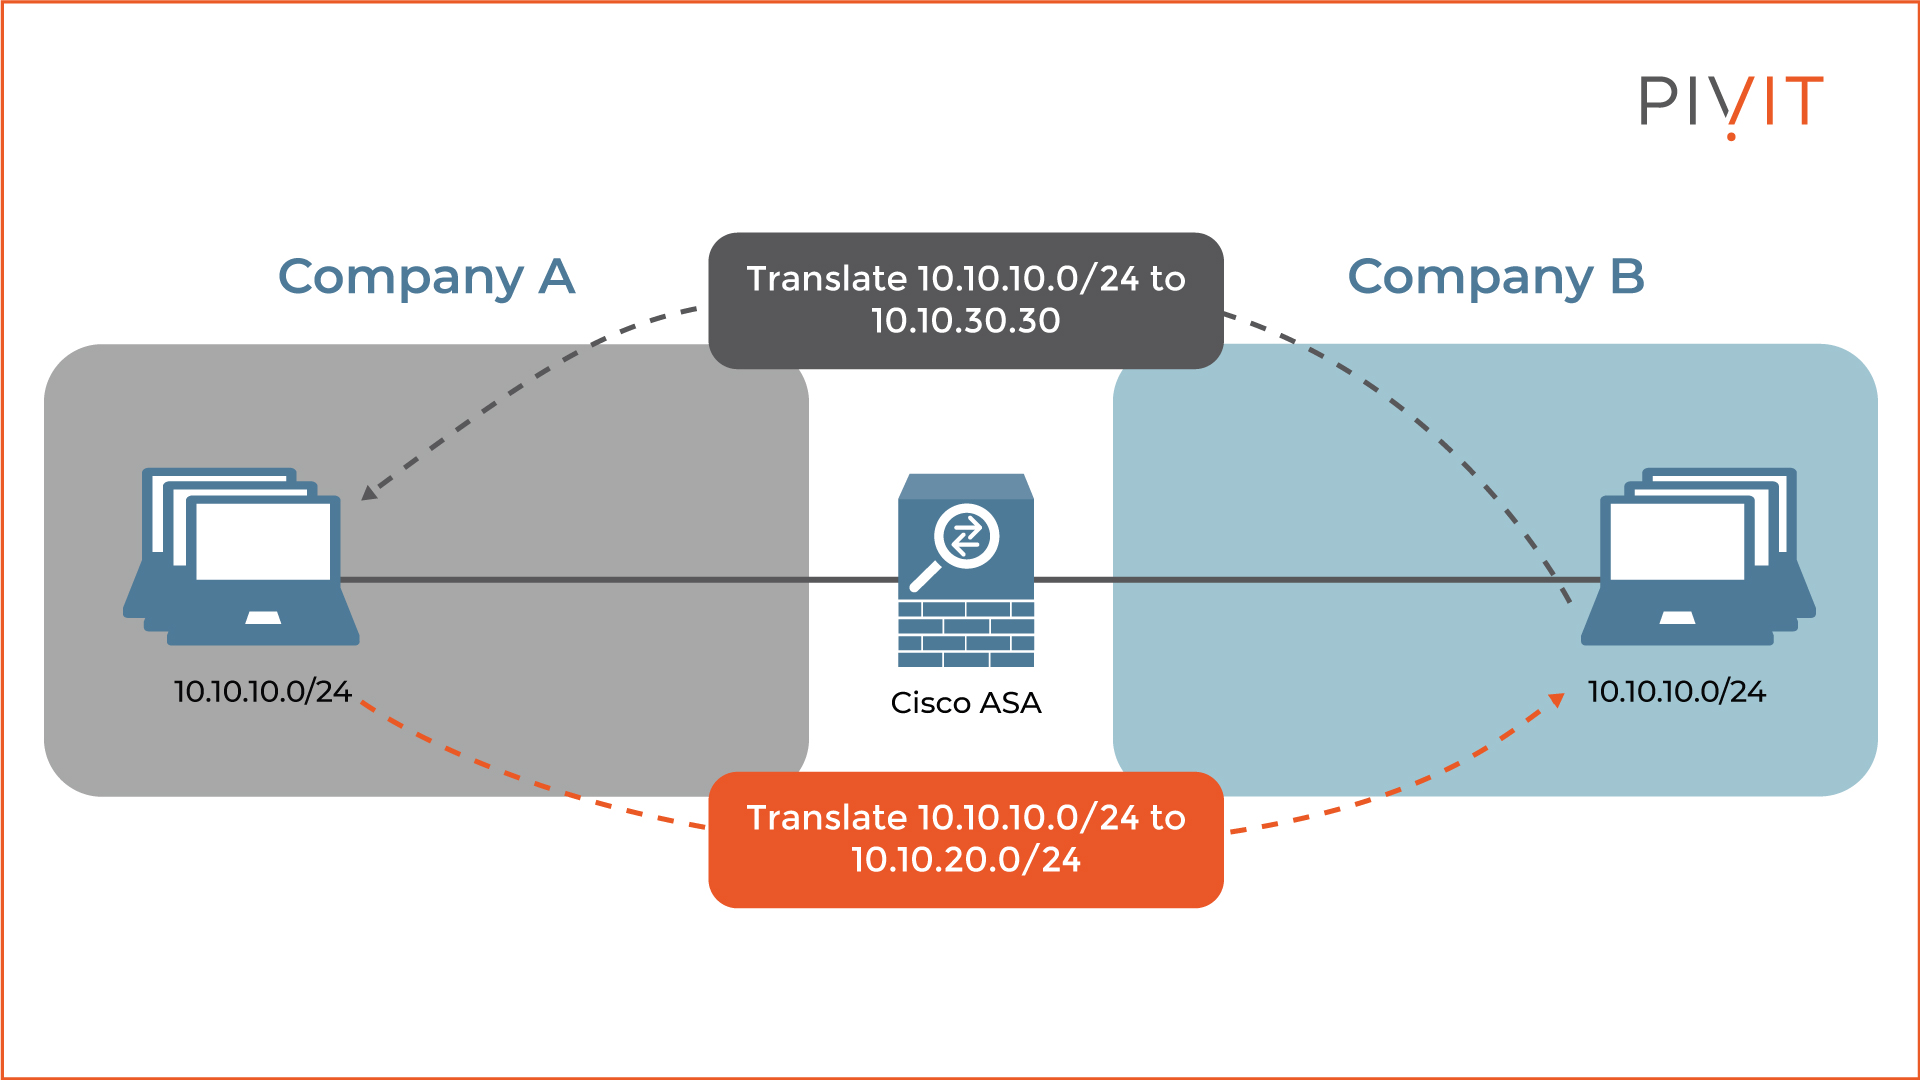
The easiest way to achieve that is by configuring manual NAT. This will translate the overlapping IP network of 10.10.10.0/24 into a new IP address space in both directions. Configuring both translations in the same NAT rule is referred to as twice NAT.
This way, when company A communicates with company B, the ASA will translate the 10.10.10.0/24 network to the 10.10.20.0/24 network. Likewise, when company B communicates with company A, the ASA will translate the 10.10.10.0/24 network to the 10.10.30.30 IP address using PAT.
To configure manual NAT, you must complete three essential tasks in the Cisco ASDM management tool.
First, navigate to Configuration>Firewall>NAT Rules in the Cisco ASDM. Add a manual NAT rule and specify the original source and destination IP address of the packets that require translation. Then, you need to specify the translated source and destination IP address of the packets and select the desired NAT type for the translation.
Remember that network objects represent the source and destination addresses in the NAT configuration. As a matching criterion in the original packet, the network object “Company_B_network” is used as the source address, while the “10.10.20.0_network” object is the destination address.
The same approach applies when defining the parameters for the translated packet. The network object “10.10.30.30_PAT” is used as a source address, while the “10.10.10.0_network” network object is used as a destination address.
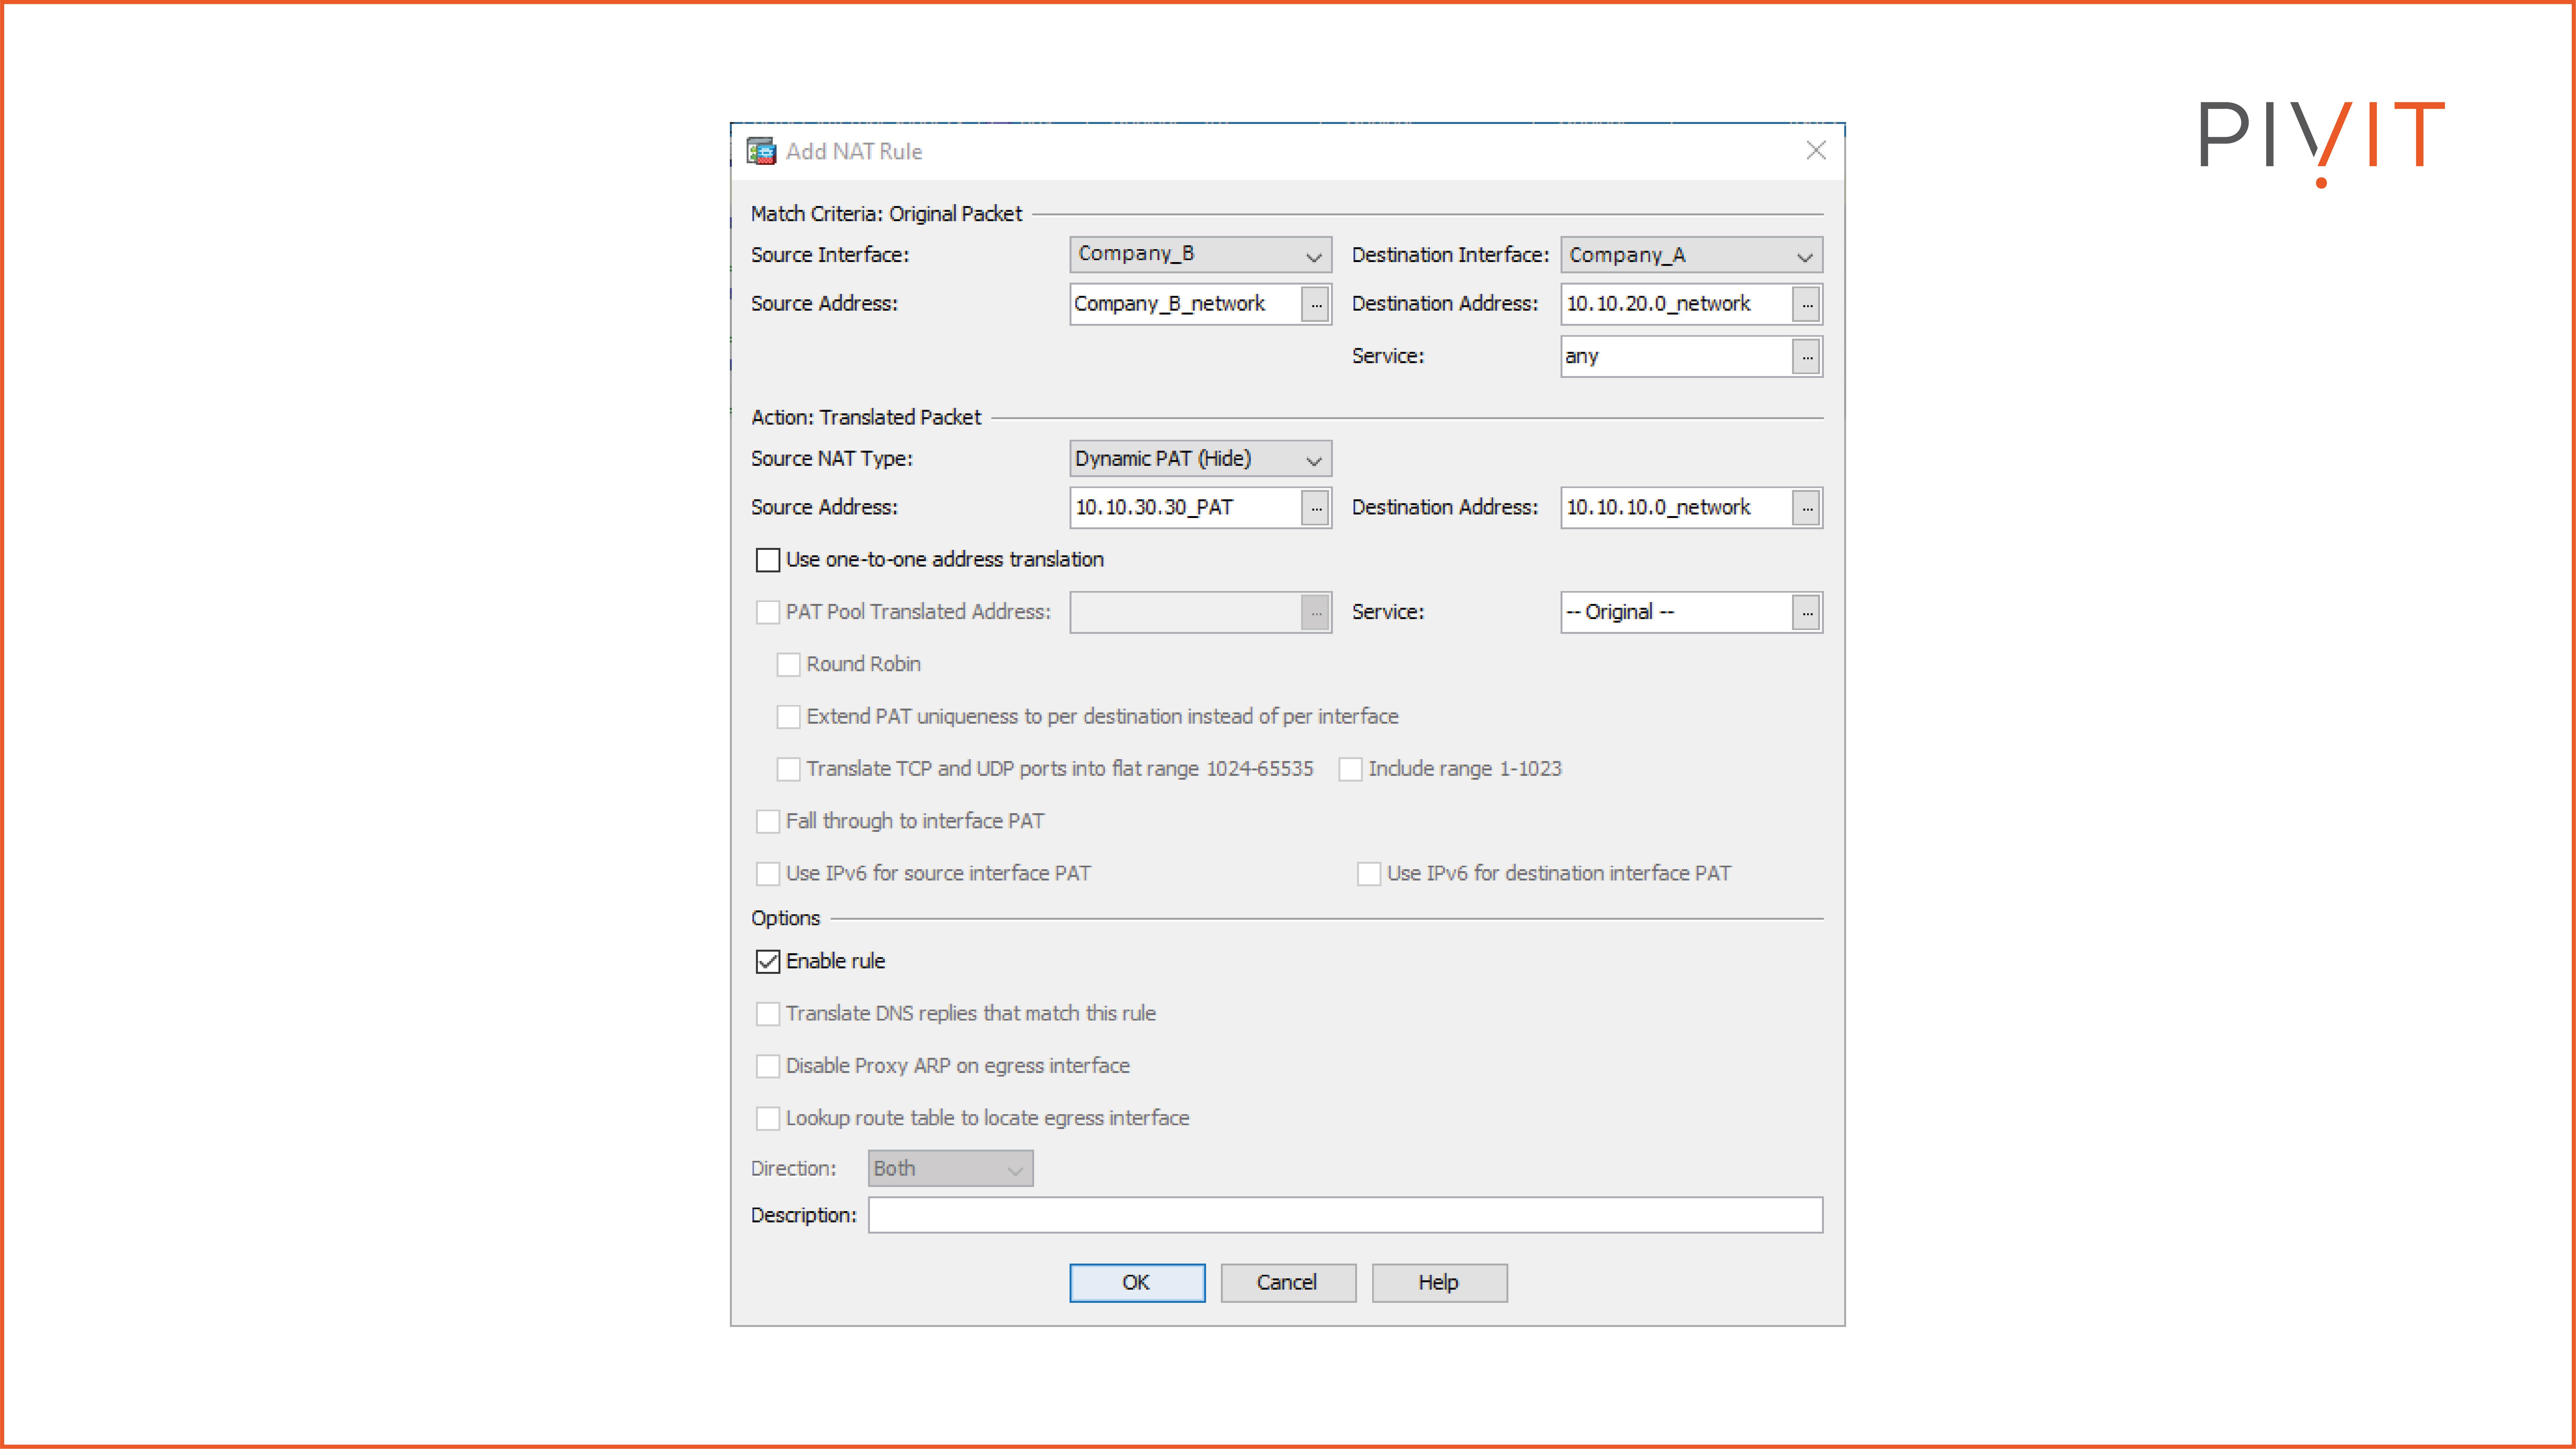
As you can see in the image above, the twice NAT configuration includes all the necessary parameters in one place so that the overlapping IP addressing problem between the merging companies won’t affect their communication.
This way, within a single NAT rule, you define the required translations, and both companies identify themselves with new IP addresses.
The Importance of NAT
You probably know by now that NAT is essential for proper network communications.
Without it, private and public IP addresses would be unusable in most use cases.
Moreover, overcoming problems like overlapping IP address space would be more challenging and almost impossible to provide internet access for all users.
However, with NAT, these issues are solved with just a few configuration commands. The next time you run into problems with NAT, refer to this guide are ensure your organization can rest easy with its network communications secured.
If you need a helping hand to configure your network, consider PivIT's EXTEND SmartHands offering to gain access to engineers around the globe to locally access your infrastructure without ever leaving your desk. But don't take our word for it, here's what one of our clients had to say:
"Great response time by the PivIT team, they came through in a pinch and we really appreciate it." - Jarrod S. (Director of Infrastructure)

