-1.png)
Have you recently tried configuring a Cisco switch, only to realize you've forgotten the commands? You're not alone; we all need a refresher occasionally. Here's your refresher course on Cisco switch commands.
Whether you are brand new to Cisco networking or a veteran with decades of experience, it's usually smart to memorize these fundamental Cisco switch commands. For this discussion, we'll be using PuTTY.
If you need to extend the life of your Cisco 3850s while waiting for your Catalyst 9200, 9300, 9400, or 9500 Series switches to arrive, PivIT supports these switches on our OneCall third-party maintenance offering.
Watch the video below for more details:

As you know, the switch is the heart of your network. It links all other equipment and gathers important information about your network traffic.
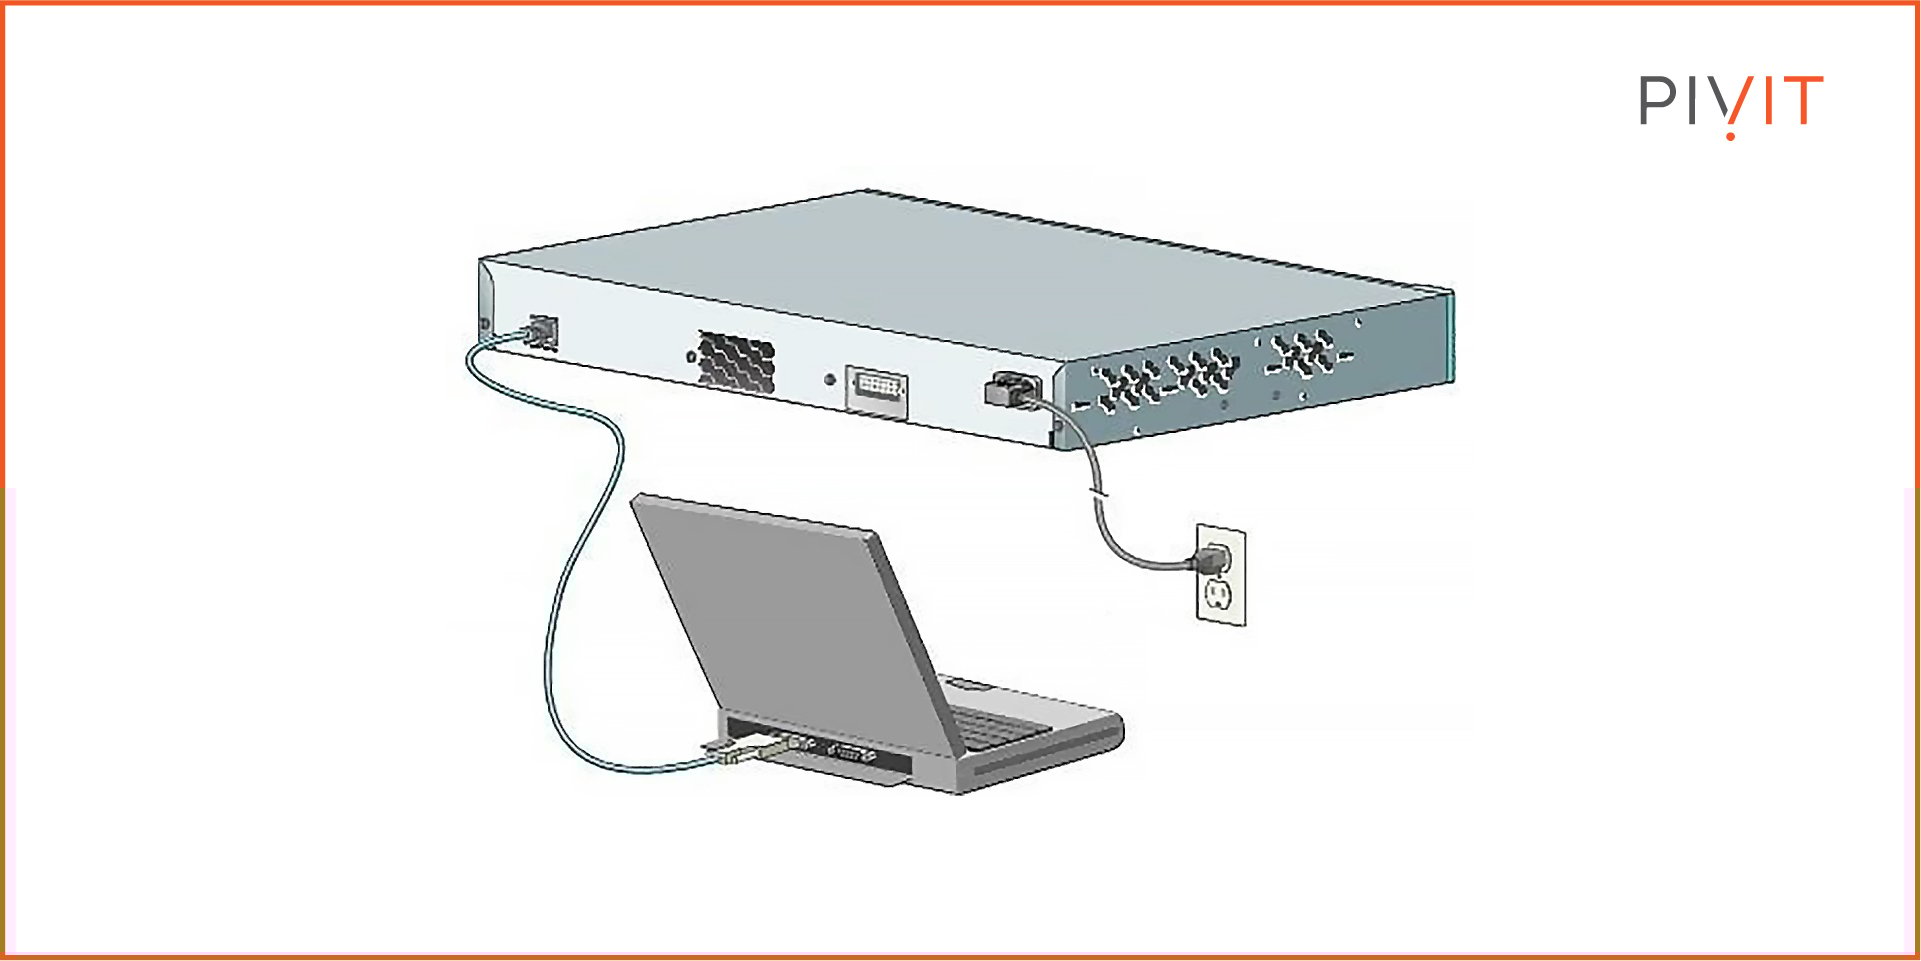
Whether installing a brand new switch or simply reorganizing your network, the first step is connecting your device to the switch's console port.
Then, we'll move to the configuration of the switch. The initial configuration allows the switch to recognize the new devices that are attached.
Not the configuration guide you're looking for? View some of our others:
- Configuration Guide: Routing Between VLANs
- A Quick Guide to EIGRP Configuration with Stub Routing
- Configuration Guide: STP Extension in Cisco NX-OS
Basic Cisco Switch Commands in Five Tasks
All you need to know to learn or refresh your knowledge of the basic commands for Cisco switches can be broken down into these five tasks:
- Task 1: How To Access a Switch
- Task 2: How To Set Up a Switch To Enable Passwords
- Task 3: How To Set Up a Cisco Switch Host Name
- Task 4: How To Configure the MOTD Banner in Your Switch
- Task 5: How To Configure Telnet on Your Cisco Switch
Task 1: How To Access a Switch
We can access the switch using different software. Most PuTTY and secure CRTs are used to access the switch through a console cable. This physical connection is shown below.
Let's configure the switch:
- Download PuTTY.
- Connect the console cable to your Cisco router or switch.
- Run the downloaded
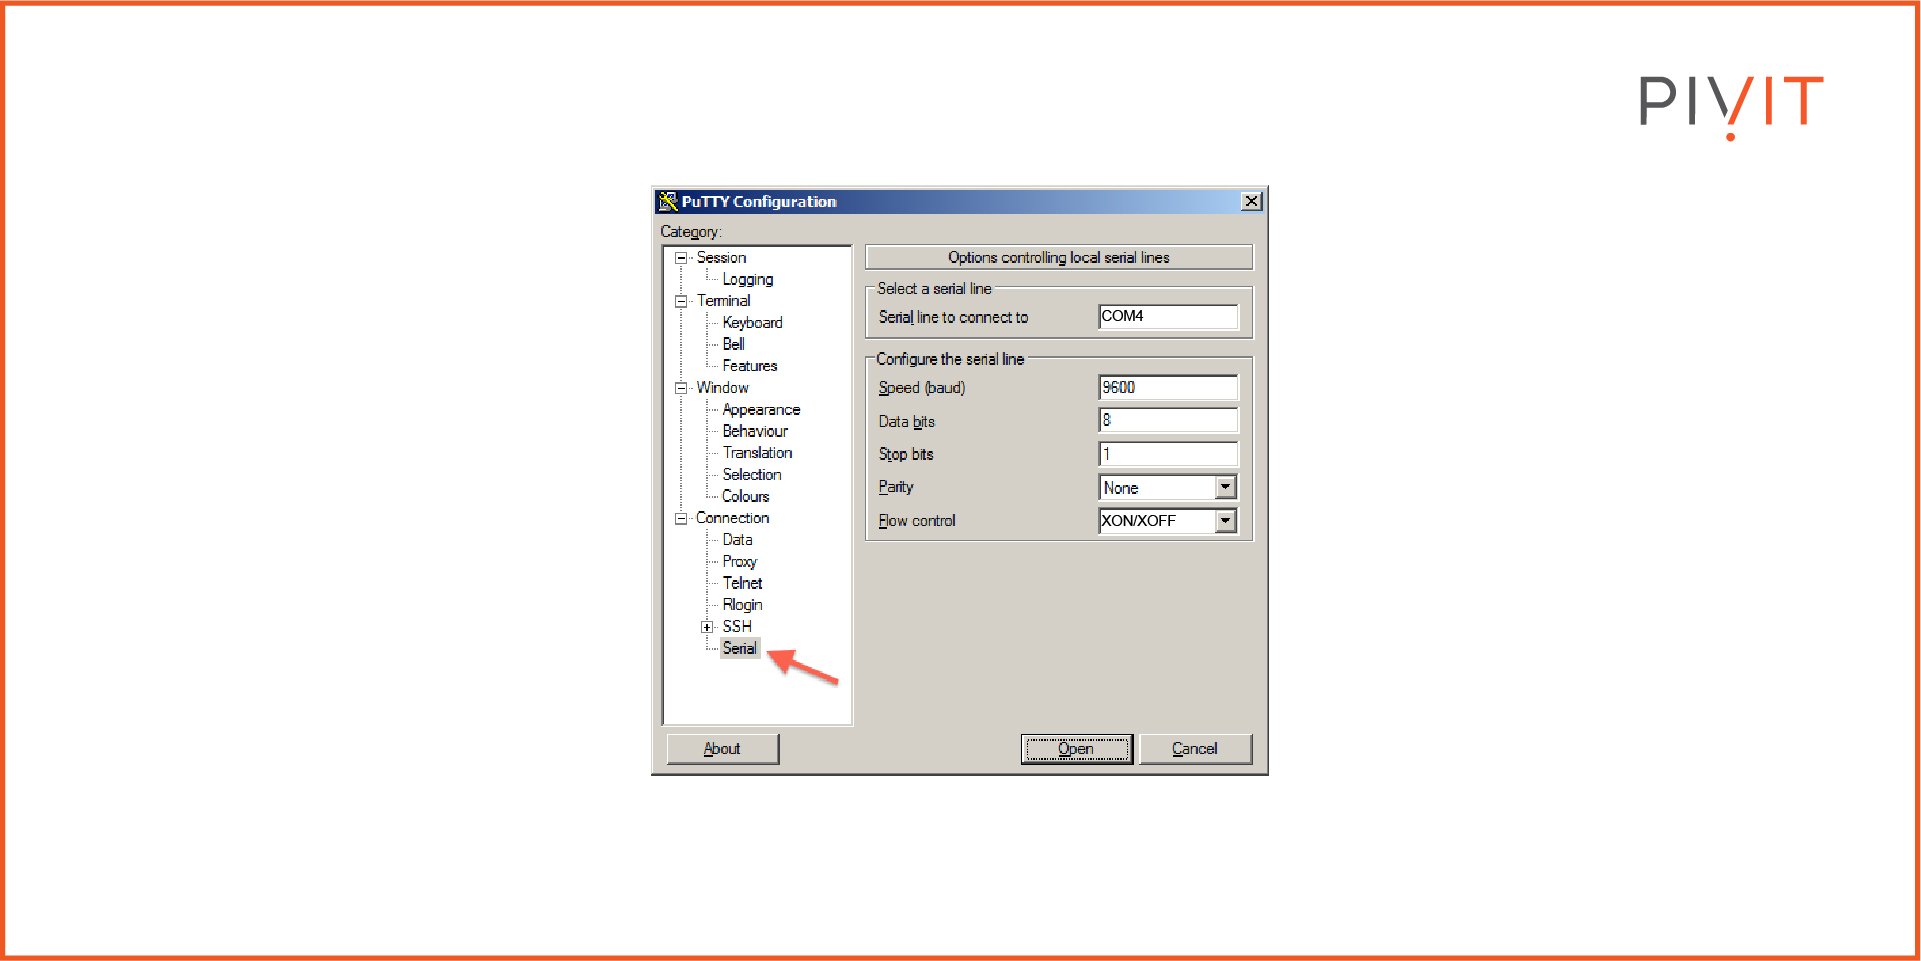
putty.exefile. - Using the PuTTY navigation, expand "Connection" then select "Serial."
- Enter the port number inside the "Serial line to connect to" text box. The port number is COM4 in the sample below, but the port number may be different for your connection. Correctly identifying the port is crucial for proper configuration.
- Next, we'll configure the serial line. For this example, we've used the values below:
- Bits per sec: 9600
- Data bits: 8
- Stop bits: 1
- Parity: None
- Flow control: XON/XOFF
- Press "Open," and the command line will appear where you can configure your switch.
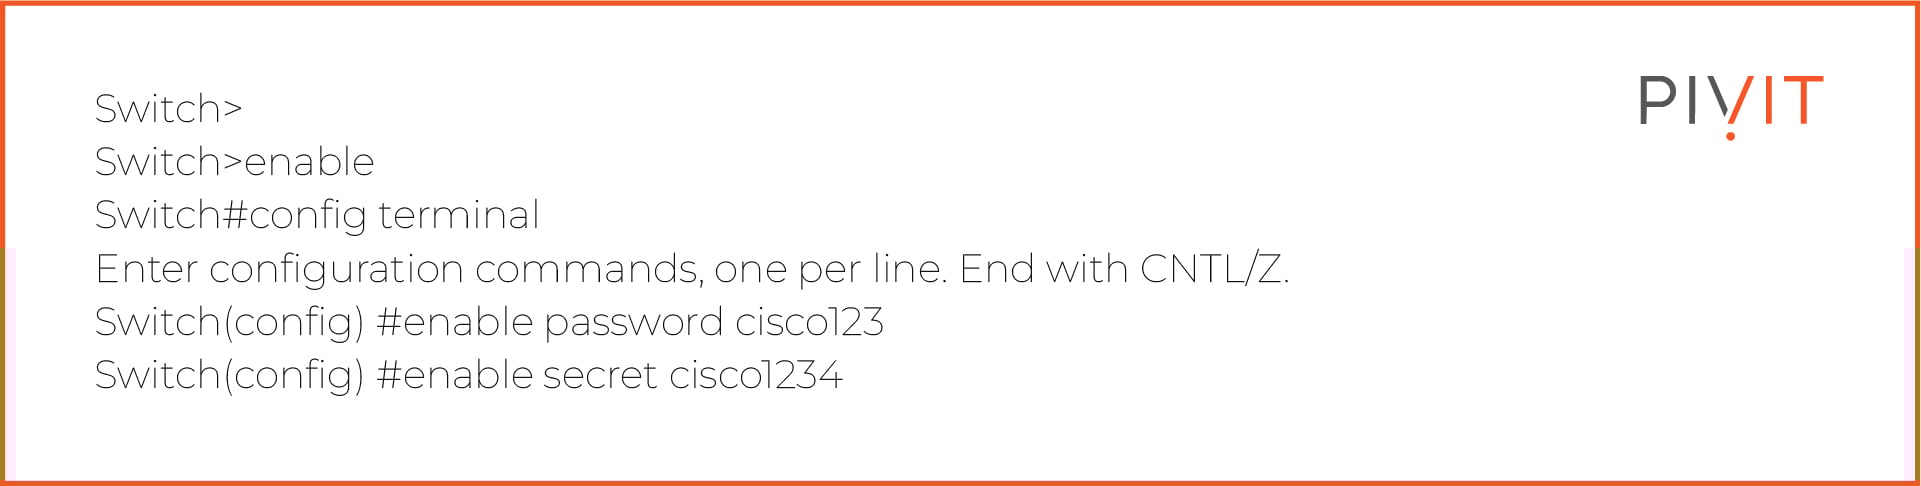
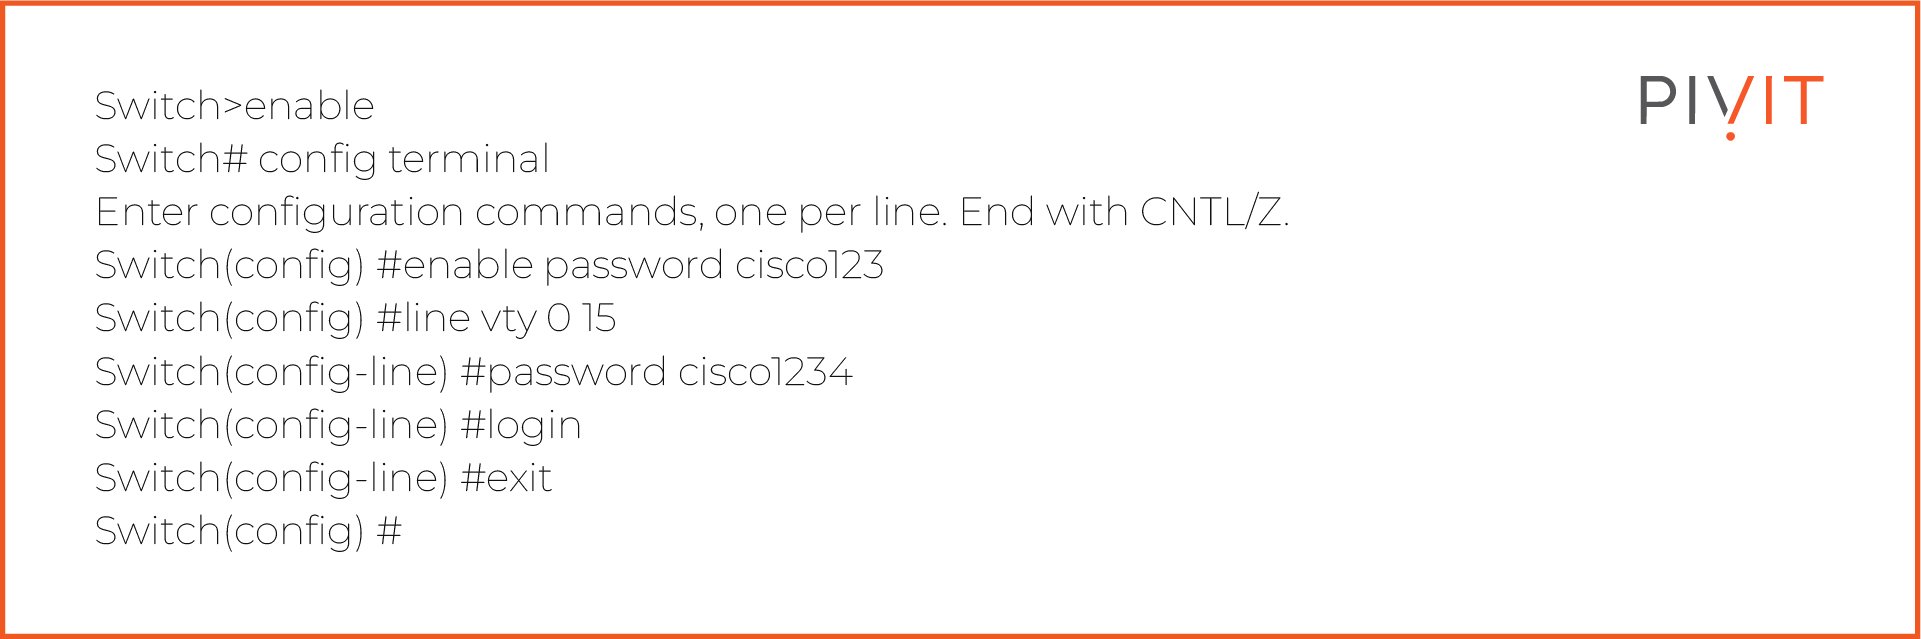
Task 2: How To Set Up a Switch To Enable Passwords
You'll want to set up a switch password for added security. Be sure to know the Cisco basic configurations before moving towards advanced configurations. You can configure a secure password, as shown in the image below.
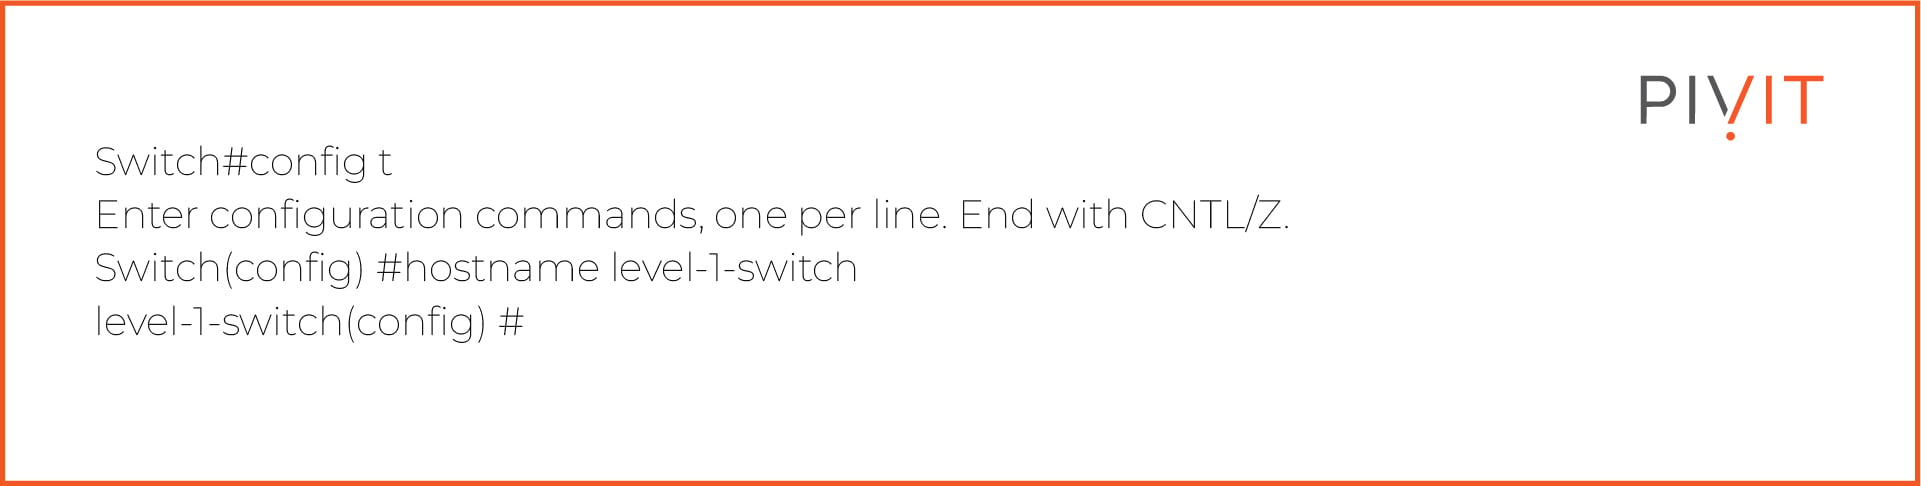
Task 3: How To Set Up a Cisco Switch Host Name
You can easily configure your Cisco switch's hostname to identify the switch location. The picture below shows how one can configure each switch's hostname.
You'll need this option if your network has multiple switches installed and it is difficult to remember all of the switches. You can configure a hostname to remember its location. Configuration is given below:
__________________
As part of PivIT's EXTEND, we offer a secure, isolated, and remote environment to pre-configure your network, compute, and storage hardware before deployment to your locations worldwide using our out-of-band (OOB) management platform. Find out more about how our Remote Staging Environment works.

__________________
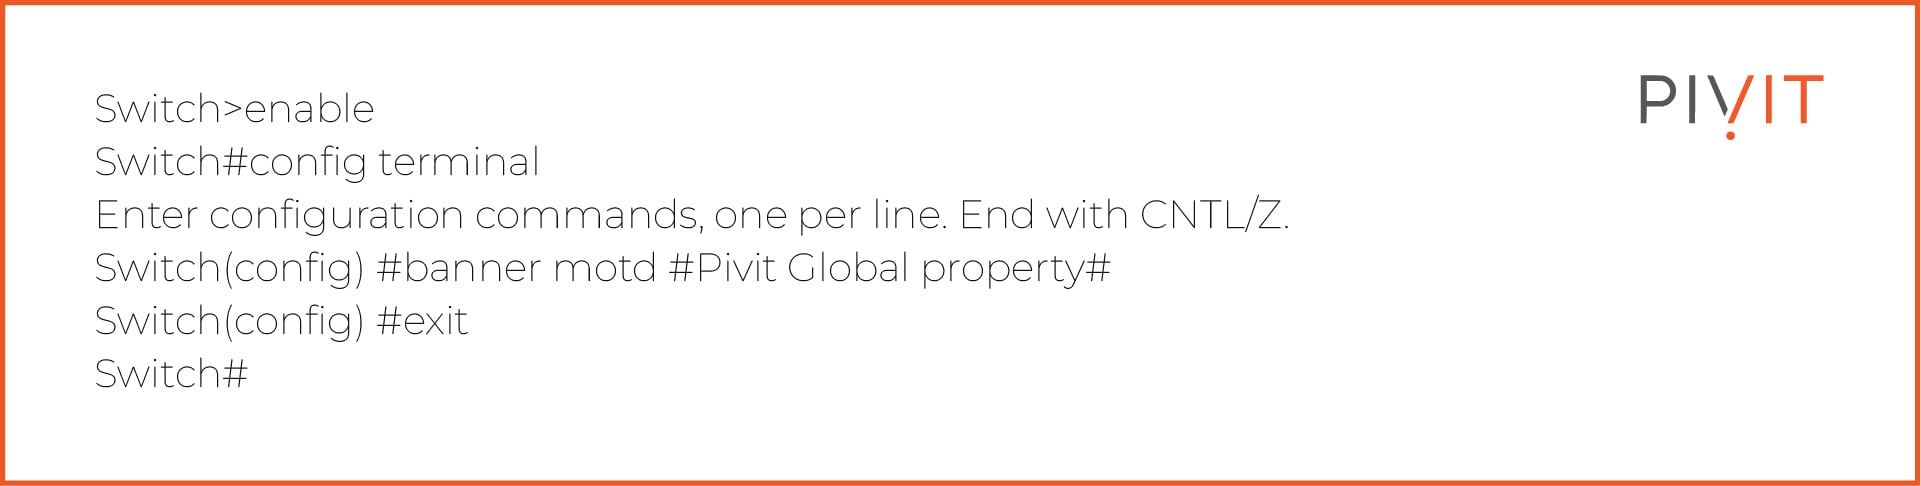
Task 4: How To Configure the MOTD Banner in Your Switch
Users will be presented with a MOTD (Message of the Day) banner every time they attempt a connection via the console port, auxiliary port, SSH, or a telnet session to the Cisco switch. Use the commands below to configure your MOTD message.
Notice the # character is before and after the message. We mostly used this banner for security purposes so that if anyone mistakenly accesses this switch, we can convey a legal message to them.
Task 5: How To Configure Telnet on Your Cisco Switch
In this task, we configure telnet services on a switch to access it from anywhere remotely. This configuration is similar to how you would configure telnet on routers. Telnet allows you to configure, monitor, and manage your switch from remote locations.
To use this feature, you have to configure and enable passwords for telnet configurations. Below are the configurations.
[Bonus] Cisco Switch Commands List
Besides the above basic Cisco switch configuration commands, we’re listing some of the most commonly used Cisco commands. Consider a cheat sheet for working with a Cisco switch.
Remember that Cisco IOS has different command modes, for example, configuration or operation modes. Some commands may only work in certain modes.
Here are most of the basic Cisco switch commands you need to know:
|
Command |
Description |
|
configure terminal |
To log into global configuration mode |
|
enable |
To log into the privileged exec mode (the # symbol indicates privilege mode) |
|
reload |
To reboot the switch |
|
hostname |
To set the hostname |
|
copy from-location-to-location |
To copy a file from one location to another |
|
Write erase |
To delete the startup configuration |
|
Copy startup-config running-config |
To merge the startup configuration with the configuration in memory |
|
Copy running-config startup-config |
To replace the startup configuration with the startup configuration |
|
show startup-config |
To display startup configuration which is activated when device starts |
|
show running-config |
To display current configuration |
|
ip address ip-address mask |
To assign the specific IP address |
|
ip default-gateway ip-address |
To set the default gateway |
|
shutdown |
To shut the interface |
|
no shutdown |
To bring up the interface |
|
show ip interface [type number] |
To display the status of a network interface and its IP configurations |
|
ip name-server serverip-1 serverip-2 |
To set the IP address of one or more DNS servers |
|
speed {number / auto} |
To set the transmission speed of the network interface to the specified value of automatic detection |
|
duplex {auto/full/half} |
To set the duplex to auto, full, or half |
|
show mac address-table |
To show the MAC address table |
|
show interfaces |
To display information about interface (status, counters, and settings) |
|
show interface status |
To display interface line status |
|
show interfaces switchport |
To display configuration settings and operational status |
|
show cdp |
To see if CDP is enabled |
|
show cdp neighbors[detail] |
To list summary of each neighbor connected |
|
show vlan |
To list every VLAN and its assigned interface |
|
show vtp status |
To list the current VLAN Trunk Protocol (VTP) |
|
vlan |
To create a VLAN and configure it |
|
switchport access vlan |
To set the VLAN to the interface it belongs to |
|
switchport access |
To configure an Ethernet port on a switch and operate it in access mode by a device (computer or peripheral) |
|
ip address dhcp |
To get an IP address on an interface through DHCP |
|
domain-name domain |
To specify the domain name of the DHCP client |
|
ip domain-name name |
To configure a DNS domain name |
|
switchport port-security |
To enable port security on the interface |
|
show port security [interface interface-id] |
To display information about security configured on the interface |
FAQs
How to check the full configuration of a Cisco switch?
Use the command ‘show run’ or ‘show start’ to see the entire current configuration or startup configuration, respectively. Use the command ‘show run brief’ if you don’t want to see all the lengthy certificate data.
How to assign an IP address to a switch?
Suppose you want to assign an IP address to the switch for VLAN 1.
Here’s how you can do it:
- Access VLAN 1 configuration mode using the "interface vlan 1" global configuration command.
- Allocate an IP address using the "ip address IP_ADDRESS SUBNET_MASK" interface subcommand.
- Activate the VLAN 1 interface by utilizing the "no shutdown" interface subcommand.
- (Optional) Establish the default gateway with the "ip default-gateway IP_ADDRESS" global configuration command.
- Optionally, include the "ip name-server IP_ADDRESS" global configuration command to set up the DNS server.
How many command modes are there in Cisco IOS?
There are five command modes in Cisco IOS:
- Global configuration mode
- Interface configuration mode
- Subinterface configuration mode
- Router configuration mode
- Line configuration mode
Additional Resources To Keep Your Network Running
Need to implement these Cisco switch commands on an actual unit? Explore your switch options here at PivIT. Click below to learn more about the switch solutions we can bring to your network, whether it be the hardware itself, maintenance, or the field services you need to get online.

We created the Tech Corner to connect with you on product discussions, configurations, and product comparisons, and provide you with information about the industry!
Subscribe to the Tech Corner today! Leave a comment, question, or concern below.