
In a perfect world, every network engineer would know the architecture of network devices like the back of their hand. They would also understand its hardware and software-based behavior.
However, in the real world, things are a bit different.
Many factors increase the chances of device misconfigurations and inadequate actions in enterprise networks. Threat actors frequently use such lapses to gain access to enterprise networks, as the Cybersecurity and Infrastructure Security Agency warned in 2022.
Risk factors include the wide range of network devices available today — such as switches, routers, and firewalls, among many other types — paired with limited training attendance by employees and busy everyday schedules.
These unintentional flaws can be devastating for the health of networks and result in extreme resource consumption, unavailability, man-in-the-middle attacks, or even extended downtime periods.
And it’s no secret about the sky-high downtime costs: the ITIC says 44 percent of firms indicated hourly downtime costs exceed $1 million to more than $5 million.
Therefore, you must implement protection of the control plane for critical devices, guaranteeing normal network behavior.

This article will provide the following:
- An overview of control plane security.
- A look at infrastructure ACLs.
- An outline of Control Plane Policing.
- An examination of Control Plane Protection.
- A quick peek at routing protocol authentication.
Looking for other articles to get the most from your network devices? Try these articles:
- It’s About Time — The Importance of NTP for Networks
- Configure Your Devices Network Time With This Guide
- Configure Network Security Using an ACL in SVI Environments
An Overview of Control Plane Security
The control plane includes the hardware and software on a network device that supports the routing and management functionalities. Typically, the control plane packets are destined for the device itself or originated from it. For example, such traffic would be generated by the dynamic routing protocols when routers exchange routing updates.
However, the control plane traffic depends on the device’s CPU resources, which could lead to excessive resource use and service failures when not accordingly managed.
Since the control plane provides essential traffic-routing functions by building the device routing and forwarding tables, you must apply appropriate protection to protect against various types of compromise.
Different attacks can compromise network devices based on their type in one way or another. Such attacks are STP poisoning, VTP spoofing, control plane flooding, and routing protocol spoofing (including route poisoning, route injection, et cetera), among many others.
Therefore, if an attacker corrupts a routing table of a Layer 3 device, he can also easily redirect traffic afterward and facilitate a man-in-the-middle attack. Or, if an attacker causes an extreme load on the device’s CPU, it can lead to service failures or even crush the device.
The routed control plane uses numerous processes that run at the process level on the CPU on the network device. Its functionality is to provide routing functions in a device by building routing and forwarding tables using static or dynamic routing.
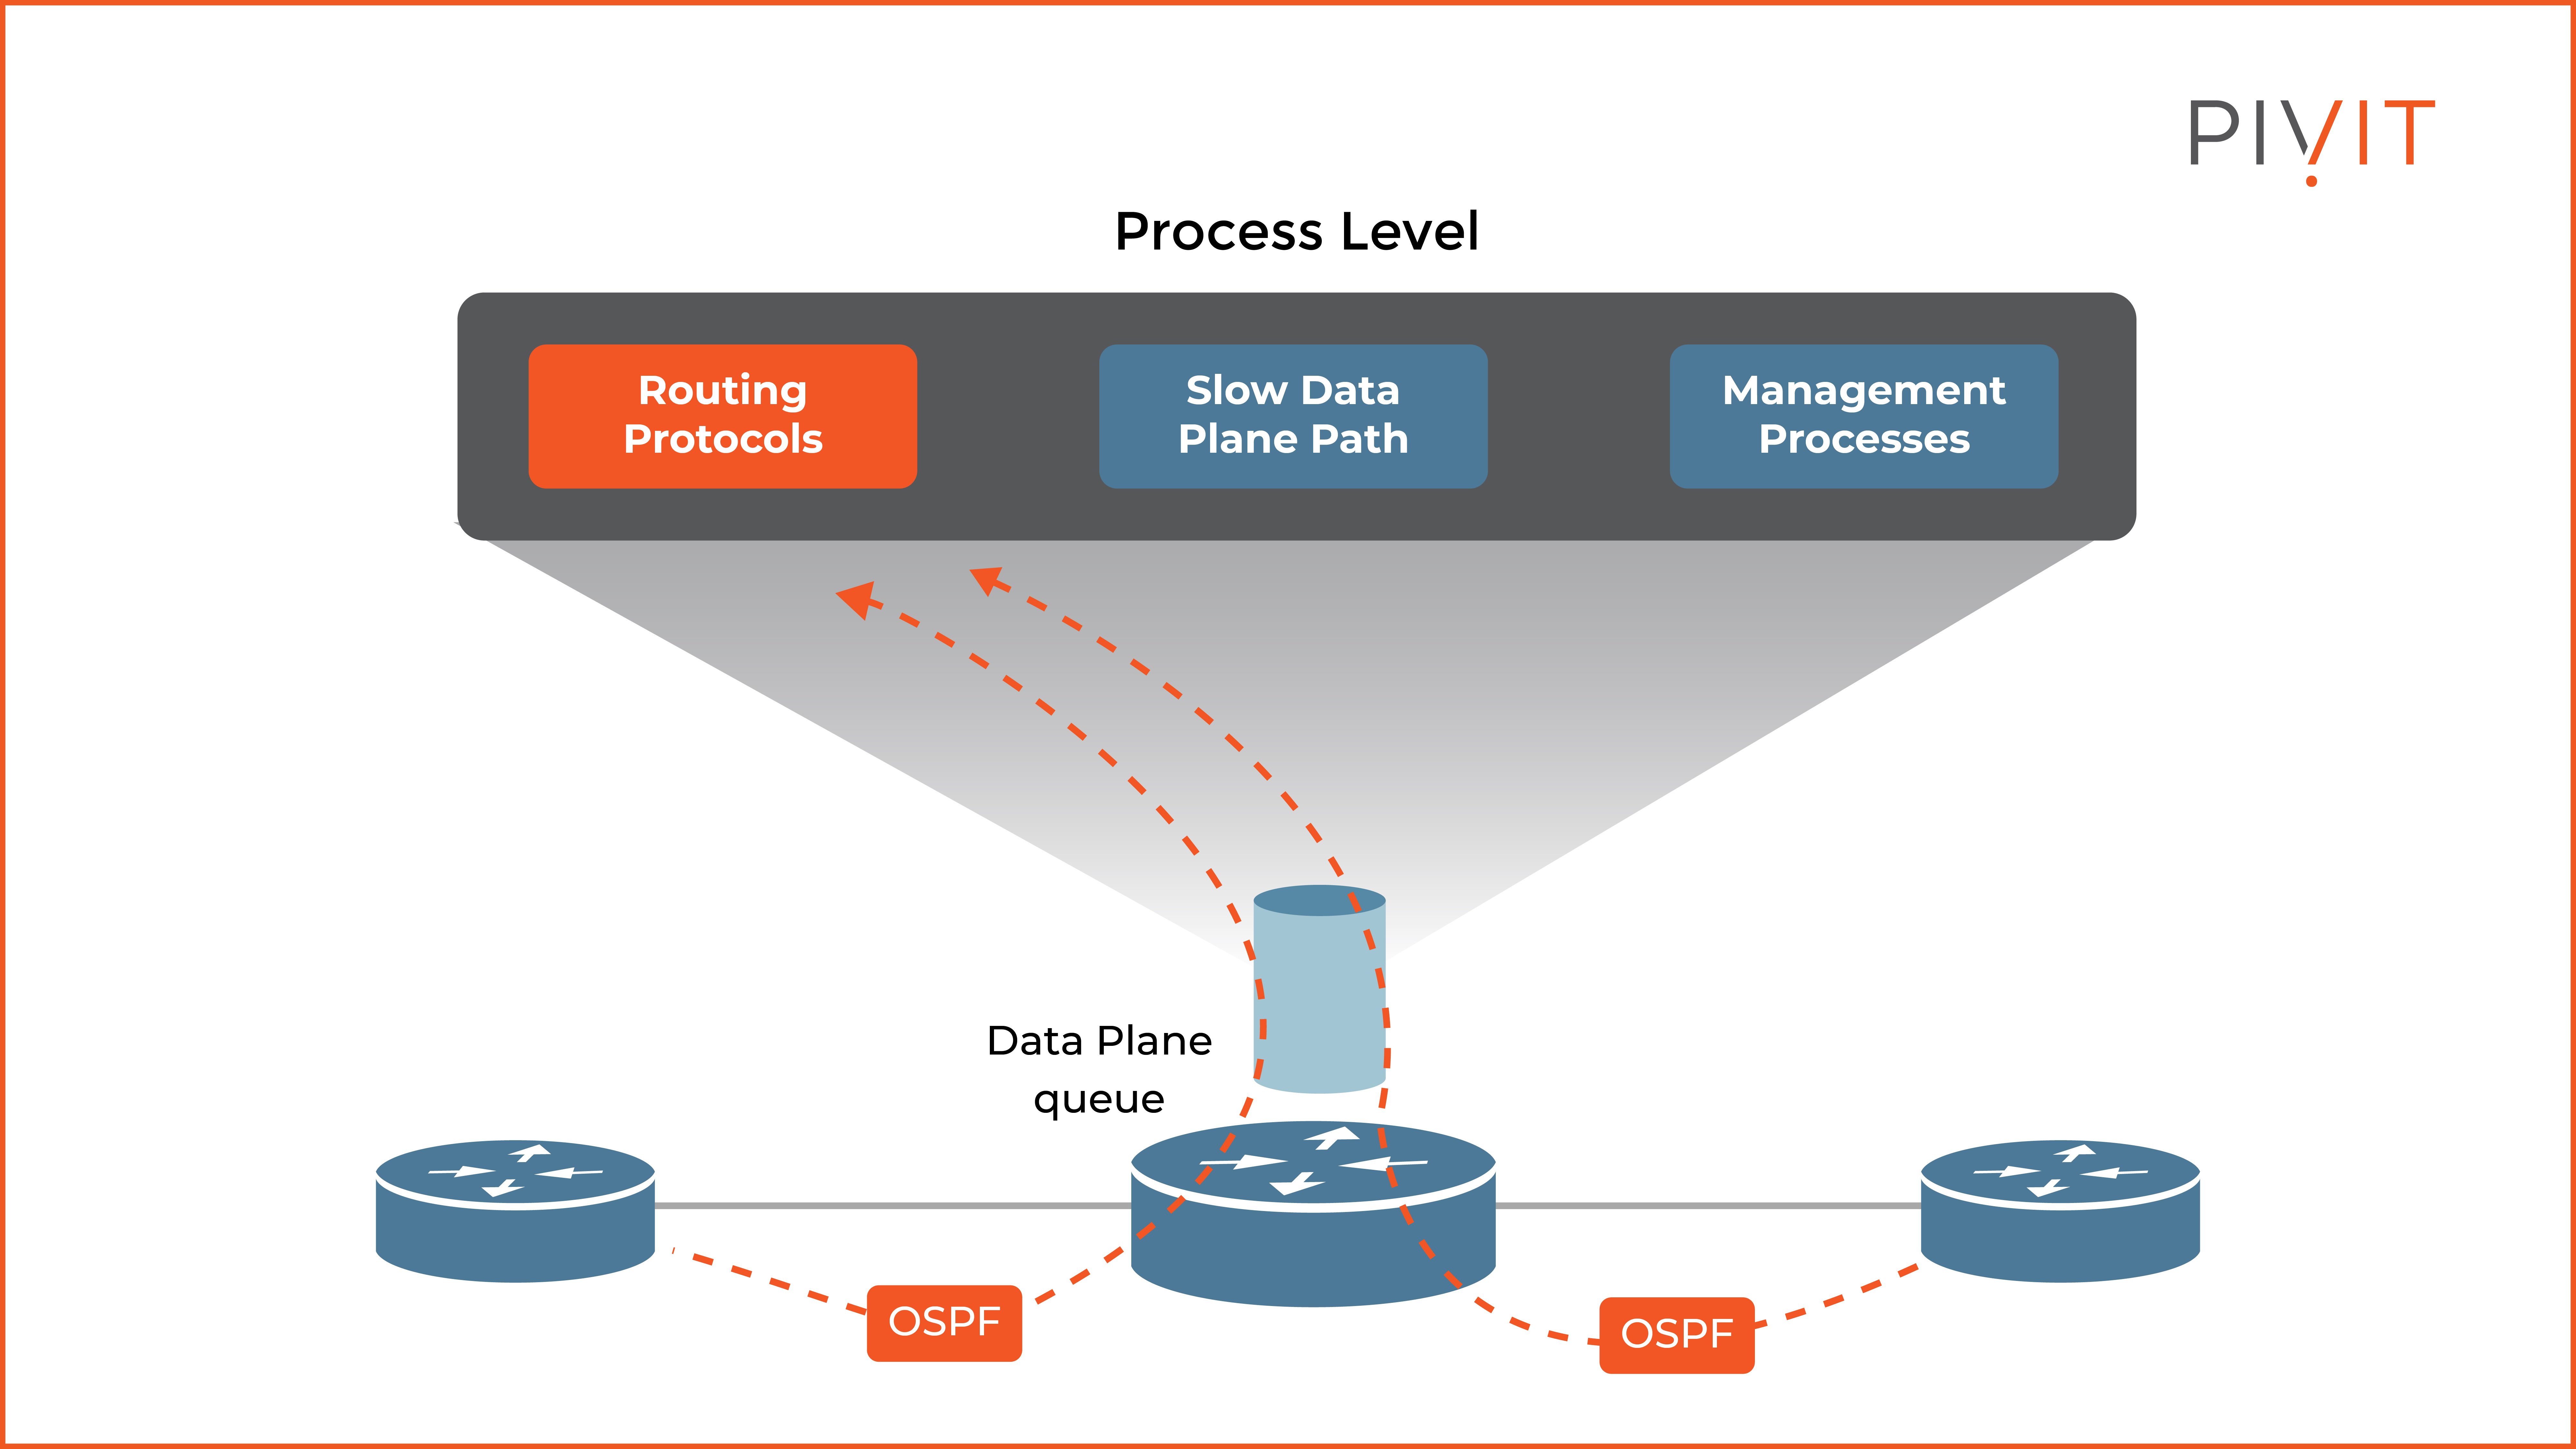
However, as you can see in the image above, the control plane, with its primary routing functionalities, shares the CPU of the router with two other groups of processes — the slow data path processes and the management processes.
The management processes provide device management functions, while the slow data path processes manage traffic you can’t manage by the fast data path or Cisco Express Forwarding (CEF) processing.
Because the CPU is shared among these three functions, excessive traffic to just one of these functions can cause high overall CPU usage and influence the behavior of the other two functions that depend on the CPU resources.
Therefore, securing the control plane with the available countermeasures and guarding against various threats is crucially important.
You can deploy one of many security features available on network devices to achieve that. You can implement infrastructure ACLs and routing protocol authentication on both Cisco IOS and Cisco ASA.
In addition, you can implement Control Plane Policing and Control Plane Protection on Cisco IOS devices and Control Plane ACLs on Cisco ASA.
________________
Let PivIT handle your Control Panel with EXTEND, a seamless and confidential extension of your IT teams. Consider us your feet on the street, working to cost-effectively extend your reach and complete your projects.
________________
Applying Infrastructure ACLs
Infrastructure ACLs are typically applied in the inbound direction on the device interfaces that connect to external networks.
Once applied, they deny and log all traffic destined to the IP addresses of network infrastructure devices, such as routers and firewalls. As a result, all routing protocols and management traffic gets rejected and isn’t processed by these devices.
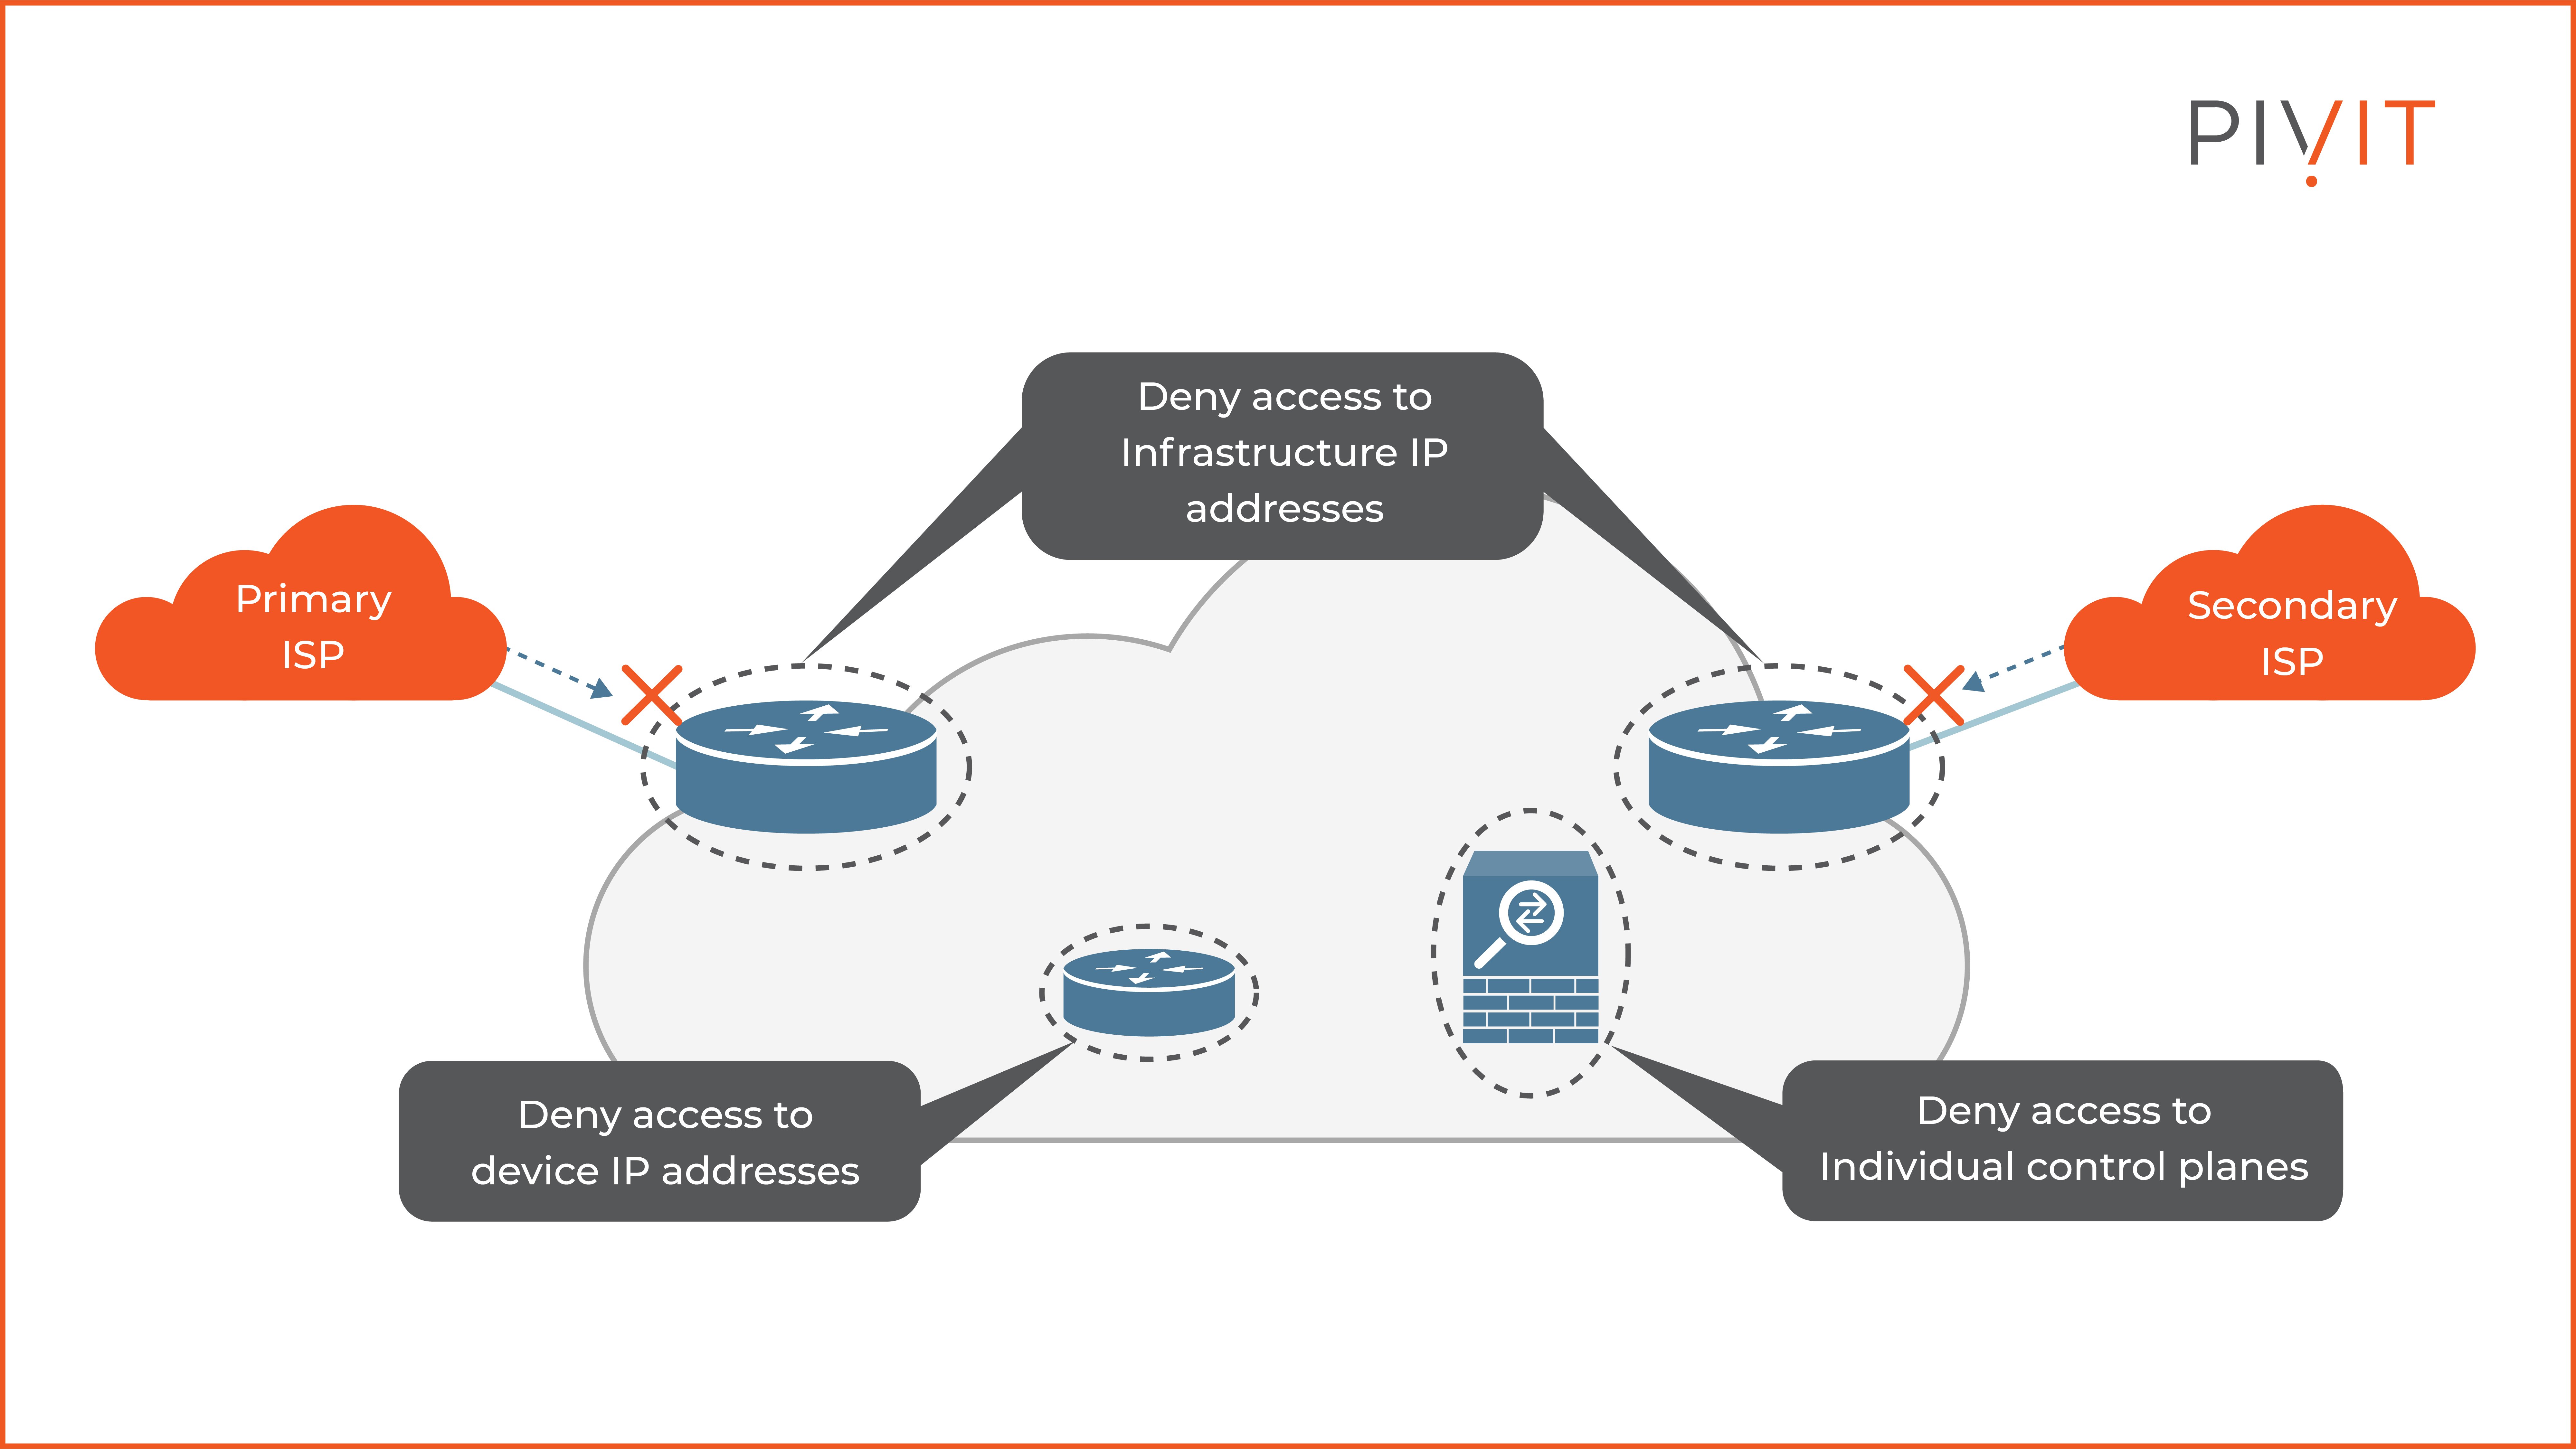
As you can see in the image above, infrastructure ACLs protect all edge and internal routers and firewalls that deny traffic destined to their IP addresses.
However, the rest of the transit traffic is permitted and not filtered out by the same ACLs. This can easily result in high CPU consumption since malicious transit traffic might require processing in the CPU-intensive slow data plane path on network devices.
You must base your network on a structured addressing plan to implement infrastructure ACLs. That way, you can optimize the ACL implementation.
However, if that is not the case, you may consider on-device countermeasures, such as implementing personal firewalls and control plane rate limiters on each device.
You can implement infrastructure ACLs using the traditional Cisco IOS ACLs approach or Flexible Packet Matching (FPM).
FPM is a special ACL pattern matching tool that provides a more complete and customized packet filtering. Doing so enables you to create your stateless packet classification criteria and to define corresponding policies with multiple actions such as drop, log, or sending ICMP unreachable messages to block malicious traffic from potentially harming the network.
The Goals of Control Plane Policing
Control Plane Policing (CoPP) is a special feature that aims to prevent unnecessary traffic from overwhelming the device’s system resources.
Such traffic could be the traffic that routing protocols exchange, management processes, or any other traffic that uses the slow data plane path of the network device.
CoPP functionality is unique and treats the control plane as a separate entity with its ingress and egress ports. This way, all traffic forwarded to the CPU of the network device is controlled in the same way via a central configuration mechanism to protect the CPU resources independently of the local physical interfaces where traffic enters or exits.
Besides filtering the traffic to be allowed or denied on the control plane interfaces, CoPP also supports rate-limiting of traffic forwarded to the CPU of the network device. It’s accomplished by implementing modular QoS CLI or MQC that integrates class maps, policy maps, and service policies.
Although many choose Control Plane Protection (CCPr) feature over CoPP because of the more granular approach, some platforms do not support it. Therefore, you must be familiar with the functionalities of CoPP and know how to implement it in such situations.
How to Configure CoPP
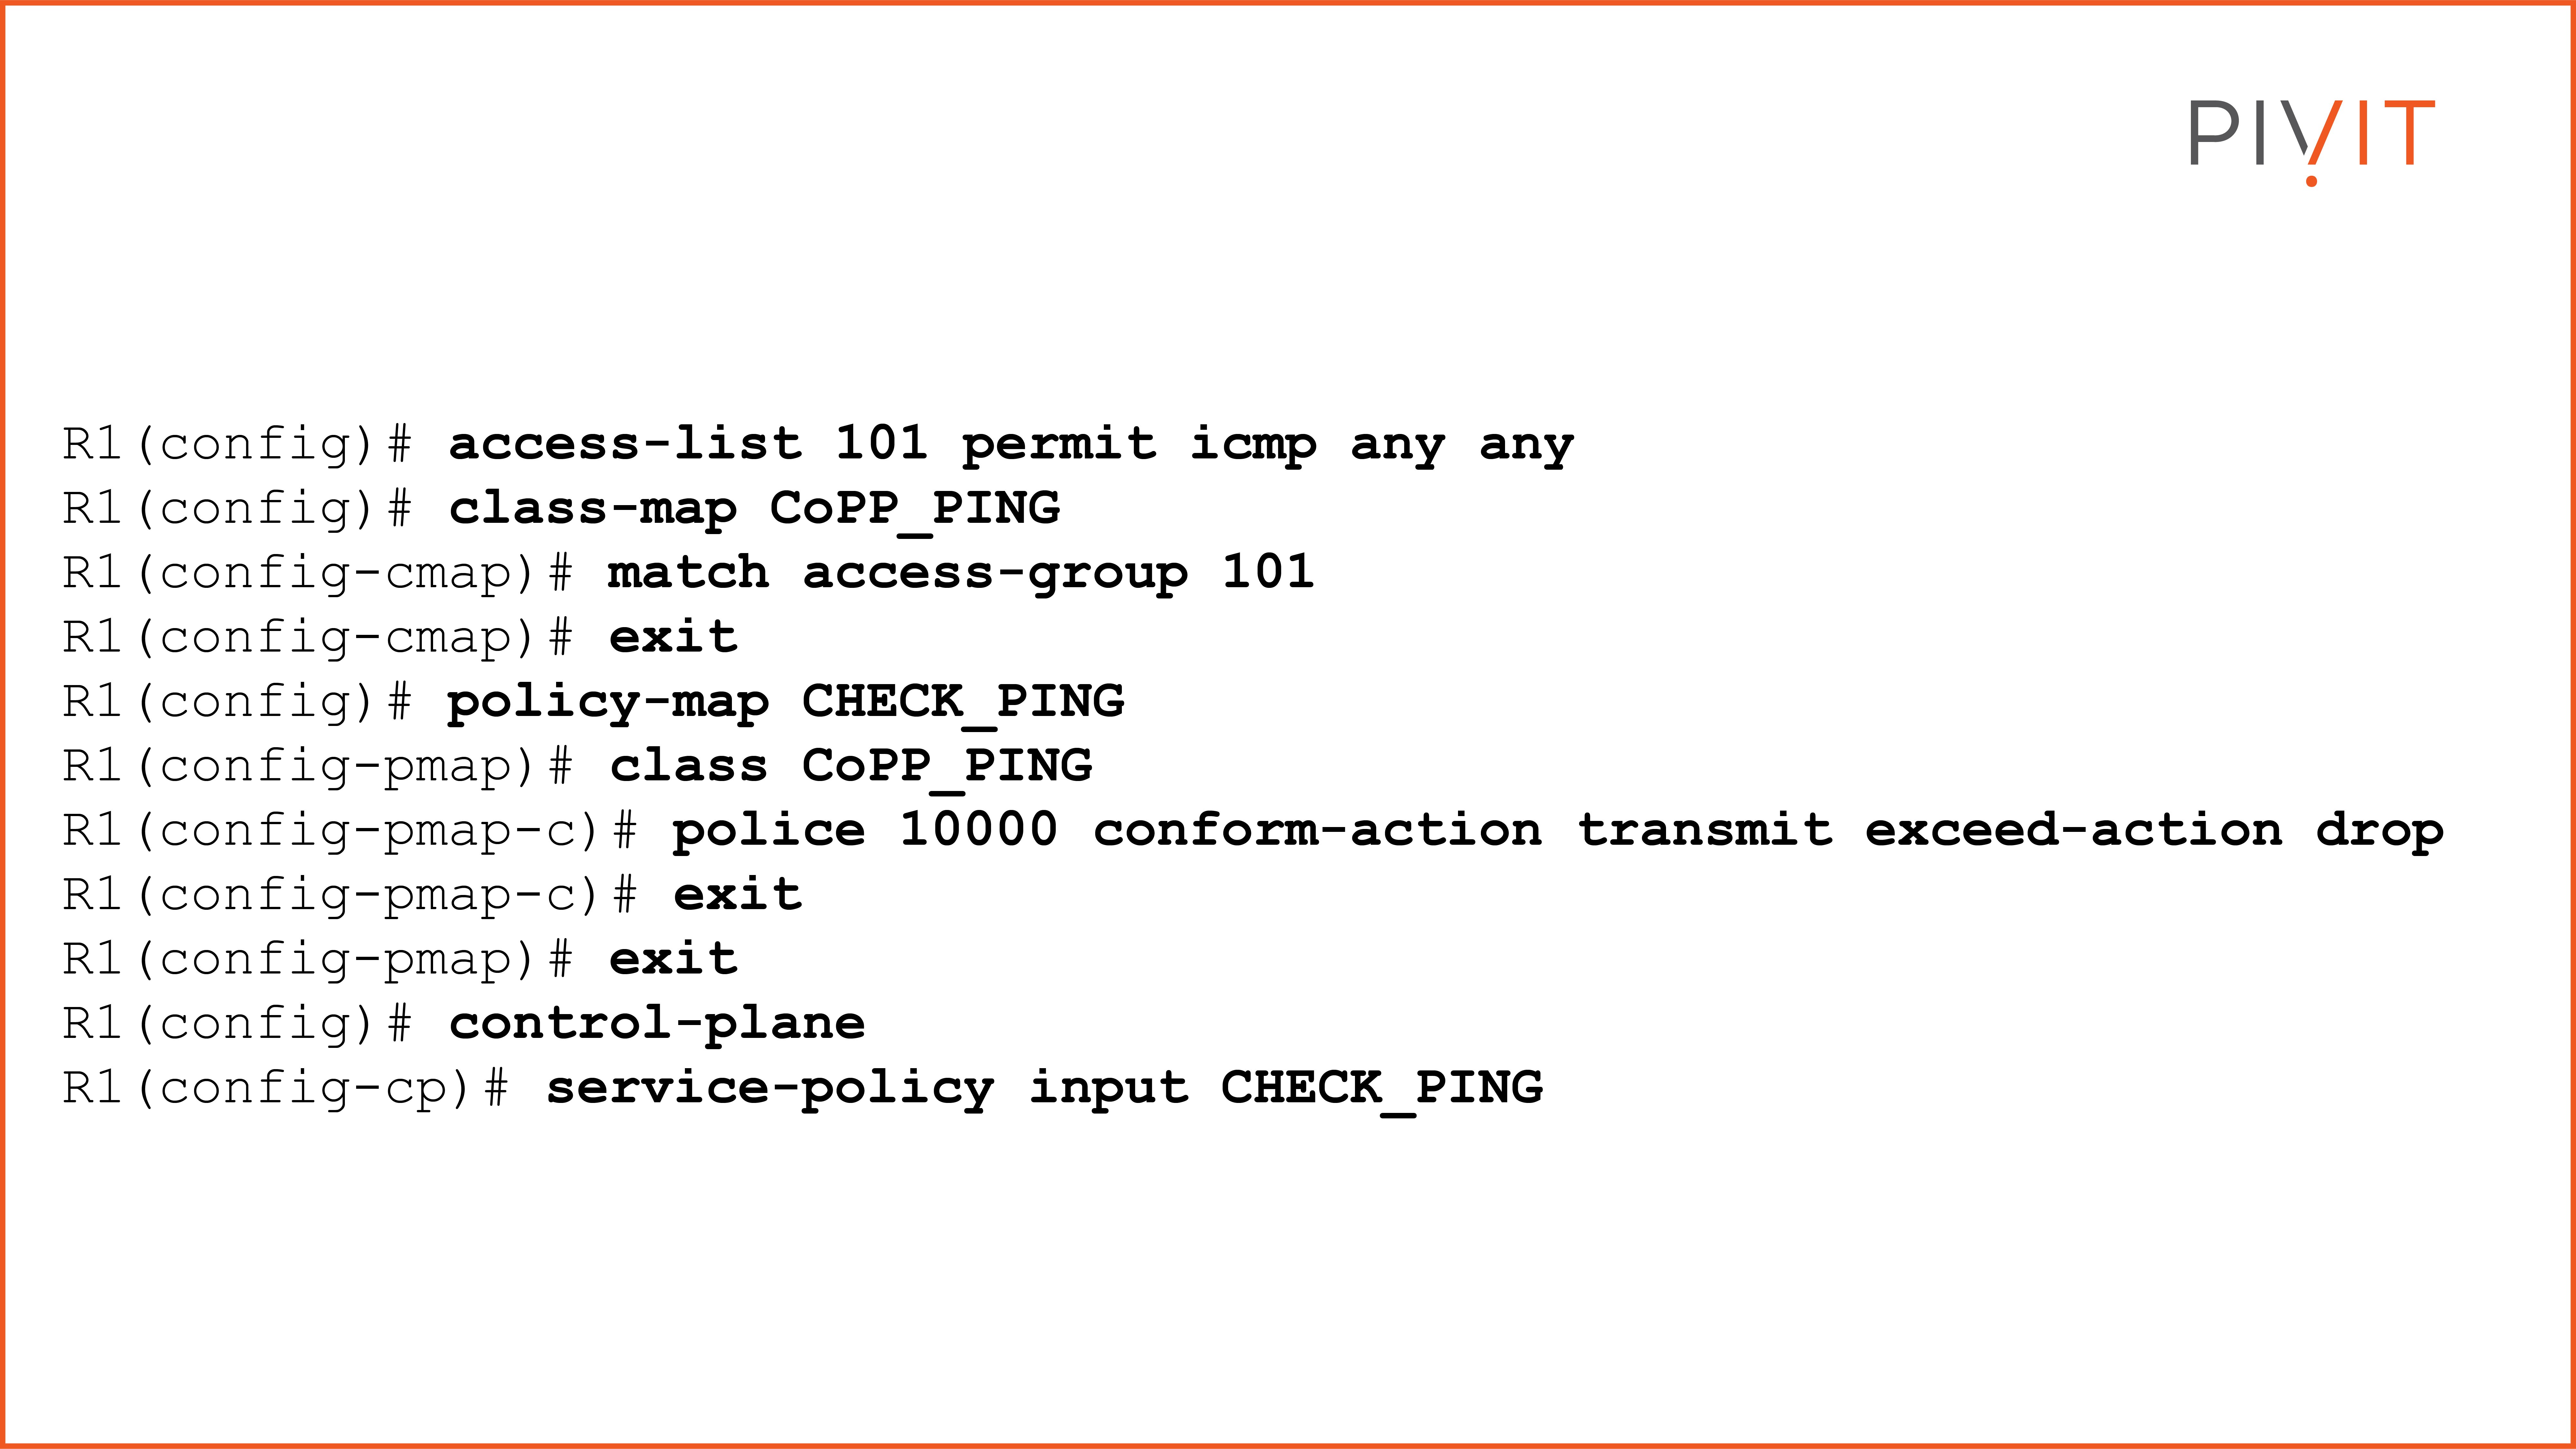
To understand better how CoPP can help you protect a router's control plane from being flooded with ping packets, let’s look at one MQC configuration example. The goal is to rate-limit the ping (ICMP) packets to 10,000 bits per second.
The process consists of three steps, so let’s cover them one by one to understand their functionalities better.
- Step 1: Define an ACL that permits ICMP traffic from any source to any destination. Afterward, use the same ACL as a matching criterion in the class map that you must create.
- Step 2: Create a policy map and reference the class map from the previous step, and define the rate-limit parameters and actions.
- Step 3: Finally, apply the policy map under the control plane virtual interface using the service policy command. View the commands below.
More Options With Control Plane Protection
Although the Control Plane Protection feature is similar to CoPP and its behavior, it additionally provides a deeper approach and options for controlling the control plane. While CoPP treats all traffic processed by the control plane identically, CPPr automatically classifies all CPU-bound traffic into three queues.
These queues belong to the corresponding special-type control plane subinterfaces. Each one receives and processes a specific type of CPU-bound traffic where separate traffic policies are applied to them.
The three control plane subinterfaces used by the CPPr feature are:
- Host subinterface: Receives traffic that is destined to one of the router interfaces. Such traffic is SSH, Telnet, SNMP, or any routing protocol updates.
- Transit subinterface: Receives all transit traffic that is not compatible with CEF. Nonterminating tunnels are an example of such traffic.
- CEF-exception subinterface: Receives traffic that is either redirected as a result of a configured input feature in the CEF packet forwarding path or directly enqueued in the control plane input queue by the interface driver. OSPF, BGP, ARP, and all non-IP host traffic, among others, represent such traffic.
The CPPr configuration is similar to the one of CoPP. However, instead of applying the service policy in the control-plane configuration mode (control plane virtual interface), it is applied inside the control plane subinterfaces modes.
Better Understanding How to Configure CPPr
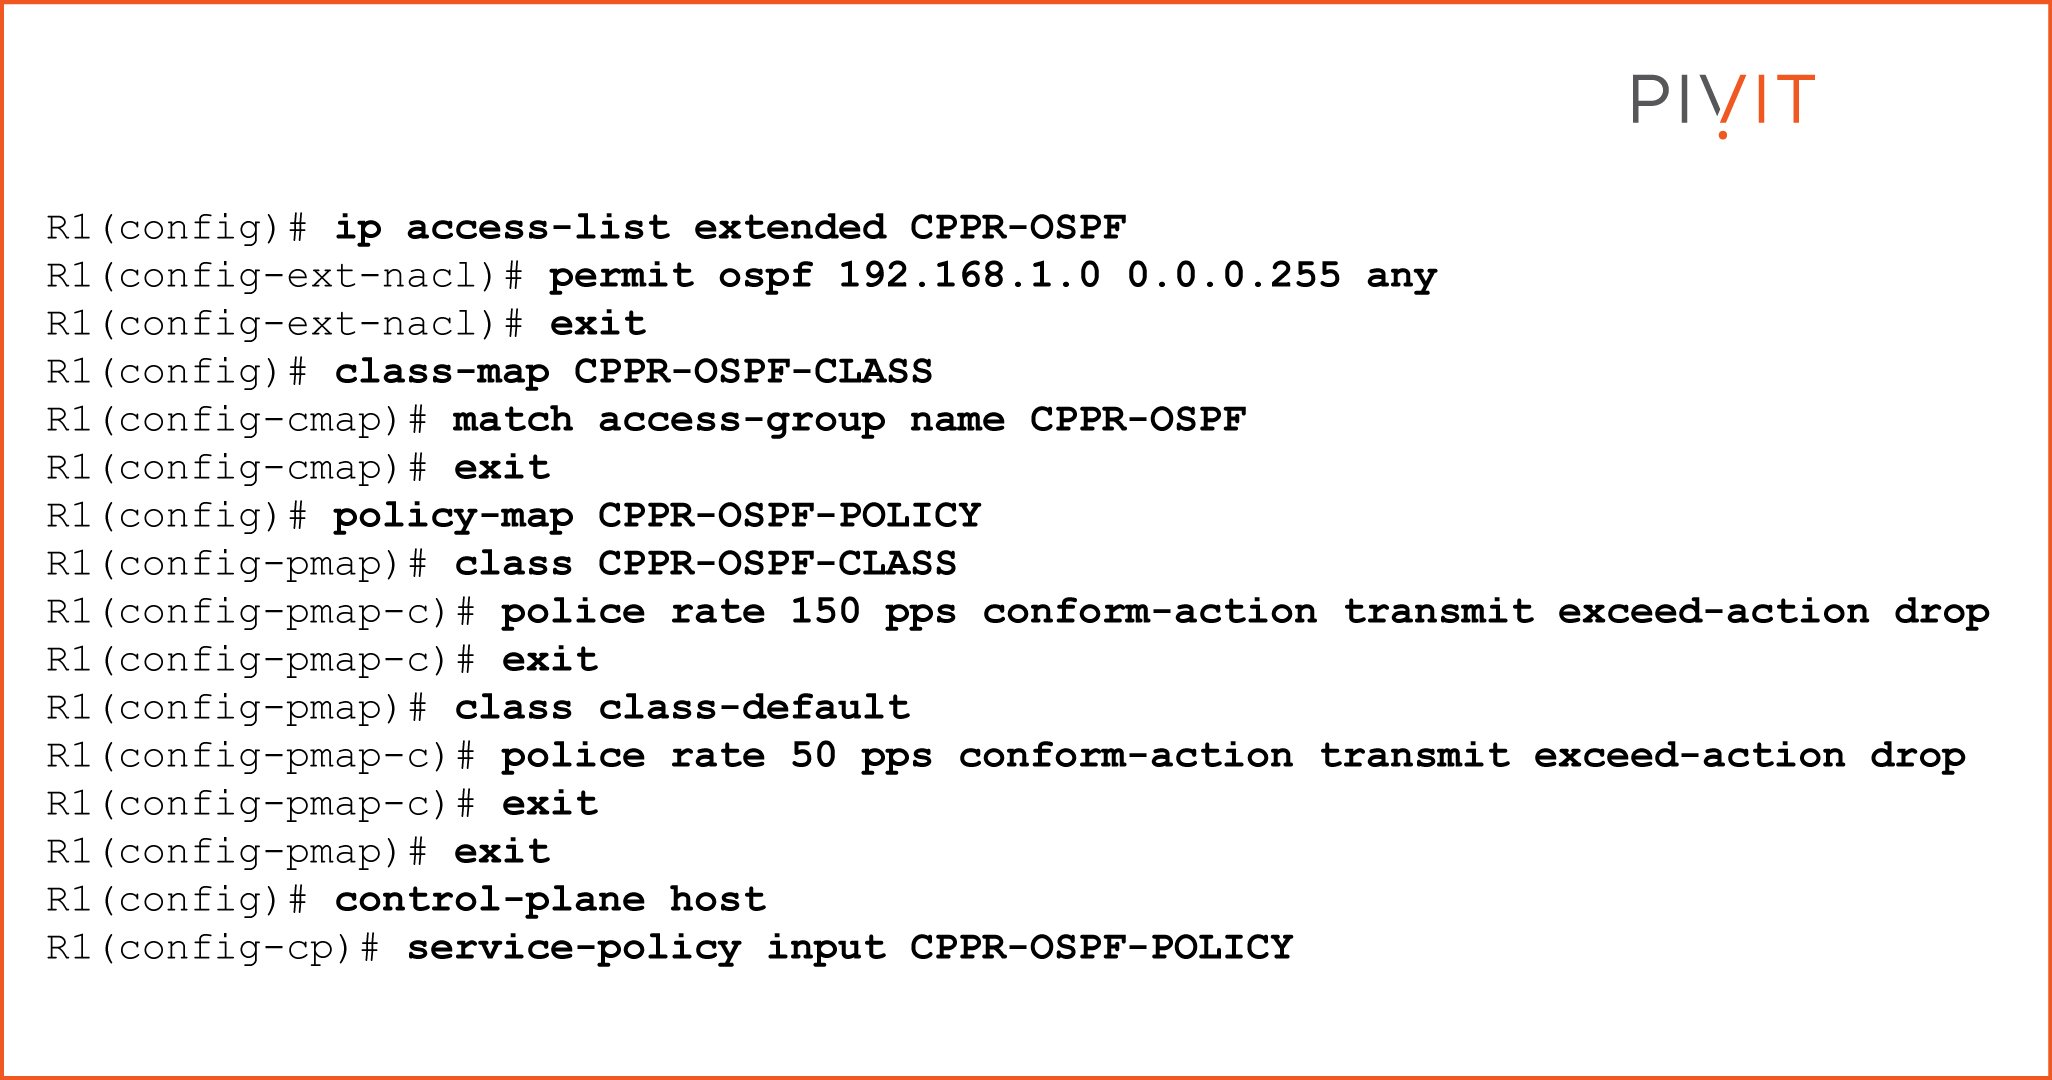
To understand better what the CPPr configuration looks like, let’s take a look at one CPPr configuration example in which OSPF traffic is processed on a router based on specific criteria.
The goal in this use case is to limit the OSPF packets to no more than 150 packets per second, while all other traffic for the control plane should not produce more than 50 packets per second.
The process is the same as the one we covered for CoPP, but with one small difference at the end, so let’s go step by step and find out what the final configuration should look like.
- Step 1: Define an ACL that permits OSPF traffic from the source network in question on which limits will be applied. Then, after you create a class map, you will use the same ACL as a matching criterion.
- Step 2: Create a policy map and reference the previously configured class map. In the policy map, you define the OSPF limits from the requirements above.
- Step 3: Finally, apply the policy map to the host subinterface of the control plane by using the service policy command.
To translate the requirement into MQC configuration, you should enter the commands in the example below on an OSPF-enabled router.
Implementing a Routing Protocol Authentication
By default, routers are only aware of networks to which they directly connect, therefore, the best method to learn about the rest of the networks in the topology is by implementing a routing protocol. However, things can quickly get out of hand when one doesn’t handle routing protocols appropriately.
Routing protocols need to be protected to protect against unknown routers connecting to the network and injecting forged routing updates that could easily lead to man-in-the-middle attacks or black holes.
One can accomplish this by implementing routing protocol authentication, which allows only trusted routers to participate in routing.
Remember that different routing protocols support different authentication types (algorithms such as MD5 or SHA) and different configuration approaches.
Therefore, depending on the routing protocol that you use, different authentication options will be allowed. Once one implements the routing protocol authentication, only authenticated routers can communicate with each other and protect from spoofed neighboring relationships and malicious updates.
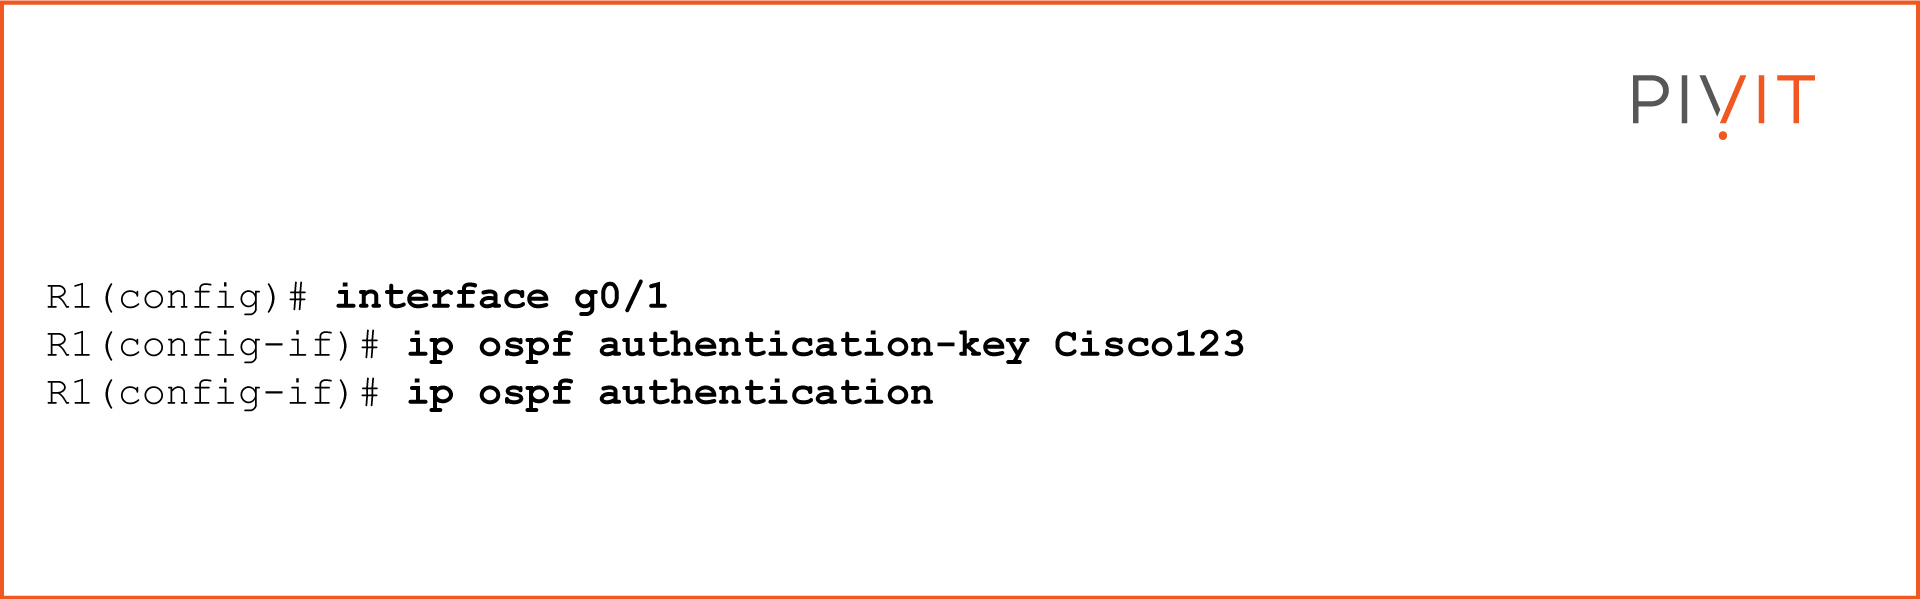
How to Configure OSPF Authentication
To understand better how routing protocol authentication works, let’s implement OSPF authentication on a router. Although OSPF supports two types of authentication, in the example, a simple password (plaintext) authentication will be configured.
The process is straightforward and consists of only two steps:
- Step 1: You need to define a password that will be used in the authentication process with the OSPF neighbor. At the same time, the neighbor must have the same password configured so they can successfully authenticate.
- Step 2: You enable a simple password OSPF authentication type inside the mode of the same interface you configure the password.
Now Time for the Verdict
Based on everything we discussed so far, it is evident that protecting the control plane of the essential devices is crucial for networks to operate without any abnormal resource consumption, DoS or failures.
With this information in your back pocket — and understanding the various protection methods available — it is up to you, your network environment, and your requirements to choose and implement how you’ll most benefit.
________________
Long lead times getting you down and making deadlines impossible to meet? What if there's a simple solution and more?
- Get a single source for your IT needs.
- Get hardware options to match your budget.
- Get speedy fast lead times.

________________